This guide provides an in-depth look at setting up and managing on-premise chat and video features for Zimbra Daffodil version 10.3.0 and above. It covers a range of topics like prerequisites, installation, post-installation configurations, SSL setup, logging, service management, CLI tools, Zimlet extensions, feature enablement, migration from NG Connect and more.
Zimbra Chat - Single-server
Introduction
Zimbra Chat is a messaging solution that intends to work along with Zimbra Collaboration providing real-time chat capabilities. In a single-server installation, all components are installed on one server and require no additional manual configuration.
Zimbra Chat, although integrated with Zimbra, operates as a separate application and should be isolated to prevent potential conflicts. This installation can be considered a single-server setup, as no scaling features will be configured.
Key Considerations Before Installing Zimbra Chat and Video (On-Premises)
Before proceeding with the installation of Zimbra Chat and Video on-premises, it is crucial to review the following points to ensure a smooth deployment:
1. Separation of Servers
-
Zimbra Chat must not be installed on the same server as the Zimbra Collaboration Suite (ZCS). A dedicated server is required for Zimbra Chat to avoid conflicts and for optimal performance.
-
Zimbra Video cannot function independently and requires Zimbra Chat to be installed first.
-
Both Zimbra Chat and Zimbra Video services need separate servers for proper operation and scalability.
2. Incompatibility with Hosted/SaaS Versions
If you are using the hosted or SaaS version of Zimbra Chat and Video (from version 10.0.0), you cannot run it alongside the on-premises version. Starting with Zimbra 10.1.0, only the on-premises version will be supported. A migration utility will be provided in near future to assist in moving data from the hosted version to the on-premises version.
3. Docker-Based Installation
The on-premises version relies on a Docker-based installation process. Currently, it is supported on the RHEL and Ubuntu operating systems. Ensure that your environment is configured to handle Docker-based applications for a seamless installation.
4. Meaning of Single Server Setup in Zimbra Chat context
While a single-server option is available, it refers to one server for Zimbra Chat and another for Zimbra Video. Both servers must be separate and cannot be combined with other Zimbra services. If scaling is required, consider planning for a multi-server installation in future releases.
5. Multi-Server Installation (Not Yet Supported)
A multi-server installation, where multiple servers work together to distribute the workload and ensure high availability, is not supported in this initial release. This setup will be available in a future release, providing a scalable architecture for larger environments with higher demands. Organizations planning to scale beyond single-server deployments should wait for the next releases to leverage this feature.
6. Post-Installation Requirements
After installation, there are essential post-installation steps to ensure the proper functionality of Zimbra Chat and Video. These steps include configuration settings and verification procedures, which must be carefully followed to avoid potential issues.
7. Zimbra Compatibility
Zimbra Chat is currently compatible with Zimbra 10.1.3 or later.
This installation guide is a quick start guide that describes the basic steps needed to install and configure Zimbra Chat in a direct network connect environment. In this environment, the Zimbra Chat server is assigned a domain. When Zimbra Chat is installed, you will be able to sign up and create new accounts and domain accounts to send and receive messages in real-time.
Zimbra Compatibility
The Zimbra Chat is currently compatible with Zimbra 10.1.3 or later.
When to use the Zimbra Chat single-server.
The single-server solution contains all services installed in the same instance. If you don’t expect to have a large number of users (see the sizing guidelines), and high availability is not a requirement this model might be ideal for you. It is usually recommended for test purposes as well.
Sizing Guidelines
Important notice that the sizing is based on the number of concurrent users and not the total number of users in your corporation. Is necessary to understand your expectations in terms of concurrent users prior to defining the infrastructure requirements.
A minimum requirement is mandatory for the system.
vCPU: 2
Memory: 8 GB
Network: 5 Gbps
Storage: 50 GB
| Concurrent Users | vCPU | Memory | Network | Storage* |
|---|---|---|---|---|
1000 |
2 |
8 GB |
Up to 5 Gbps |
1 TB |
3000 |
2 |
8 GB |
Up to 5 Gbps |
2 TB |
30000 |
3 |
16 GB |
Up to 5 Gbps |
15 TB |
60000 |
4 |
32 GB |
Up to 5 Gbps |
30 TB |
90000 |
4 |
48 GB |
Up to 5 Gbps |
45 TB |
*Storage: The storage requirements can vary and the 1 TB per 1000 Users projection might not be necessary depending on the behavior of the users in the corporation.
You can keep scaling vertically to achieve the right sizing you expect, however at some point, depending on the limits of resources available in your environment for a single instance, it might be a good idea to start thinking in a Multi-server model to guarantee horizontal scalability.
Important Notice About Single Server Installations
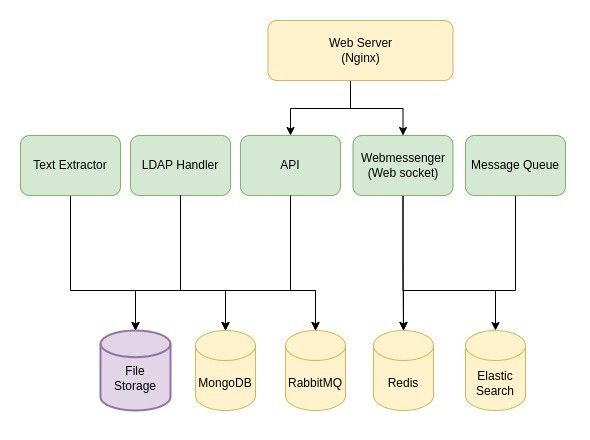
Zimbra Chat is designed to be the only application installed on the server. As part of the installation process, Zimbra Chat bundles and installs various other third-party and open-source software, including MongoDB, Redis, Nginx, Tomcat, and others on top of the Docker containers. The versions installed have been tested and configured to work with Zimbra Video software. See the Zimbra Chat guide for a complete list of software.
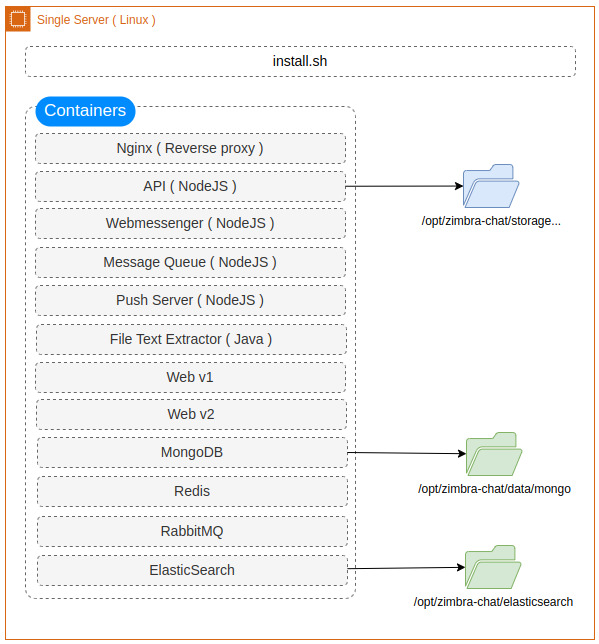
Docker-base application architecture
The Zimbra Chat installation package is designed to install the application and its dependencies using Docker containers. This approach reduces complexity during the installation process and ensures compatibility with all Linux distributions currently supported by Zimbra.
The diagram below illustrates how the service containers are distributed in the instance in a single-server model.
Port Mapping
The following table shows the default port settings when Zimbra Chat is installed.
External access
At least the listed ports below must be open for external access:
| Port | Protocol | Service | Description |
|---|---|---|---|
80 |
http |
Web and API/proxy |
Redirect by default to 443 |
443 |
https |
Web and API/proxy |
HTTP over TLS |
Internal access
These are ports typically only used by the Zimbra Chat system itself.
| Port | Protocol | Service | Description |
|---|---|---|---|
27017 |
- |
MongoDB |
NoSQL persistent Database |
6379 |
- |
Redis |
In-memory database |
9200 |
- |
ElasticSearch |
Message Search |
8080 |
http |
Tomcat |
Text Extractor service |
81 |
http |
Web server |
Web UI version 1 |
82 |
http |
Web server |
Web UI version 2 |
5672 |
amqp |
RabbitMQ |
AMQP 0-9-1 and AMQP 1.0 |
25672 |
amqp |
RabbitMQ |
RabbitMQ clustering |
15672 |
- |
RabbitMQ |
RabbitMQ HTTP API |
4369 |
amqp |
RabbitMQ |
RabbitMQ clustering |
| Important: You cannot have any other web server and database running, when you install Zimbra Chat. If you have installed any of those applications before you install Zimbra Chat software, disable them. During Zimbra Chat installation, Zimbra Chat makes global system changes that may break applications that are on your server. |
Preparing Your Server Environment
Prerequisites
Make sure all servers have one of these operating systems and versions installed.
-
RHEL 8
-
RHEL 9 (Beta OS support)
-
Ubuntu 20.04 LTS
-
Ubuntu 22.04 LTS ( Beta OS support )
Install Docker 19.x or later by following our quick guide available here or using the official documentation, whichever you prefer.
| Ensure the server has internet connection, as some dependency packages need to be downloaded during the installation process. |
Minimum requirements
Minimum requirements for each server.
-
2 vCPU
-
8 GB RAM
-
50 GB disk space
DNS configurations
For a proper configuration, one subdomain is required.
-
Define a subdomain address, something like chat.your-domain.com.
-
Route the subdomain to the Primary Server Public IP.
Install Zimbra Chat
Primary Server
|
The application will be installed initially with the Let’s Encrypt
certificate, ensure you have the “A“ record configured and routed
to your main server and port 80 open before starting the
installation to avoid issues during the certificate generation. Before starting the installation, ensure that Docker logs rotation is configured to prevent the server from running out of disk space. |
By running the install.sh script, the application including databases
and services will be installed and configured.
-
Open an SSH session to the Zimbra Chat server and follow the steps below:
-
Log in as a ROOT user to the Zimbra Chat server and
cdto the directory where the Zimbra Chat archive tar file is saved.
Run the following commands:-
Unpack the file
tar xvzf [zimbra-chat-fullname.tgz] -
Change to the correct directory
cd [zimbra-chat-fullname]
-
-
-
Begin the installation
The installation is self-guided and a few configuration parameters will
be requested.
As a ROOT user, execute the following script:
./install.sh
|
The installation can take several minutes. You can follow the installation progress by executing tail -f /var/log/zimbra-chat-installation.log.
|
-
Choose Single-server installation mode.
Which installation mode do you want to execute? 1) Single-server installation. 2) Multi-server installation. Please, choose one of the options above: 1 -
Provide Web domain (The subdomain defined for the Zimbra Chat server).
Provide WEB domain (E.g. chat.your-domain.com): chat.your-domain.com -
Provide an email address for SSL (Let’s Encrypt) certificate default configuration.
Provide an email address for internal SSL certificates (E.g. support@your-domain.com): support@your-domain.com -
Provide SMTP credentials for transactional emails. The application needs to send transactional emails to the users in operations like sign-up, password recovery, contact invites, etc.
Provide SMTP Host (E.g. mail.your-domain.com): mail.your-domain.com Provide SMTP Port (E.g. 587): 587 Provide SMTP User (E.g. noreply@your-domain.com): noreply@your-domain.com Provide SMTP Password : 123456 -
Provide a system admin user password.
Note the system admin user will always be created in the following format:
admin@PROVIDED_WEB_DOMAINProvide a system admin user password (admin@chat.your-domain.com): 123456 -
Wait for a few minutes while the Zimbra Chat is being configured.
-
After the installation process is done, access chat.your-domain.com on your browser.
| Note that by default the app is configured with a Let’s Encrypt SSL certificate. Follow the SSL configuration steps if you intend to configure your own certificate. |
Post-installation steps
Managing domains and users
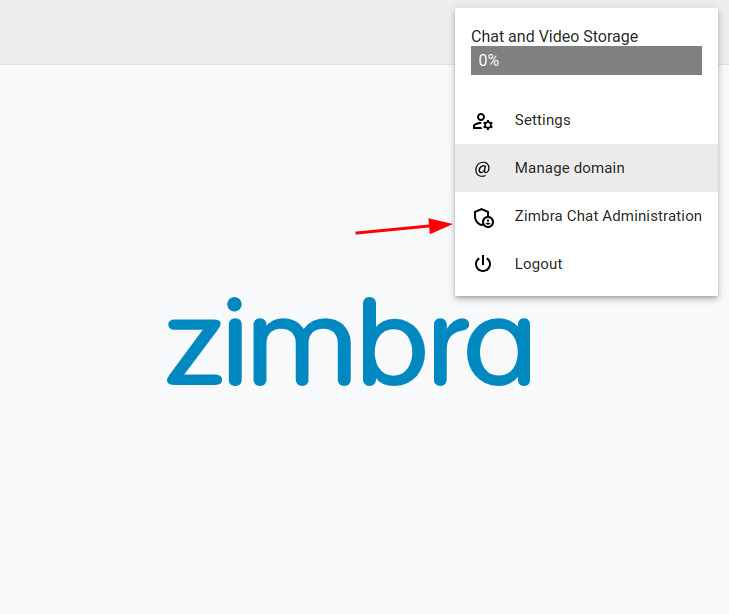
You should access the Zimbra Chat Administration Dashboard to manage multiple domains and users.
-
Access the Zimbra Chat on the browser.
-
Sign in as the admin user configured during the installation.
-
Go to the main menu located at the top-right of the page.
-
And click on Zimbra Chat Administration.
Allow Zimbra domain
To avoid Content Security Policy issues and allow the Chat to be loaded on the Zimbra interface, the authorized Zimbra domains needs to be configured on Chat.
-
Access the Zimbra Chat server as zimbra-chat user.
-
Edit the configuration file
/opt/zimbra-chat/config. -
Find the
ALLOWED_DOMAINSproperty and add the list of Zimbra domains you intend to connect to the Zimbra Chat. (Separate each domain with comma. Do not use https://).ALLOWED_DOMAINS=mail.myzimbra01.com,mail.myzimbra02.com -
Restart Zimbra Chat by running
zimbra-chat restart -
Repeat the steps for each secondary server if necessary.
SSL: Configuring your own certificate
Zimbra Chat solution is configured by default using a Let’s Encrypt certificate generated automatically.
If you have your own certificate, and intend to use it, please follow the steps below to get this configured:
-
Access Zimbra Chat main server as zimbra-chat user.
-
Copy your certificate files to
/opt/zimbra-chat/nginx/ssl, ensuring they are named exactly as shown in the example below:E.g.: cp /etc/letsencrypt/live/domain.com/fullchain.pem /opt/zimbra-chat/nginx/ssl/domain.crt cp /etc/letsencrypt/live/domain.com/privkey.pem /opt/zimbra-chat/nginx/ssl/domain.key-
domain.crt: Must be your certificate or full chain.
-
domain.key: Must be your private key.
-
The name and extension of the files must match, do not use a different name or extension.
-
-
Restart Zimbra Chat services by running
zimbra-chat restart. -
Open the Zimbra Chat URL in your browser (the incognito tab is recommended to avoid cache ) and check the new certificate was loaded.
Zimbra Chat Control
Logging
For logging and debugging purposes, a good start is to check the
application logs.
Show the application logs by executing the following steps.
-
Log in as zimbra-chat user.
-
Execute:
zimbra-chat logs [api|webmessenger|message-queue|web-v1|web-v2|push-server|file-text-extractor|mongo|redis|rabbitmq|es01|es02|nginx]-
You can check the services available by running
zimbra-chat status.
-
Stop/Start services
If you want to stop/start all the services do the following:
-
Log in as zimbra-chat user.
-
Execute
zimbra-chat stop. -
Execute
zimbra-chat start.
Restart the services
If you want to restart all the services do the following:
-
Log in as zimbra-chat user.
-
Execute
zimbra-chat restart.
Show services status
If you want to show the status of all the services do the following:
-
Log in as zimbra-chat user.
-
Execute
zimbra-chat status.
Show services monit
If you want to monitor information like CPU usage, Memory usage and Network I/O of all the services do the following:
-
Log in as zimbra-chat user.
-
Execute
zimbra-chat monit.
Zimbra Chat CLI (Command line interface)
Some management operations can be performed by the CLI available on the server side.
On the server terminal as zimbra-chat user, use the following
command to show the commands available:
zc-cli help
The following content will be displayed:
A Zimbra Chat CLI for configuration, management and patching.

Options:
  -v, --version         output the current version
  -h, --help            display help for command

Commands:
  generate:apikey       Generate API Key for one or more domains.
  delete:user           Delete one or more users by providing email addresses.
  update:email-account  Update an user email account.
  calc:user-storage     Writes as CSV file listing users and used storage.
  count:online-users    Return the number of users currently online.
  import:chat           Import users, conversations and messages from a compressed file.
  create:system-admin   Create the system administrator user. Provide a password or leave it blank to
                        generate a random one. E.g.: "create:system-admin 123456"
  view:system-admin     View the system administrator information.
  reset:password        Reset any user password.
  help [command]        display help for command
Uninstall
To run a fully uninstalling process, do the following:
-
Log in as a ROOT user.
-
Go to
/opt/zimbra-chat. -
Execute
./uninstall.sh.
| Note all data and files stored will be removed. |
Zimlets and Extension
Modern UI Zimlet Installation
At the end of these steps, the Zimlet Chat and Video must be installed, and an option (Chat and Video) should be available on Zimbra’s main menu
-
Download the Zimlet package here.
-
Push
zimbra-zimlet-chat-video.zipfile to the Zimbra server: -
As a zimbra user run the following command to install the Modern Interface’s Zimlet:
zmzimletctl deploy zimbra-zimlet-chat-video.zip-
Grant permission to Chat and Video domains if they are different from the Zimbra domain:
zmprov mc default +zimbraProxyAllowedDomains *.your-domain.com-
To configure the Chat and Video URLs in the Zimlet and other properties, create a config template file with the right addresses:
echo '<zimletConfig name="zimbra-zimlet-chat-video" version="1.3.0">
      <global>
          <property name="apiURL">https://chat.your-domain.com/api</property>
          <property name="webURL">https://chat.your-domain.com</property>
          <property name="appName">Chat and Video</property>
          <property name="showAppIcon">false</property>
      </global>
</zimletConfig>' > /tmp/video_chat_config_template.xml-
Import the new configuration file by running the following command:
zmzimletctl configure /tmp/video_chat_config_template.xml-
You might need to clear the Zimlet cache to see the new configuration applied
zmprov flushCache zimletClassic UI Zimlet Installation
At the end of this step, the Zimlet Chat and Video must be installed, and a Tab (Chat and Video) should be available on Zimbra Classic UI.
-
Download the Zimlet package here.
-
Push
com_zimbra_chat_video.zipfile to the Zimbra server: -
As a zimbra user run the following command to install the Classic Interface’s Zimlet:
zmzimletctl deploy com_zimbra_chat_video.zip-
Grant permission to Chat and Video domains if they are different from the Zimbra domain:
zmprov mc default +zimbraProxyAllowedDomains *.your-domain.com-
To configure the Chat and Video URLs in the Zimlet, create a config template file replacing
iframeURLandapiURLproperties at least by your Chat and Video installation URLs as necessary:
echo '<?xml version="1.0" encoding="UTF-8"?>
<zimletConfig name="com_zimbra_chat_video" version="1.3.0">
  <global>
    <property name="iframeURL">https://chat.your-domain.com</property>
    <property name="iframePath">/v1</property>
    <property name="apiURL">https://chat.your-domain.com/api</property>
    <property name="appName">Chat and Video</property>
    <property name="appDescription">Chat and video meeting features for organizations</property>
  </global>
</zimletConfig>
' > /tmp/chat_video_config_template.xml-
Import the new configuration file by running the following command:
zmzimletctl configure /tmp/chat_video_config_template.xml-
You might need to clear the Zimlet cache to see the new configuration applied:
zmprov flushCache zimletAPI Key generation
Before to get Zimbra Chat integrated with Zimbra, one API Key must be generated for each domain intended to be connected to Zimbra Chat.
We have two different ways to generate an API Key on Zimbra Chat.
Generating API Key on Zimbra Chat Administration Dashboard.
-
Log into Zimbra Chat web as an administrator.
-
Click on the Zimbra Chat Administration option, located in the main menu at the top-right corner of the interface.
-
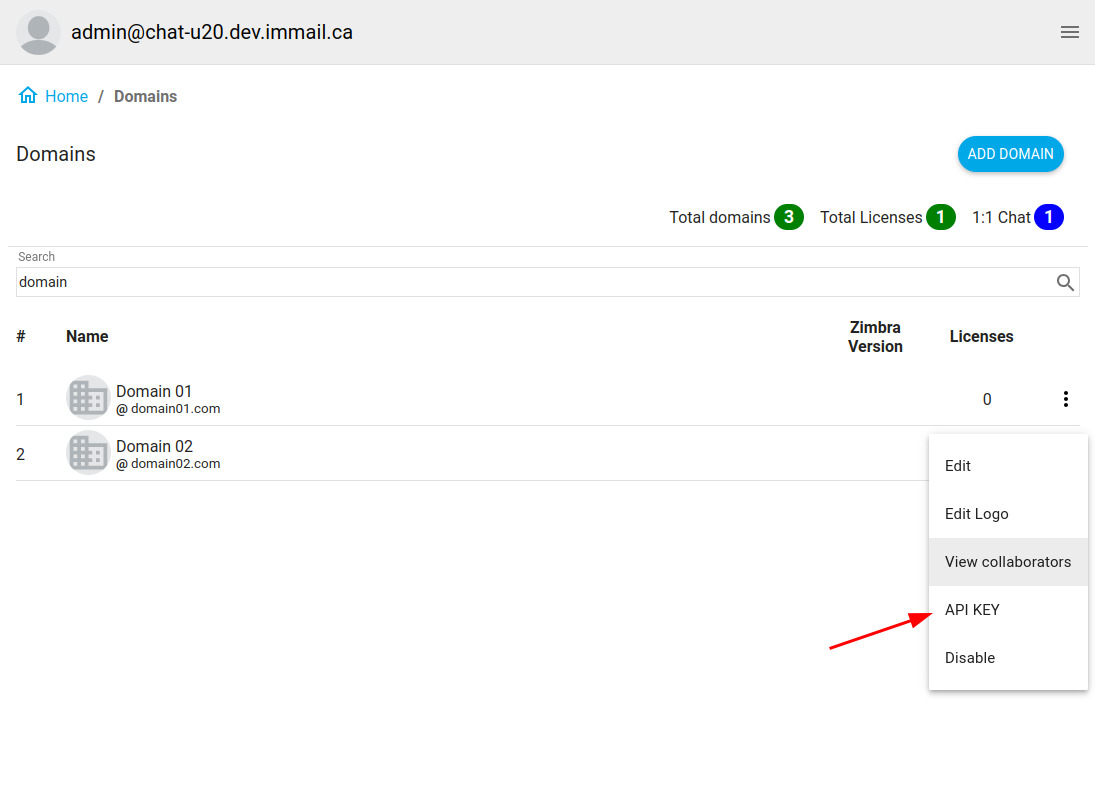
Find on the list the domain you wish to generate the API Key.
-
Click on the API Key option, located in the 3-dot menu next to each domain listed.
-
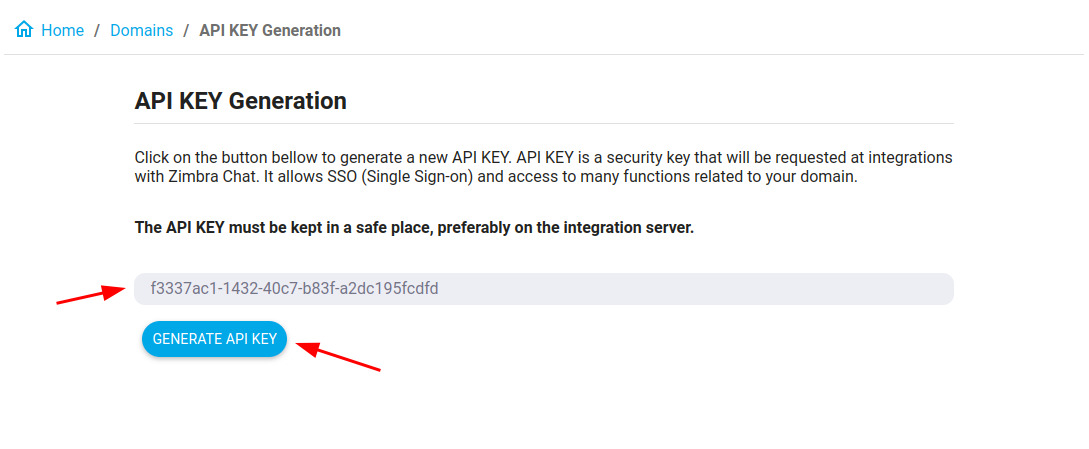
Click on the Generate API Key.
-
Save the API Key in a safe place. This key will be displayed only once. If you click on the button to generate a new key, the old one will be invalidated.
Generating API Key in batch from the command line.
-
Log in to the Zimbra Chat server as zimbra-chat user.
-
Execute
zc-cli generate:apikey -
Choose between the 2 options available:
Choose an option below: 1) Specify one or more domains. 2) Generate API Key for all active domains. Answer: 2-
If you choose Option 1, provide the list of domains for which you want to generate API keys.
? Choose an option below: Specify one or more domains. ? Enter the email domains you want to generate the API key for. Use space as a separator: domain01.com domain02.com -
If you choose Option 2, go to the next step.
-
-
Select your preferred output format:
? Which output format would you like? 1) Plain text 2) JSON (Zimbra config file) Answer:-
If you choose the Plain Text format, the newly generated API Keys will be displayed on the screen.
✔ SUCCESS The API Keys were successfully generated! domain01.com >> 40a446cd-d6f5-4f46-9687-86d65c13123123 domain02.com >> 40a446cd-d6f5-4f46-9687-86d65c1312adfa -
If you choose the JSON format, a
config.domain.jsonfile will be created in your current directory, containing all API Keys, one for each domain.
-
Chat API Key configuration in the Zimbra Server:
To get the API key configured on the Zimbra server pointing to the right Zimbra Chat on-premises; do the following:
-
Log in to Zimbra Server.
-
Create the directory
/opt/zimbra/lib/ext/chat-videoif necessary. -
If still not, generate the API Keys on the Zimbra Chat server.
-
Create or copy the
config.domains.jsonfile to/opt/zimbra/lib/ext/chat-video/config.domains.jsonas necessary. -
If the
config.domains.jsonfile was not generated on the Zimbra Chat server, you need to manually add the API keys. Follow these steps: -
*Locate the Configuration File: *Navigate to the directory where the
config.domains.jsonfile should be located:/opt/zimbra/lib/ext/chat-video/ -
*Edit the Configuration File: *Open or create the
config.domains.jsonfile in a text editor. -
*Add the API Keys: *Use the following template format to add your API keys:
[
   {
      "domain": "example.com",
      "apiKey": "<your_api_key_here>"
   }
]
Replace
"example.com"with your domain and"your_api_key_here"with each domain API Key. -
Example of multiple domains configuration:
[ { "domain": "abc.com", "apiKey": "ee35f524-8362-427f-b5d0-6c0a3a81bcea" }, { "domain": "xpto.com", "apiKey": "74727ded-c8a3-4b82-9add-561fb5d79a24" } ] -
*Save the File: *After adding the necessary details, save the changes to
config.domains.json. -
Restart the mailbox server using:
zmmailboxdctl restart
Java Extension
To get the extension configured on the Zimbra server pointing to the right Zimbra Chat on-premises do the following:
-
Create the directory
/opt/zimbra/lib/ext/chat-videoif necessary. -
Download the Java Extension here and move to
/opt/zimbra/lib/ext/chat-videoif thechat-video.jarfile is still not there. -
Open the file
/opt/zimbra/lib/ext/chat-video/config.properties. -
Replace the
chatVideoApiURLconfiguration with your Zimbra Chat on-premises API URL.
E.g.:chatVideoApiURL=https://chat.your-domain.com/api -
Save the file and restart the mailbox server.
Multi-node Zimbra: each Zimbra mailbox that will have Chat and Video
must have the config.properties and config.domains.json properly in
/opt/zimbra/lib/ext/chat-video
|
Enable Zimbra Chat/Video Features
You can use the following attributes to enable Zimbra Chat/Video features for a specific user or COS (Class of Service).
zimbraFeatureBasicOneToOneChatEnabled: Enables basic chat features for a user or COS including 1:1 chat.
zimbraFeatureAdvancedChatEnabled: Enables all chat features for a user or COS including group chat.
zimbraFeatureAdvancedChatVideoEnabled: Enables all chat and video features for a user or COS including video conferencing start sessions.
|
Please be aware that ChatAccountsLimit and
ChatVideoAccountsLimit may affect the activation of chat and video
features. You can check about limits by running zmlicense -p .
|
To enable features on COS
As zimbra user execute one of the following commands to activate the
desired features to a COS.
-
zmprov mc <COS NAME> zimbraFeatureBasicOneToOneChatEnabled TRUE -
zmprov mc <COS NAME> zimbraFeatureAdvancedChatEnabled TRUE -
zmprov mc <COS NAME> zimbraFeatureAdvancedChatVideoEnabled TRUE
To enable features to a user
As zimbra user execute one of the following commands to activate the
desired features to a user.
-
zmprov ma <EMAIL ADDRESS> zimbraFeatureBasicOneToOneChatEnabled TRUE -
zmprov ma <EMAIL ADDRESS> zimbraFeatureAdvancedChatEnabled TRUE -
zmprov ma <EMAIL ADDRESS> zimbraFeatureAdvancedChatVideoEnabled TRUE
To check current features
You can check which features are active/inactive for a user or COS by running the following command:
-
For user:
zmprov ga <EMAIL ADDRESS> | grep -e BasicOneToOne -e AdvancedChat -e AdvancedChatVideo -
For COS:
zmprov gc <COS NAME> | grep -e BasicOneToOne -e AdvancedChat -e AdvancedChatVideo
Update Zimbra Chat
Primary Server
| It is recommended to perform a Database Backup and File Storage Backup before proceeding with the update. |
-
Open an SSH session to the Zimbra Chat server and follow the steps below:
-
Log in as a ROOT user to the Zimbra Chat server and
cdto the directory where the Zimbra Chat archive tar file is saved.
Run the following commands:-
Unpack the file
tar xvzf [zimbra-chat-fullname.tgz] -
Change to the correct directory
cd [zimbra-chat-fullname]
-
-
-
Begin the update.
The update is self-guided and a few configuration parameters will be
presented for confirmation.
As a ROOT user, execute the following script:
./install.sh
|
The update can take several minutes. You can follow the installation progress by executing tail -f /var/log/zimbra-chat-installation.log.
|
-
Wait for a few minutes while the Zimbra Chat is being updated.
-
After the update process is done, access chat.your-domain.com on your browser.
Disaster Recovery
A Disaster Recovery (DR) procedure may be necessary in the event of a total failure of the Zimbra Chat system when a quick and simple solution is not available. The primary goal of DR is to minimize downtime and data loss, allowing the organization to resume operations as swiftly and efficiently as possible after an incident.
To prevent data loss, it’s crucial to have a periodic routine in place
that performs both
Database
and
File Storage
Backups. You can use crontab or any other tool of your
choice to automate this process. Be sure to define a* Recovery Point
Objective (RPO) *that suits your needs; at a minimum, an hourly backup
should be considered.
To ensure a safe and efficient Disaster Recovery process, please follow the steps below:
-
Automatic Backups: Ensure you have automatic Database and File Storage Backups configured.
-
Prepare a Standby Instance: Keep another instance of Zimbra Chat installed, clean, and configured identically with the same domain configured. This standby instance will significantly reduce your Recovery Time Objective (RTO) in the event of a disaster.
-
DNS Configuration: Once the new instance is ready, update your DNS record to point to this new instance.
-
Database Restoration: Execute the Database Restore process on the new instance.
-
File Storage Restoration: Execute the File Storage Restore process.
-
Verification: After completing both restoration processes, verify that Zimbra Chat is fully operational by opening the application in a browser and confirming that all data from the original server has been restored correctly.
| There is no need to restart the Zimbra server after completing the restoration process. |
Docker logs rotation
It is recommended to prevent docker from taking up all the disk space that we set a limit for docker log files.
-
Open the daemon.json file:
sudo nano /etc/docker/daemon.json-
Paste the content:
{
  "log-driver": "json-file",
  "log-opts": {"max-size": "50m", "max-file": "3"}
}-
Restart the services:
 sudo systemctl daemon-reload

 sudo systemctl stop docker

 sudo systemctl start docker
IP Config
Possibly, you can have some conflict between docker0 and some network ip range.
It’s recommended to avoid keeping the default docker0 ip 172.17.x.x
Follow below some steps for change the docker0 ip address:
-
Open the daemon.json file:
sudo nano /etc/docker/daemon.json-
Paste the content in the open file:
{
  "bip": "192.168.1.31/24"
}-
Restart the services:
 sudo systemctl daemon-reload

 sudo systemctl stop docker

sudo systemctl start docker-
Check the new ip:
ip route

or

ifconfig
#include::chat-on-prem-multi-server.adoc[]
#include::video-on-prem-single-server.adoc[]
#include::video-on-prem-multi-server.adoc[]
Docker Installation
Find here a quick installation guide that aims to help you install
Docker and Docker Compose on all Linux distributions supported by
Zimbra.
Feel free to consult the official documentation or other sources.
Red Hat Enterprise Linux 8
Add the external repository by running the following command.
sudo dnf config-manager --add-repo=https://download.docker.com/linux/centos/docker-ce.repoVerify whether the repository has been enabled. To do that, run the following command that returns detailed information about all the enabled repositories.
sudo dnf repolist -vInstall docker-ce with the --nobest option. With this option, the first version of docker-ce with satisfiable dependencies is selected as the "fallback" version.
sudo dnf install --nobest docker-ce -yRun the docker command, add your username to the docker group:
sudo usermod -aG docker ${USER}Start and enable the docker daemon
sudo systemctl enable --now dockerConfirm whether the daemon is active by running this command:
systemctl is-active dockerYou will need to log out of the server and back in as the same user to enable this change.
Red Hat Enterprise Linux 9
Install the yum-utils package (which provides the yum-config-manager utility) and set up the repository.
sudo yum install -y yum-utils
sudo yum-config-manager --add-repo https://download.docker.com/linux/rhel/docker-ce.repo
Install Docker Engine, containerd, and Docker Compose:
To install the latest version, run:
sudo yum install docker-ce docker-ce-cli containerd.io docker-buildx-plugin docker-compose-pluginIf prompted to accept the GPG key, verify that the fingerprint matches
060A 61C5 1B55 8A7F 742B 77AA C52F EB6B 621E 9F35, and if so, accept
it.
This command installs Docker, but it doesn’t start Docker. It also creates a docker group, however, it doesn’t add any users to the group by default.
Start Docker.
sudo systemctl start dockerRun the docker command, add your username to the docker group:
sudo usermod -aG docker ${USER}Start and enable the docker daemon
sudo systemctl enable --now dockerConfirm whether the daemon is active by running this command:
systemctl is-active dockerYou will need to log out of the server and back in as the same user to enable this change.
Ubuntu 20.04 LTS
First, update your existing list of packages:
sudo apt update -yNext, install a few prerequisite packages which let apt
sudo apt install apt-transport-https ca-certificates curl software-properties-common -yThen add the GPG key for the official Docker repository to your system:
curl -fsSL https://download.docker.com/linux/ubuntu/gpg | sudo apt-key add -Add the Docker repository to APT sources:
sudo add-apt-repository "deb [arch=amd64] https://download.docker.com/linux/ubuntu focal stable"Next, update the package database with the Docker packages from the newly added repo:
sudo apt update -yMake sure you are about to install from the Docker repo instead of the default Ubuntu repo:
apt-cache policy docker-ceFinally, install Docker:
sudo apt install docker-ceRun status docker
sudo systemctl status dockerStart docker
sudo systemctl start dockerEnable docker to start on boot:
sudo systemctl enable dockerExecuting the Docker Command Without Sudo
sudo usermod -aG docker ${USER}You will need to log out of the server and back in as the same user to enable this change.
Ubuntu 22.04 LTS
First, update your existing list of packages:
sudo apt updateNext, install a few prerequisite packages which let apt use packages over HTTPS:
sudo apt install apt-transport-https ca-certificates curl software-properties-commonThen add the GPG key for the official Docker repository to your system:
_curl -fsSL https://download.docker.com/linux/ubuntu/gpg | sudo gpg
--dearmor -o /usr/share/keyrings/docker-archive-keyring.gpg_
Add the Docker repository to APT sources:
_echo "deb [arch=$(dpkg --print-architecture)
signed-by=/usr/share/keyrings/docker-archive-keyring.gpg]
https://download.docker.com/linux/ubuntu $(lsb_release -cs) stable" |
sudo tee /etc/apt/sources.list.d/docker.list > /dev/null_
Update your existing list of packages again for the addition to be recognized:
sudo apt updateMake sure you are about to install from the Docker repo instead of the default Ubuntu repo:
sudo apt-cache policy docker-ceFinally, install Docker:
sudo apt install docker-ceRun the docker command, add your username to the docker group:
sudo usermod -aG docker ${USER}Docker should now be installed, the daemon started, and the process enabled to start on boot. Check that it’s running:
sudo systemctl status dockerYou will need to log out of the server and back in as the same user to enable this change.
#include::chat-video-on-prem-section-backup.adoc[]
General Questions
G1: What is Zimbra Chat?
Zimbra Chat is a messaging solution that intends to work along with Zimbra Collaboration providing real-time chat capabilities.
Technical Support
T1: What should I do if the Zimbra Chat is not loading on the browser?
-
Check all services' status on the server by running the following steps:
-
Log in to the Zimbra Chat server as a zimbra-chat user.
-
Execute
zimbra-chat status
-
-
Restart all services by running
zimbra-chat restart. -
Check DNS configuration and ensure the domain is routed to the Primary Server Public IP.
-
Check Nginx logs by running
zimbra-chat logs nginxand while you try to access the application on the browser ensure the requests are shown on the logs. -
On the browser, open the developer tools by pressing
CTRL+SHIFT+iand check on the "console" tab for additional error messages.
T2: What should I do if the Zimbra Chat is not loading on Zimbra?
-
Check the logs on the Zimbra server.
-
Log in to the Zimbra server as
zimbrauser. -
Check the logs by running
tail -f /opt/zimbra/log/mailbox.log | grep ChatVideo -
Log into Zimbra on the browser and check which logs will appear on the terminal.
-
The log message (
ChatVideo - Check /opt/zimbra/lib/ext/chat-video/config.domains.json and make sure the domain's API_KEY is properly configured) might indicate some format error on theconfig.domains.jsonfile. Ensure no commas or quotes are missing or anything else that could break the content file.
-
-
Ensure you have the Chat/Video features enabled for the user by following the steps described here
-
Check the
ChatAccountsLimitandChatVideoAccountsLimiton Zimbra server by runningzmlicense -caszimbrauser.-
If limits are exceeded no more users will be created.
-
T3: What should I do if the conversation messages are not loading?
-
If everything loads ok except the messages in a conversation, there is a chance the Websocket service is not working properly.
-
Log into the Zimbra Chat server as a zimbra-chat user.
-
Check the Webmessenger logs by running
zimbra-chat logs webmessenger. -
Look for an error message that can lead to a possible solution.
-
Most of the cases will be solved by restarting the services
zimbra-chat restart.
-
-
If after restart the service is still not stable, contact the advanced support team and share any error logs that appear.
T4: What should I do if the messages search keeps loading but does not return any search results?
-
Log in to the Zimbra Chat primary server as a zimbra-chat user.
-
Check the status of the services
ElasticSearch 01andElasticSearch 02. -
Check the logs by running
zimbra-chat logs es01andzimbra-chat logs es02.-
Look for any error logs that can help to understand the issue.
-
-
Check that port
9200is open for the Zimbra Chat secondary server. -
Check the API logs by running
zimbra-chat.sh logs api.-
While checking the logs, try to execute some search on the Zimbra Chat interface and check if anything helpful appears.
-
T5: What should I do if messages sent via the “Compose“ option are not delivered?
-
If everything works fine except messages sent via “Compose“, that means the Message Queue service might not be working properly.
-
Log in to the Zimbra Chat primary server as a zimbra-chat user.
-
Check the status of
Message Queueservice by runningzimbra-chat status. -
Check the logs
zimbra-chat logs message-queue. -
Look for error messages that can help to find a solution.
-
Try to restart all the services
zimbra-chat restart.
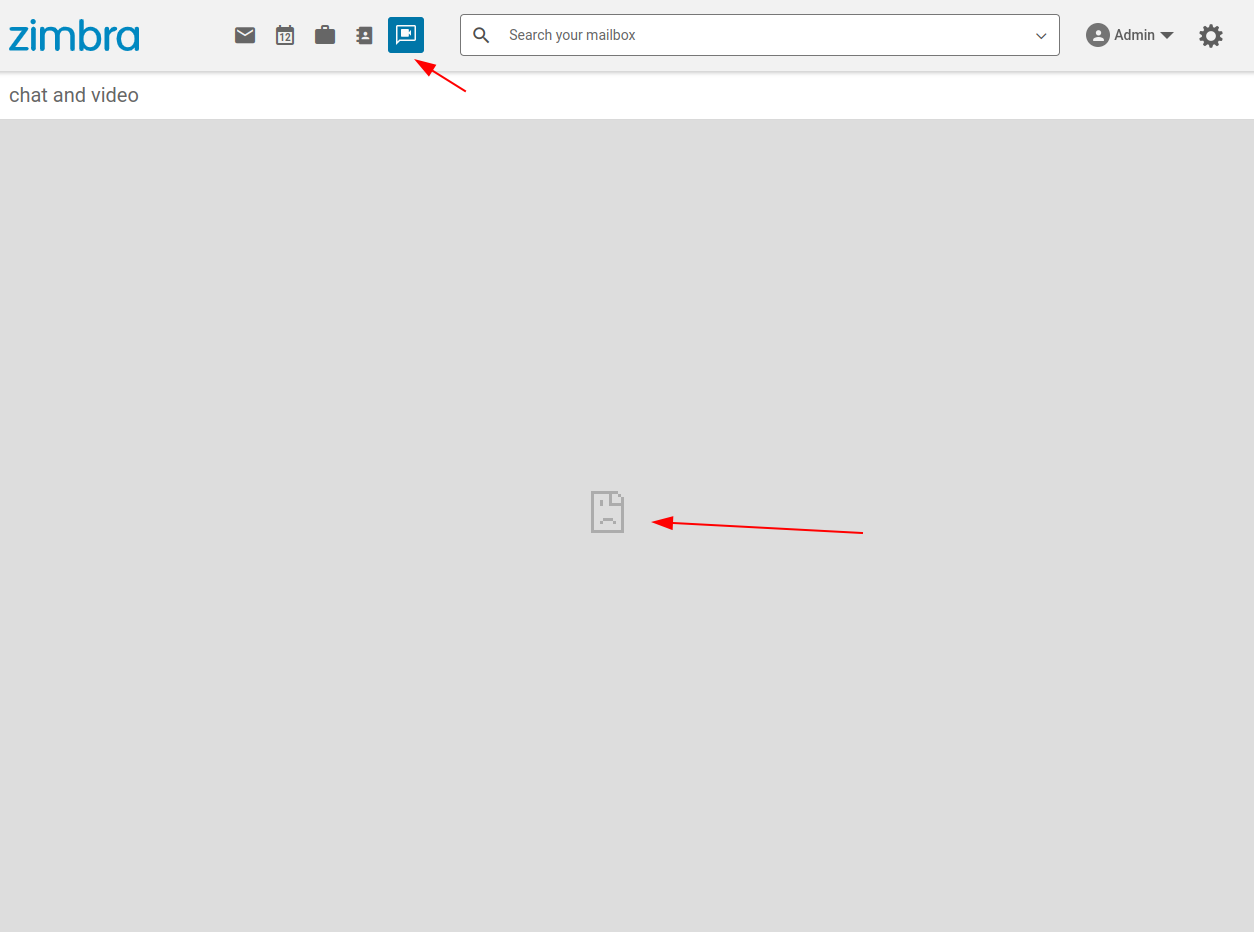
T6: The Chat and Video Zimlet looks installed, however the chat page did not load.
-
Check the image below for reference:
-
The Modern UI Zimlet Installation steps might not be followed properly.
-
Ensure the apiURL and webURL properties were configured with your Chat URL and not the example. Both properties must be replaced with your own Chat URL.
<property name="apiURL">https://chat.company.com/api</property> <property name="webURL">https://chat.company.com</property> -
If you identify the properties misconfigured, repeat the configuration steps here
T7: The Chat and Video Zimlet looks installed, however the Chat page did not load and present an error message like “refused to connect“.
-
Check the image below for reference:
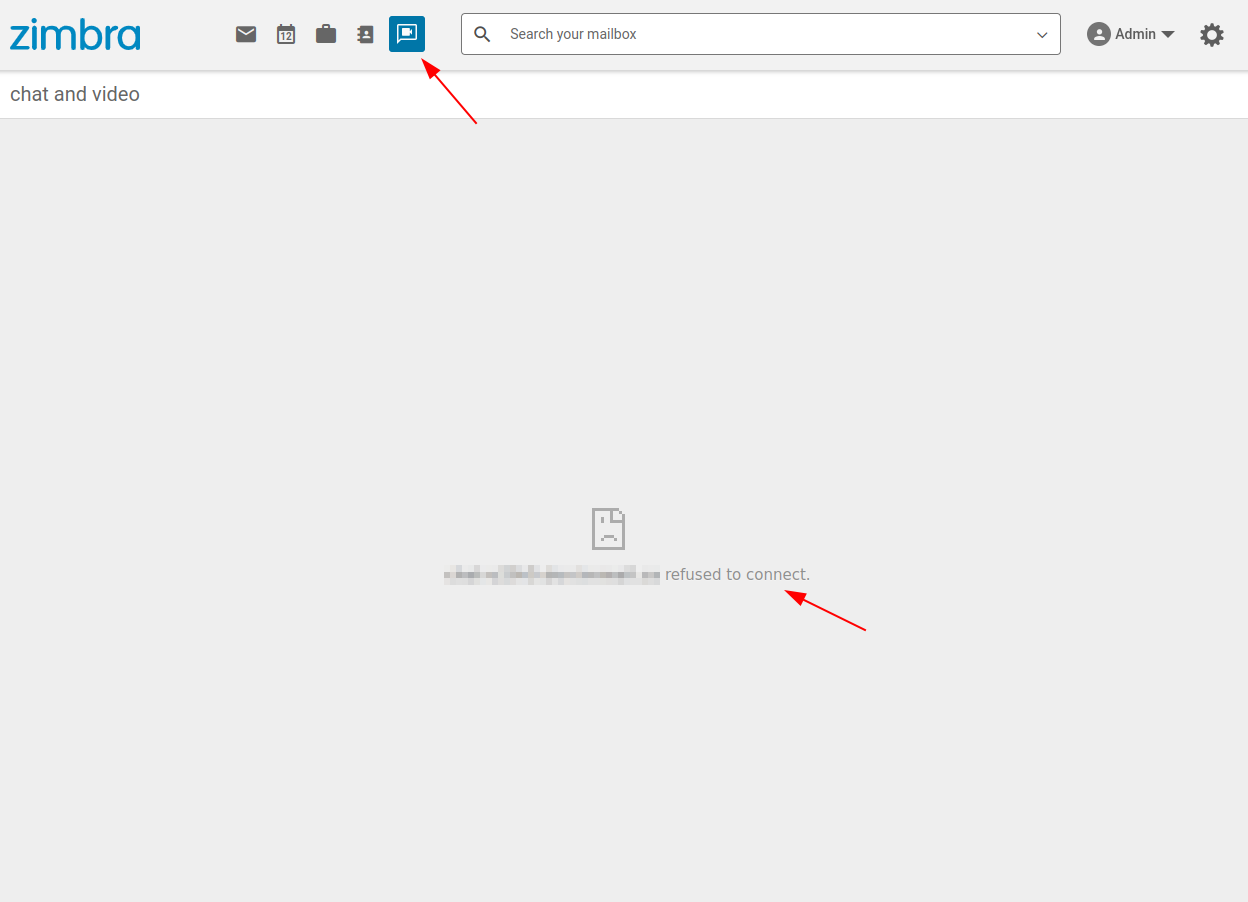
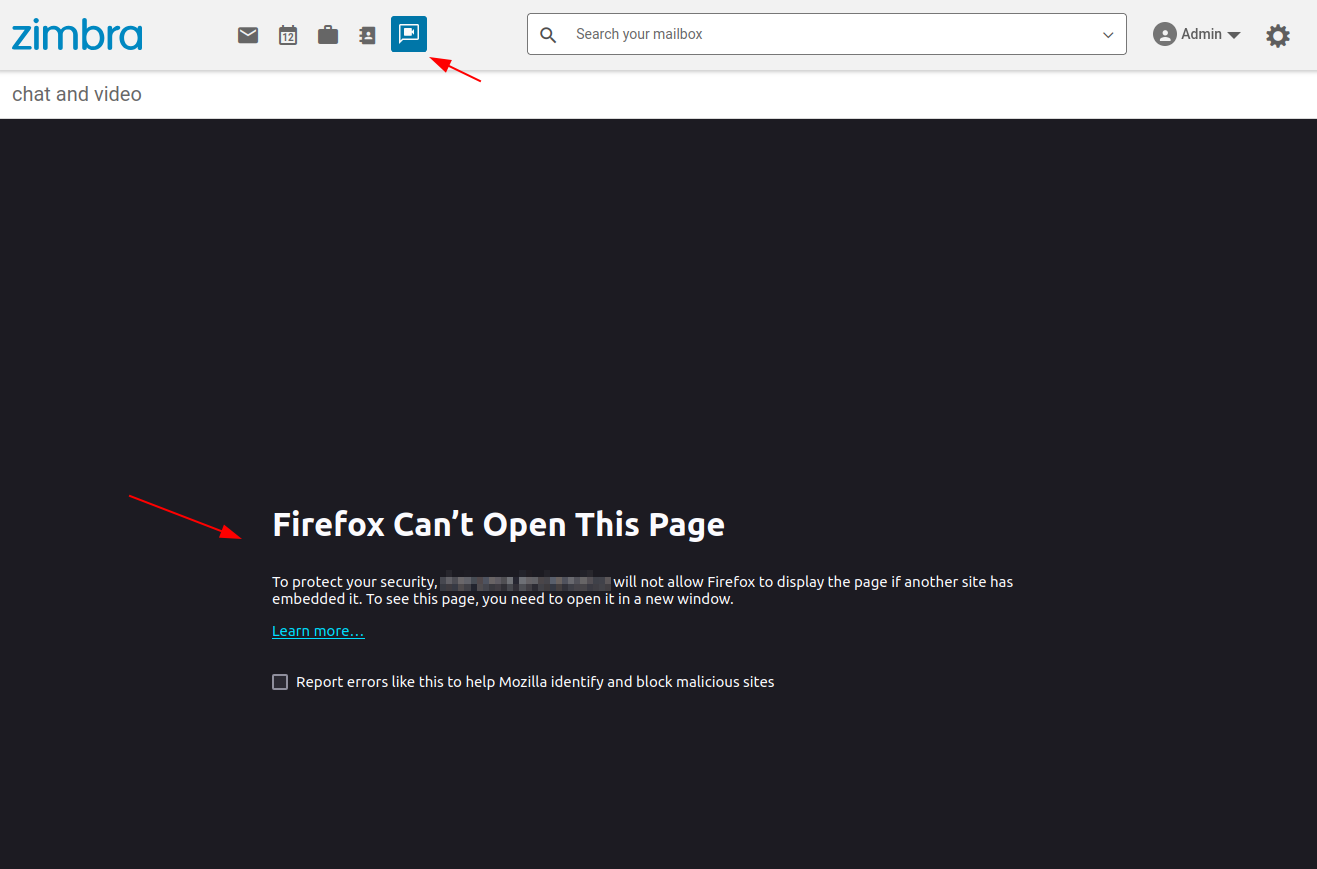
-
A Content Security Policy might be blocking the Chat to loaded in Zimbra interface.
-
Follow the steps here to allow your Zimbra load the Zimbra Chat properly.
T8: Transaction emails are not being delivered.
Some transaction emails are fired from Zimbra Chat like external user
invite and password recovery.
In the case those emails are not being delivered properly, check by
following the steps below:
-
Access the Zimbra Chat server as zimbra-chat user.
-
Edit the file
/opt/zimbra-chat/config. -
Find the properties
SMTP_HOST, SMTP_USER, SMTP_PASSWORD and SMTP_PORTand make sure the credentials are right and SMTP is working properly. -
In the case a change needs to done, update the properties with the right value.
-
Save the config file.
-
Restart the Zimbra Chat by running
zimbra-chat restart.
T9: Messages looks not being delivered in real-time to the destination.
In the case messages are not being delivered in real-time something might be wrong on the Webmessenger service, RabbitMQ or Redis.
In order to check and obtain more information about errors, follow the steps below:
-
Access the Zimbra Chat server as zimbra-chat user.
-
Check the API logs to make sure the message is being delivered to the server by running
zimbra-chat logs api. -
Check the Webmessenger logs by running
zimbra-chat logs webmessenger. -
Check the RabbitMQ logs by running
zimbra-chat logs rabbitmq. -
Check the Redis logs by running
zimbra-chat logs redis. -
Collect any error message.
-
Initially restarting the Zimbra Chat service may be enough to stabilise the application. Try it by running
zimbra-chat restart. -
In the case restart does not work, try to update the application by following instructions here
-
If the issue persists, contact support and provide the collected logs.
T10: Message search not returning results.
In the case the message search feature is not returning any results, will be necessary to check the API and the ElasticSearch service.
Follow the steps below the check both services:
-
Access the Zimbra Chat service as zimbra-chat user.
-
Check the API logs by running
zimbra-chat logs api. -
Try to execute one message search and check on the logs if the request is reaching the API and if some error is presented.
-
Check the ElasticSearch logs by running
zimbra-chat logs es01andzimbra-chat logs es02. -
Collect any error message.
-
Initially restarting the Zimbra Chat service may be enough to stabilise the application. Try it by running
zimbra-chat restart. -
In the case restart does not work, try to update the application by following instructions here
-
If the issue persists, contact support and provide the collected logs.
T11: Advanced chat features do not appears to the user.
In order to advanced chat features like group creation to be presented
to the user the zimbraFeatureAdvancedChatEnabled attribute needs to
be enabled on Zimbra and the Zimbra license has enough chat account
limits available.
-
Follow the steps here to activate Advanced Chat features to an user or COS.
-
The changes will be applied after the user reload the Zimbra page.
-
In the case a error message appears on
zimbraFeatureAdvancedChatEnabledactivation, your account limits might not be enough. -
On Zimbra server as zimbra user, execute
zmlicense -pto check your limits. -
Look for something like that:
Feature : ChatAccountsLimit Status: Authorized for use Max Limit: 50 Used Limit: 50 -
If used limits are exceeded, you can remove feature from some users or contact Zimbra for an upgrade.
-
If the limits are not exceeded and Advanced Chat features still not enabled, check the Zimbra logs.
-
Access the Zimbra server as zimbra user and execute
tail -f /opt/zimbra/log/mailbox.log | grep ChatVideo. -
Collect the logs and contact support for further assistance.
T12: Video feature does not appears to the user.
In order the Video feature to be presented to the user the
zimbraFeatureAdvancedChatVideoEnabled attribute needs to be enabled
on Zimbra and the Zimbra license has enough video accounts available.
-
Follow the steps here to activate Chat and Video to an user or COS.
-
The changes will be applied after the user reload the Zimbra page.
-
In the case a error message appears on
zimbraFeatureAdvancedChatVideoEnabledactivation, your account limits might not be enough. -
On Zimbra server as zimbra user, execute
zmlicense -pto check your limits. -
Look for something like that:
Feature : ChatVideoAccountsLimit Status: Authorized for use Max Limit: 50 Used Limit: 0 -
If used limits are exceeded, you can remove feature from some users or contact Zimbra for an upgrade.
-
If the limits are not exceeded and Video feature still not enabled, check the Zimbra logs.
-
Access the Zimbra server as zimbra user and execute
tail -f /opt/zimbra/log/mailbox.log | grep ChatVideo. -
Collect the logs and contact support for further assistance.
T13: Video feature is enabled but session does not open after clicking on meeting link.
If the Zimbra Video does not open after meeting link click and only a blank page is presented, Zimbra Chat might be misconfigured.
-
Make sure you followed these steps properly.
-
Ensure Zimbra Video is installed correctly and running.
-
Access from your browser the Zimbra Video solution URL directly and check if the application is loaded.
-
This direct access is only for testing, you will not be able to get in a video session without accessing the Zimbra Chat first.
T14: Installation or restart is taking too long and you encounter a network error like getaddrinfo EAI_AGAIN in the log file /var/log/zimbra-chat-installation.log.
It typically indicates network IP conflicts on the Docker. Possiblly, you can have some conflict between docker0 and some network ip range. It’s recommended to avoid keeping the default docker0 ip 172.17.x.x
Follow the steps below to check and get this fixed:
-
If the installation or restart is taking too long, check the log file located at
/var/log/zimbra-chat-installation.logand look for an error similar to the one below:npm ERR! code EAI_AGAIN npm ERR! errno EAI_AGAIN pm ERR! request to https://registry.npmjs.org/ms/-/xxxxxx.tgz failed, reason: getaddrinfo EAI_AGAIN registry.npmjs.org -
Once you identify the message on the logs, follow the configuration steps here to change the default docker0 IP.
-
Rerun the installation or restart the application, then check if the issue persists or not.
-
If the issue persists or reappears, it could indicate DNS issues related to your network. Please double-check your DNS configuration.
-
For further assistance, contact the support team.
T15: No disk space left.
If one of the Zimbra Chat instances runs out of disk space, some potential causes could be responsible.
-
Ensure that Docker logs rotation is configured to prevent that.
-
Check if the Zimbra Chat storage located in
/opt/zimbra-chat/storageis causing the issue. If so, it is recommended to either expand the existing storage or migrate to an instance with more storage capacity.
T16: No disk space left during the chat import.
During the chat import process on the Zimbra Chat server, the TGZ file
exported from Zimbra will be decompressed, and the storage files will be
copied to the application storage directory located at
/opt/zimbra-chat/storage. Both the decompression process and the
copying of storage files require a significant amount of disk space. If
there is insufficient disk space, the import process will be
interrupted, and an error message will be displayed.
✖  ERROR  ENOSPC: no space left on device, write
✖  ERROR  Please check error logs on /import/20240830T022721961Z-error.log!
events.js:377
      throw er; // Unhandled 'error' event
      ^
Error: ENOSPC: no space left on device, write
Emitted 'error' event on WriteStream instance at:
    at emitErrorNT (internal/streams/destroy.js:106:8)
    at emitErrorCloseNT (internal/streams/destroy.js:74:3)
    at processTicksAndRejections (internal/process/task_queues.js:82:21) {
  errno: -28,
  code: 'ENOSPC',
  syscall: 'write'
}-
Before starting the import process, ensure that your Zimbra Chat server has at least three times the size of the .tgz file available as free space.
-
For example, if the .tgz file is 200GB, you will need at least 600GB of free space on the server.
T17: “Cannot read property '_id' of undefined” error on the chat import process.
During the chat import process, an error like “*Cannot read property '_id' of undefined”* might occur. This error is often caused by an attempt to override a previously imported user who has the same email address but a different Zimbra ID.
✖ ERROR Cannot read property '_id' of undefinedIf you are running a chat import process multiple times on the same Zimbra Chat environment, the application will always use the Zimbra ID rather than the email address to ensure each user account is matched correctly.
After the initial import, if a user account is recreated in Zimbra, it will be assigned a new Zimbra ID, and the system will treat it as a new account. In this case, the chat history cannot be transferred to the new user account.
-
Try to run the chat import process only once to avoid complications.
-
If a second chat import is necessary, ensure that no user accounts have been recreated in Zimbra.
-
To prevent conflicts, consider exporting chat data from Zimbra in smaller batches.
The chat export feature lets you export users based ondomain name, specific email address, or a list of email addresses. For more details, refer to the documentation here.
T18: Chat import file not found.
During the execution of zc-cli import:chat, after entering the name
of the exported chat file, if you see the error message “ERROR: File
"/import/FILE_NAME_PROVIDED.tgz" not found,” it indicates that the
specified file could not be located.
ℹ  INFO  Extracting files...
✖  ERROR  File "/import/file.tgz" not found.
Make sure to follow these steps:
-
Verify that the name of the exported TGZ file from Zimbra is correct.
-
Confirm that the TGZ file is located in the correct directory:
/opt/zimbra-chat/import. -
Ensure that the
zimbra-chatuser has the necessary permissions to access the file.
For additional details, refer to the chat import instructions.
T19: “No such file or directory” on the logs after finishing chat import.
Occasionally, the chat export feature on Zimbra may fail to export certain files from Connect (the old chat application). This can happen if the Connect API encounters an issue, resulting in some data loss and causing specific message files to be unavailable during the export process.
As a result, an error like the one shown below may occur during the chat import, and some file messages could be missing at the end of the process.
[2024-08-29T13:17:00.547Z] [Message creation] [id: 27f93cdf-5713-4277-a67d-8529efd82c25]
[Error: ENOENT: no such file or directory, stat '/import/20240829T034712039Z/files/27f93cdf-5713-4277-a67d-8529efd82c25'] {
  errno: -2,
  code: 'ENOENT',
  syscall: 'stat',
  path: '/import/20240829T034712039Z/files/27f93cdf-5713-4277-a67d-8529efd82c25'
}
Currently, there is no available workaround for this specific case.
If you have any questions regarding this matter, contact the support team.
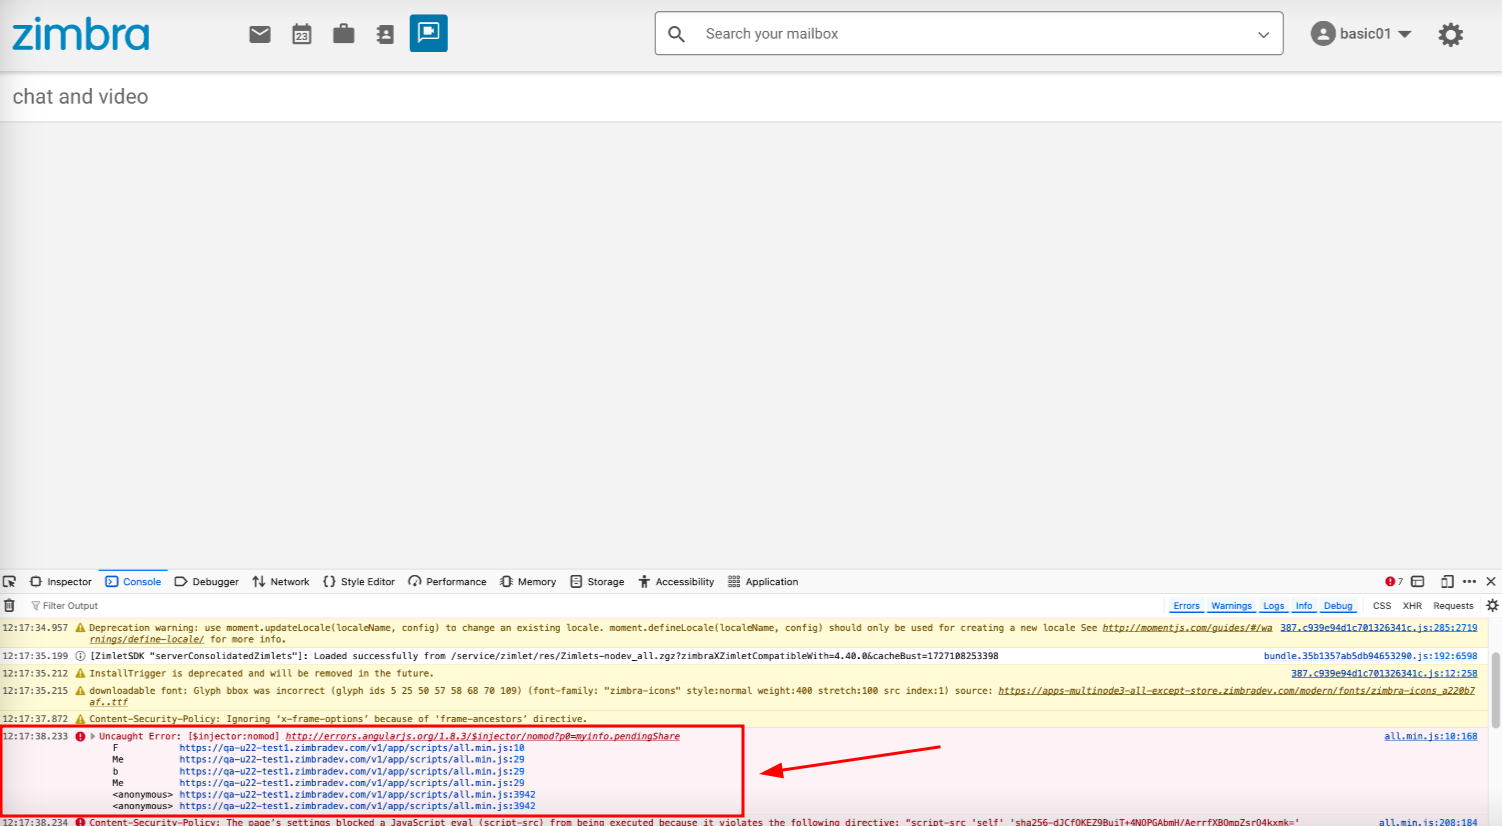
T20: Zimbra Chat not loading on Zimbra and "errors.angularjs.org" is presented on the browser console.
Occasionally, the Zimbra Chat interface might get broken after a zimbra-chat restart blocking the interface of being loaded on Zimbra.
If the Zimbra Chat is not loading on Zimbra, execute the following steps to check browser console logs and verify if this error is the cause.
-
Open your browser’s developer tools (usually F12 or Ctrl+Shift+I) and switch to the Console tab.
-
Look for any errors related to AngularJS. You should see a message similar to the following:
-
If you see an error like the one above, it means that the AngularJS module is not loaded properly.
-
To fix this issue, restart the Zimbra Chat one more time by running
zimbra-chat restart. -
Open the Zimbra Chat URL in a different tab out of Zimbra and hard reload the page (usually Ctrl+Shift+R) to avoid cache.
-
Return to the Zimbra interface and verify that the Zimbra Chat module is loading correctly.
#include::zimbra-video-support-faq.adoc[]