March, 2020 Zimbra Collaboration 9.0.0
License
 Synacor, Inc., 2022
© 2022 by Synacor, Inc. Zimbra Collaboration Users guide
This work is licensed under the Creative Commons Attribution-ShareAlike 4.0 International License unless another license agreement between you and Synacor, Inc. provides otherwise. To view a copy of this license, visit https://creativecommons.org/licenses/by-sa/4.0 or send a letter to Creative Commons, PO Box 1866, Mountain View, CA 94042, USA.
Synacor, Inc., 2022
40 La Riviere Drive, Suite 300
Buffalo, New York 14202
What is Modern Web App?
Zimbra is a full-featured messaging and collaboration solution that includes email, address book, calendaring, tasks, and Web document authoring.
Zimbra comes with a Modern Web App that is a new-age email application usable from virtually any device or screen size.
It is secure, flexible, and scalable to meet spikes in demand and comes with built-in rich user experience.
| Your account might not include all the features described in this guide. Check with your administrator to see which features are available. |
Login
When you Sign In, you enter your username and password and select the version you want to use. You can select to use the default client, or change the client version.
| Contact the Zimbra administrator for the login URL and credentials. |
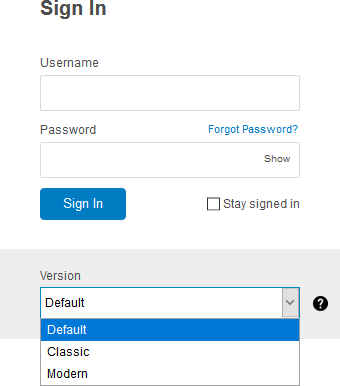
Zimbra client has two versions — Modern and Classic. A Default option also appears in the version drop-down. After login, you can choose either Modern or Classic to be the default client.
-
Type the URL in a browser’s address bar.
-
Enter your username in the Username field.
-
Enter the password in the Password field.
-
Choose Modern from the Version drop-down to experience the all new Zimbra email.
-
Check the box Stay signed in to avoid entering your password each time you launch Zimbra.
-
Click Sign In to login.
Must Change Password
| The Must Change Password setting will have to be enabled by the Administrator. |
When the setting is enabled, it will allow user to set the new password when logging in Modern Web App.
-
Type the URL in a browser’s address bar.
-
Enter your username in the Username field.
-
Enter the password in the Password field.
-
Choose Modern from the Version drop-down.
-
Click Sign In. UI will be displayed to set a new password.
-
Enter the Username and Password.
-
Enter new password in New Password and Confirm Password fields.
-
Click Sign In.
-
Your new password is successfully set.
Two-factor Authentication
Two-factor Authentication (2FA) is a method of confirming your identity by utilizing an information like password and a second factor in the form of a code through Time-based One Time Password (TOTP) apps. Please visit the wiki for supported apps.
In Zimbra, administrators have the option to enable or enforce Two-factor authentication.
When the Two-factor connection is only enabled, not enforced, you have the option to set it up from Settings → Accounts at your convenience. In such a case, you can log in with just your username and password.
Below section explains the case when administrator has enforced the two-factor authentication for your account.
2FA Enforced
If the administrator has enforced two-factor authentication, you are required to set it up immediately after you log in for the first time. You cannot use the application until you set up 2FA on your account.
-
Launch Zimbra.
-
Login using an authorized username and password.
Since the administrator has enforced two-factor authentication, you immediately reach a page to set up Two-factor Authentication. -
Click Begin setup.
-
Install an authentication app on your mobile device. Check supported apps.
-
Once installed, configure it on your smartphone.
-
Click Next on the Zimbra screen to begin the process of adding this account to the authentication app.
-
On the authenticator app, enter the code generated on the Zimbra screen.
-
Click Next.
-
Enter the code generated by your authenticator app and click Verify to complete the two-factor authentication setup.
This section familiarizes you with Zimbra’s email interface.

This page is the first thing you see when you log in to check your emails. It has
-
A left sidebar.
-
An email pane.
-
A reading pane located to the right or below the email pane. The reading pane can be disabled from Settings.
You can drag to change the width of each pane.
Left Sidebar
The left pane of the email window contains the following folders.
- Inbox
-
Whenever someone sends you an email, it comes straight to your Inbox. Click this folder to view your incoming emails. You can also right-click this folder to create subfolders.
- Drafts
-
Mails that you have written and saved — or which Zimbra saved while you were composing them — but not yet sent appear under drafts folder.
- Sent
-
When you send an email to someone, it appears in your sent folder. You can right-click this folder to create subfolders.
- Junk
-
Zimbra moves all the unwanted or spam emails here to keep them out of your Inbox.
- Trash
-
All deleted emails are moved to this folder until you Empty the Trash, permanently delete, or move to another folder to keep.
- Folders
-
Sometimes, you may want a folder for storing specific emails. All such folders are listed here.
- Saved Searches
-
If you create a search that you want to use again, you can save it. The saved searches are listed here.
- Tags
-
It also lists your tags that other emails may carry. Clicking a tag lists all emails in the email pane, carrying that tag. You can also create a custom tag.
Email Pane
This pane displays emails from your Inbox by default.
Event invitations appear with ![]() . This icon helps set an invitation apart from an email.
Clicking a folder in the Left Sidebar lists its contents in this pane.
. This icon helps set an invitation apart from an email.
Clicking a folder in the Left Sidebar lists its contents in this pane.
This pane also displays the search result.
Reading Pane
When an email is selected, this pane shows its contents.
A toolbar displays some quick actions regarding an email.
| These buttons become functional after you select an email and view its contents in the reading pane. |
Click  to reply to the person who sent this email.
Click
to reply to the person who sent this email.
Click  to reply to everyone whose email address appears in To or Cc fields.
| Any attachment in the original email is not included in Reply or Reply All functions. |
Click  to forward this email to others.
It is especially helpful in sending a received attachment to others.
to forward this email to others.
It is especially helpful in sending a received attachment to others.
 archives your emails and saves space.
Archived emails do not appear in Inbox or any of the folders, but you can search for them using Email Search box.
archives your emails and saves space.
Archived emails do not appear in Inbox or any of the folders, but you can search for them using Email Search box.
 removes emails from the current folder and moves them to a folder chosen from the drop-down.
 deletes emails.
The deleted emails appear in the Trash folder.
deletes emails.
The deleted emails appear in the Trash folder.
 marks emails as spam and moves them to the Junk folder.
 reveals further actions to take on emails like marking an email as read or unread, or mark an email with a
  for it to stand out, and blocking a contact from sending you emails.
Keyboard Shortcuts
Zimbra supports keyboard shortcuts; to see what shortcuts are defined, type Ctrl+Q. The available keyboard shortcuts are context-sensitive. Ctrl+Q displays different shortcuts depending on whether you have selected mail, calendar, or contacts.
Shift and Ctrl help you select contiguous or non-contiguous emails, respectively.
Keyboard Shortcuts During Input
While providing input, e.g. "Add Event" dialog:
-
Tab moves to next element
-
Shift+Tab moves to previous element
-
Command+C or Ctrl+C to Copy
-
Command+X or Ctrl+X to Cut
-
Command+V or Ctrl+V to Paste
-
Commmand+Z or Ctrl+Z to Undo
-
Commmand+Shift+Z or Ctrl+Shift+Z to Redo
| Mac users should consider enabling full keyboard access See Use your keyboard like a mouse with Full Keyboard Access |
Tags
Tags help classify and organize email messages or conversations. Tags also help sort emails and make searches easy. You can also apply multiple tags to an email.
Create a Tag
-
In the Left Sidebar, hover on Tags and click
 .
. -
Enter the new Tag name and select a color for the tag.
Tag names can include any character except a colon (:), forward-slash (/), and quotation mark ("). -
Click Save.
You can also create tags when applying them.
-
In the Email Pane, right-click an email.
-
From the context menu, select Tag.
-
Choose
Add a Tag. -
Enter the new Tag name and select a color for the tag.
-
Click Save.
The new tag now appears under Tags.
Assign a Tag to an Email
You can assign multiple tags to an email to classify it under different categories.
-
In the Email Pane, right-click an email.
-
From the context menu, select Tag.
-
From the Tags modal, choose an already created tag or create a new one.
-
Click Save to apply the tag.
You can create tags while applying them.
The new tag is now listed and ready to be applied.
Remove a Tag
-
Right-click an email that you have tagged.
-
From the context menu, select Tag.
-
From the pop-up that appears, uncheck the box against a tag to remove it from the email.
-
Click Save to remove the tag.
Display Messages with a Specific Tag
-
In the Left Sidebar, click
 before Tags to list all created tags.
 -
Click a tag to list all emails with the selected tag in the Email Pane.
Edit a Tag
-
In the Left Sidebar, click
before Tags to list all created tags. -
Right click a tag and choose Edit from the context menu.
-
Change the name and color associated with a tag.
-
Click Save.
Delete a Tag
-
In the Left Sidebar, click
before Tags to list all created tags. -
Right-click a tag and choose Delete from the context menu.
-
Choose Continue from the confirmation popup.
-
The selected tag is deleted and cleared off from all emails marked with that tag. The emails stay safe in their respective folders.
Import Email Folders
You can import email folders directly in Zimbra, provided the folders to import are in .tgz format.
-
In the Left Sidebar, right-click a folder under which you prefer to import your email folder.
-
From the context menu, choose Import.
-
From the Import modal, click Choose File.
-
From the file browser window, choose the
.tgzfile to import. -
Click Import to begin the import process.
-
The imported folder appears under the selected folder after the process completes.
Export Email Folders
You can export email folders directly in Zimbra in .tgz format.
-
In the Left Sidebar, right-click a folder to export.
-
From the context menu, choose Export.
-
From the file browser window, choose a location to save the
.tgzfile. -
The exported folder downloads at the specified location.
Share Email Folders
You can share your email folders with others and grant them controlled access.
-
In the Left Sidebar, right-click a folder to share.
-
From the context menu, choose Share.
-
Choose appropriate permissions from the Sharing Permissions drop-down.
- View
-
Users can view all emails under the shared folder but cannot make changes to that folder.
- View, edit, add, and remove
-
Users have permission to view and edit the contents of a folder, create new subfolders, present items on your behalf, and delete items from the folder.
- View, edit, add, remove, and administer
-
Users have permission to view and edit the content of a shared folder, create new subfolders, present on your behalf, delete items from the shared folder, and share the folder with others.
-
Enter the email address(s) with whom to share the email folders.
-
Click Save for changes to take effect.
If the recipient declines the share, you receive a notification email. Similarly, when you revoke the share, the recipient also receives an email notification.
| When you revoke access to a folder you shared, the folder appears with a strikethrough to receivers of that shared folder. |
Compose and Send a Message
-
Click New message in the left bar.
-
Add a recipient email address in the To field. Separate multiple recipients with a comma.
-
Click To to launch the Choose Contacts dialog. Using this tool, you can search for and choose contacts from a selection of contexts.
-
Known addresses (from your contacts or frequent correspondents) appear as suggestions automatically. You can click suggestions, or select them with the arrow keys and press Enter.
-
-
Set the subject of the email.
-
Add images and files to your message.
-
Click Send to send the email.
Select Contacts
When composing an email, click To to launch Choose Contacts window. Alternatively, begin typing recipients to bring up suggestions from which to choose.
| The first suggestion in the auto-complete list is highlighted. You can use Tab, Comma, Semi-colon, or Enter keys to select a highlighted contact. |
These email addresses can be copied and pasted to Cc and Bcc fields as well.
| You can drag and drop email addresses anywhere in To, Cc, and Bcc fields. |
Pick a context for searching and choosing contacts. The options are from your Contact Folders and lists, including:
- Contacts
-
This group lists all the contacts that you have added yourself.
- Emailed contacts
-
This folder lists people to whom you have sent emails.
- Global Address List
-
These are people whose email address domain is the same as yours. However, only a Zimbra administrator can enable this feature.
Format an Email
Use the toolbar at the bottom of the message compose screen to format your text.
-
Click
 beside the font size to see the available options.
 -
Click
beside the font type to see the available options. -
Click
 for bold,
  for italicized, or
  for underlined text.
 -
Click
 to choose your desired text color.
 -
Click
 to choose your desired highlight color.
 -
Select text and click
 to see alignment options.
-
left-aligns the selected text.
-
 right-aligns the selected text.
 -
 center-aligns the selected text.
-
-
Click inside a sentence and click
 to see numbered list options.
 -
Click inside a sentence and click
 to see bulleted list options.
 -
Highlight a sentence and click
 to increase or decrease indent of your text.
 -
To create links click
 and enter the URL, Text to display, and link’s Title.
 -
Click
 to select and insert an emoji.
 -
To insert and format a table, click
 for options.
 -
Click
 to undo and
  to redo your changes.
Add images & files
Use the toolbar at the bottom of the message compose screen to attach files to your email.
Attach From my Computer
-
Click
 to open file attach options.
 -
Clicking Attach From My Computer brings up a file explorer.
-
Navigate to the file to attach and click Open. The selected file now appears as an attachment.
You can cancel the attachment upload when it is in progress.
Hover on the attachment and click  . .
|
Attach From Email
Photos
-
Click
to open file attach options. -
Select option Attach Photo From Email to open a pane on the right, which shows all the photos that you have sent and received.
-
Select a photo to attach it to your current email.
Files
-
Click
to open file attach options. -
Select option Attach File From Email to open a pane on the right which shows all the files sent and received by you.
-
Select a file to attach it to your current email.
GIFs
You may also attach `GIF`s to your email if you have the option.
Request Read Receipts
You can send a request for an acknowledgment to recipients that they see when they open your email.
When composing an email, click the three-dot menu () to the right of the From address and choose Request Read Receipt to ask your recipients for a read receipt.
Remember that this is only a request, and your recipients have the option not to send the acknowledgment. Refer to Sending Read Receipts to know more.
Set Email Priority
You can set your email to have a higher priority.
Such emails appear with an exclamation mark  in the receiver’s Inbox.
When composing an email, click the three-dot menu () to the right of the From address and choose High Priority to mark your email as a high priority.
Email Search Box
You can type several phrases in the Search box at the top of the Email Pane. In addition to searching for different words and phrases, you can search in all the folders collectively or individually.
To search, type in your search word or phrase in the email search box and press Enter.
Advanced Search
Click ![]() next to the search box to show the advanced search fields.
Fields listed here help refine your search further.
next to the search box to show the advanced search fields.
Fields listed here help refine your search further.
-
Choose a folder from the Search In field.
-
Typing an email address in the From field focuses your search on all emails sent from that address.
-
Similarly, typing an email address in the To field focuses your search on all emails sent to that address.
-
Check the box Subject to search emails with these words in their subject line.
-
Check the box Message body to search the words in the body of the email. Enclose the searched text within quotes to search them as a phrase.
-
Check the boxes Any or Image if the email you are looking for has an attachment or an image.
-
Check the box Unread or Starred to search only unread emails or only emails with star.
-
Specify a date in the Date field.
| None of the above search criteria is mandatory. However, adding more criteria reduces search time and refines the search results further. |
Search Result
-
Click "Messages" (default view) to view all the searched messages.
-
Click "Photos" to filter the image files in the searched messages, such as PNG, JPG, GIF, BPM, etc.
-
Click "Documents" to filter the non-image attachment files in the searched messages.
Saved Searches
If you create a search that you want to use again, click Save Search.
-
Create the search query from Email Search Box or Advanced Search.
-
Click Save Search at the head of the Email Pane.
-
Enter a name for the search.
-
Click Save.
Searches are saved to the "Saved Searches" in the Left Sidebar.
To use a saved search, click the item in the "Saved Searches". The search results immediately display in the Email Pane.
Secure/Multipurpose Internet Mail Extensions (S/MIME)
From Kepler-Patch-24 onward, Zimbra Modern Web app supports server side S/MIME functionality. Users can send Signed or Signed and Encrypted emails to other users.
Following are the pre-requisites:
-
The administrator will have to enable this feature and provide the user’s private certificate and recipient’s public certificate.
-
The administrator will have to install the zimlet
zimbra-zimlet-secure-mailand enable it for the users.
| User can read or send signed and encrypted messages only when the S/MIME feature is enabled. By default the S/MIME feature is disabled for all users. |
Encrypted Emails
The Encrypted email refers to an email that has been encrypted with a digital certificate.
Encrypting an email helps to protect sensitive data and preserve confidentiality and privacy. This helps in making sure that only the intended recipient can read the email. If the email is intercepted and opened by an unintended user, that user won’t be able to decrypt and view the email.
For sending encrypted emails, users will need their Private certificate and the recipients Public certificate.
For reading encrypted emails, users will only need their Private certificates.
Signed Emails
The Signed email refers to an email that has been signed with a digital certificate.
Signing an email helps to:
-
Ensure data integrity i.e. the email was not altered from its original form.
-
Email authenticity i.e. the email came from an authentic sender.
-
Non-repudiation i.e. the signer cannot deny the authenticity of the email.
This helps in knowing that the received email message comes indeed from the declared sender (a warning appears if someone else intercepted and modified the message before it arrived).
For sending signed emails, users will need their Private certificate.
For reading signed emails, users will need the recipient’s Public certificate.
Importing certificate
| In this guide we assume that the users have got the certificate from standard service providers (e.g. Comodo, DigiCert, Go Daddy, etc) whose root CA certificates are already present in browsers. |
For easy understanding of the steps, we will refer to following examples throughout the section:
-
Sender’s private certificate - sender-pvt.p12
-
Recipient’s public certificate - recipient-pub.crt
Importing sender’s private certificate
Supported certificate extensions are pfx and .p12.
-
Select
 → Settings.
 -
Under S/MIME and Encryption, click +Add a certificate.
-
From the file explorer, select the sender-pvt.p12 and click Open.
-
Provide the password when prompted and click Save.
-
Upon succesfull certificate upload, a tool tip message Certificate saved successfully will get displayed.
Importing recipient’s public certificate
-
Click [Contacts] tab.
-
Right-click the contact and select Edit Details.
-
In the Security Certificate section, click on Add a certificate.
-
From the file explorer, select the recipient-pub.crt and click Open.
-
Click [Save].
Sending 'Signed' or 'Signed and Encrypted' emails
-
Compose a new message.
-
Add a recipient in the To field.
-
At the right-hand top corner choose an option from the dropdown. By default Do not sign or encrypt is selected.
-
Do not sign or encrypt: Mail is neither signed nor encrypted. This is equivalent of disabling the S/MIME feature.
-
Sign: Send signed message to the recipient.
-
Sign and Encrypt: Send signed and encrypted messages to the recipient.
-
-
Click [Send].
S/MIME and Encryption Settings
You can change the sign and encryption preferences from Settings.
-
Go to
→ Settings → S/MIME and Encryption -
Select the preference of your choice.
-
Click [Save].
-
The selected option will be applicable when users compose a new message.
Contacts
This section familiarizes you with Zimbra’s contacts tab interface. Click Contacts tab to bring up the following interface.

It has
-
A left pane
-
A contacts pane.
-
A contact details or edit pane.
Left Pane
-
This pane lists your contact folders and contact lists. You also see folders you create and those shared with you, including:
- Contacts
-
It shows all your contacts that you have added manually.
- Trash
-
It lists all the deleted contacts.
- Emailed Contacts
-
It lists contacts to whom you have sent an email.
Zimbra Enterprise users see a fourth folder — Global Address List. This folder lists all the contacts in your organization.
-
Your contact lists appear under Contacts.
-
A blank field on the bottom helps you create lists. These lists are especially helpful when you regularly send emails to a specific group of people. Refer to Manage Contact Lists.
Contacts Pane
Whenever you click one of the Contacts folders, or lists, from the left pane, this pane lists all contacts from the selected item.
Right-click any listed contact to see further options like Edit, Delete, Add to Lists, and Share.
Contact Details Pane
When a contact is selected, this pane displays its details.
This pane offers options like Edit Details, Assign to Lists, Move, and Delete. Print and Tag are also in More.
Create a New Contact
Keep track of everyone you communicate with by creating contacts. Once you’ve added a contact, you can type the first few letters of their name into an email, and Zimbra displays their names as suggestions.
Add a Contact from Email
-
Hover a name in the To, Cc, Bcc, or From field.
-
Click
on the contact information card that pops-up. -
Select Add to contacts.
-
Zimbra adds the user to your contacts folder.
Add a contact from scratch
-
Click Contacts tab.
-
Click Add a Contact to launch Add a contact page.
-
Add any relevant details you want.
-
Click Save.
| All added contacts appear under Contacts. |
Import Contacts
You can import contacts in different formats into Zimbra.
-
Click Contacts tab.
-
Click the Contact List menu, labeled Sort by … in the Contacts Pane.
-
Choose Import.
-
Select Browse, go to your saved contacts file, and select it.
-
Click Import to import the contacts to Zimbra.
Export Contacts
In Zimbra, you can export your contacts in various formats to make them portable and take a backup if required. Zimbra exports contacts in the following formats:
-
Microsoft Outlook CSV
-
Thunderbird/Netscape LDIF
-
VCF
-
Multiple VCF in a zipped file.
-
Yahoo CSV
VCF is recommended to preserve uploaded contact images.
|
-
Click Contacts tab.
-
Click the Contact List menu, labeled Sort by … in the Contacts Pane.
-
Choose Export.
-
Choose a relevant exporting format and click Export Now.
-
Save the file when prompted.
Edit a Contact
-
Right-click a contact from the list of contacts.
-
Select Edit Details.
-
Edit any relevant details you want.
-
Click Save.
Delete a Contact
-
Right-click a contact from the list of contacts.
-
Select Delete.
-
The deleted contact moves to Contacts' Trash folder.
| The option Assign to Lists adds the selected contact to a group. For details check Manage Contact Folders. |
Share a Contact
When you share a contact, Zimbra exports a card with the information of the selected contact as an email attachment.
-
Right-click a contact from the list of contacts.
-
Select Share.
-
A new mail window opens with the selected contact as a
VCFattachment. -
Enter the receiver’s email address.
-
Click Send.
Review Interaction with Contact
You can review your interactions (emails and file attachments), which a contact has sent to you.
-
Click a contact with whom you have interacted.
-
A section to the right of the selected contact’s details lists the emails and file attachments received.
-
Click View all to view those interactions in a separate tab.
Global Address List
The Global Address List (GAL) is a directory of users within an organization that is available to all users of the email system. Zimbra uses this directory to look up user addresses from within the company.
If your administrator has set up GAL, you can access it under Contacts.
Manage Contact Lists
You can create a list containing your contacts and store that list under the Contacts folder. It is especially helpful when you want to send an email to a specific set of people. So instead of typing everyone’s email address, you type in the name of your list, and Zimbra sends the email to all addresses in that list.
It is a two-step process.
-
Create a list.
-
Add contacts to this list.
Create a Contact list
-
Click Contacts tab.
-
In the New List field, enter the name of your contacts list.
-
Press Enter to save the list.
You can right-click a list, which you have created, to rename or delete it.
Add Contacts to a List
-
Click a contacts folder to list all the contacts in that folder.
-
Select the contacts which you want to add in a list.
-
Select a contact and choose Assign to Lists from the Contact Details Pane. The following are few more ways in which you can add contacts to lists.
-
Choose Assign to Lists by right-clicking the selected contacts.
-
Select multiple contacts and click Assign Contacts under Assign in the Contact Details Pane.
-
Send email to everyone on a list
-
Click the Mail tab.
-
Click New Message
-
In the To field, type the first few words of your list’s name.
-
The list appears as one of the suggestions.
-
Select the list.
-
Zimbra populates the To with all the email addresses from that list.
-
Type in the body of the email.
-
Click Send.
Manage Contact Folders
You can create folders within Contacts and use them to store contacts, lists, and subfolders. You can also share contact folders with other users. They work much in the same way as email folders. You can perform actions like creating folders, subfolders, and moving contacts across folders.
Create a Contact Folder
-
Click Contacts tab.
-
Hover over Folders and click
. -
In the text box, type in the name of the folder and press Enter.
-
Click outside the text-box or
beside the text box to cancel.
-
Add Contacts to a Folder
-
Click Contacts tab.
-
Select contacts to add to a folder.
-
In contact details pane, under
, click Move Contacts. -
In Choose a Folder modal, choose a folder to move the selected contacts.
Rename a Contact Folder
-
Click Contacts tab.
-
Right-click a folder to rename.
-
From the context menu, choose Rename Folder.
-
Type the new name for the folder in the text box.
-
Press Enter to save.
Move a Contact Folder
-
Click Contacts tab.
-
Right-click a folder to move.
-
From the context menu, choose Move Folder.
-
Select a folder under which to move this folder.
Delete a Contact Folder
-
Click Contacts tab.
-
Right-click the folder.
-
From the context menu, choose Delete Folder.
-
The folder moves under Trash.
Create a Contact Folder
-
Click Contacts tab.
-
Right click a folder.
-
From the context menu, choose Create subfolder.
-
In the text box, type in the name of the folder and press Enter.
-
Click outside the text-box or
beside the text box to cancel.
-
Share a Contact Folder
-
Click Contacts tab.
-
Right-click a folder to share.
-
From the context menu, choose Share.
-
Choose appropriate permissions from the Sharing Permissions drop-down.
- View
-
Users can view all contacts under the shared folder but cannot make changes to that folder.
- View, edit, add, and remove
-
Users have permission to view and edit the contents of a folder, create new subfolders, present items on your behalf, and delete items from the folder.
- View, edit, add, remove, and administer
-
Users have permission to view and edit the content of a shared folder, create new subfolders, present on your behalf, delete items from the shared folder, and share the folder with others.
-
Enter the email address(s) with whom to share the contact folder.
-
Click Save for changes to take effect.
Contact Search
You can type several phrases in the Search box at the top of the Contacts.
Contact Search box
Type a few words of the email address or name of a contact and click ![]()
Zimbra brings up the contacts with details matching the words you typed.
Calendar
This section familiarizes you with Zimbra’s calendar interface.
Click Calendar to bring up the following interface.

It has
-
A left pane
-
A calendar view
-
A tasks pane
Left Pane
This pane has a New Event button to schedule an event.
Mini Calendar
The left pane also displays a mini calendar. Contents of the mini calendar change as per the view selected in Calendar View Pane.
E.g.
-
To view the previous month’s calendar, click
 .
. -
To view next month’s schedule, click
. -
Click Month-Year (Aug 2019 in this case), to list calendars of previous and following six months.
Calendar List
- My calendars
-
Shows the calendars that belong to your account. You begin with one (named Calendar), and can add more.
- Others
-
Displays calendars that others have shared with you or to which you have subscribed. It is especially helpful in matching your schedule with them.
Calendar View Pane
The calendar view pane displays a calendar in Day, Week, and Year views as well.
Select the view from the views bar located just above the Middle Pane.
To fetch latest events, click ![]() .
.
All events of which you are a part, can be seen in this pane.
Calendar Views
Just below the Calendar tab are different views in which you can see your events.
- Today
-
When navigating the mini calendar click it to return to events scheduled for today. The view of the calendar is not disturbed.
E.g., you are checking out the events from September 29th - October 5th, 2019, which is the week view, click today to return to the current week.
When checking out the events scheduled on Dec 31 (month view), click to return to the current day. The calendar remains in month view and shows all the events of the current month.
- Day
-
Displays the calendar day-wise and shows all events scheduled for that day. It displays the date selected in the mini calendar.
- Work Week
-
Workweek view displays all the events in a work week.
E.g., you are viewing the events in the week Sunday, 22nd Dec 2019 - Saturday, 28th Dec 2019, and your work week starts from Monday and ends on Friday. Clicking Work Week displays events from Monday, 23rd Dec 2019 - Friday, 27th Dec 2019.
As a default setting, Monday is the first day of the week and work week. If you want to change the first day of the week and work week, set your preferred day of the week in Start of Week setting. - Week
-
Displays the calendar week-wise and shows all events scheduled for that week. It displays the week selected in the mini calendar.
- Month
-
Displays the calendar month-wise and shows all events scheduled for that month. It displays the month selected in the mini calendar.
- Year
-
Displays all the months of a year (selected in the mini calendar) in a grid. Each month in that grid displays its days week-wise.
You can print events listed in the selected view pane.
To print a selected view click ![]() → Print.
→ Print.
Tasks Pane
Tasks pane is the rightmost pane of the Calendar tab and shows all of your Task Lists. For more information, see tasks.
Manage Events
Schedule an event
-
Click Calendar.
-
Click New Event.
-
In Add Event field, type the subject of the appointment.
-
Set start and end date times or select All Day.
-
Choose an appropriate timezone for start and end date times. Enable this feature from Calendar Settings.
-
-
Set an appointment location — this is optional.
-
To schedule this event as an appointment in your calendar, do not add any invitees.
To create this event like a meeting, type the email address of the invitees. Alternatively, click the link Invitees and choose from the list of people that appears. Click Show Availability to see when your invitees are available. -
Any extra information or details go in the Notes section. Click the little pin beside Notes to attach a file.
-
Select a Remind interval. You are alerted of the appointment before the time set in Remind interval.
Choose Never if you do not want notification of this appointment. -
Choose how you would prefer to receive the alert — on the desktop/mobile application, or through email.
-
Select how that event should appear — Free, Tentative, Busy, or Out-of-Office.
-
Leave the field Calendar as-is if it is showing the calendar you want to place the event in, or if there are no other calendars set up.
-
Click Save to save this appointment in your calendar.
Edit an event
-
Locate the appointment to edit in your calendar.
-
Right-click the event to bring up the context menu and choose Edit.
-
Alternatively, you can, hover the mouse pointer to bring up the options — Details,
 (Edit),
  (Print), and (Delete).
-
Click
-
Click Details and then click
on top.
-
-
-
An interface similar to Schedule an event appears.
-
Edit the relevant information and click Save.
Delete an event
-
Locate the appointment to delete in your calendar.
-
Hover the mouse pointer to bring up the options — Details,
(Print), and (Delete) -
Click
.-
Alternatively, right-click the event to bring up the context menu and choose Delete.
-
-
A notification on the top of the calendar pane confirms the deletion of the appointment.
Copy an Event
-
Locate the appointment to edit in your calendar.
-
Right-click the event to bring up the context menu and choose Copy.
-
An interface similar to Schedule an event appears.
-
Change the relevant information and click Save.
Forward an Event
You can use a Forward action in a calendar event’s right-click context menu to forward the recurring event series or only that specific instance.
-
Locate the appointment to forward in your calendar.
-
Right-click the event to bring up the context menu and choose Forward.
-
If the selected event is a recurring event, choose if you want to forward This event only or All Events.
-
Add more invitees under the To field.
-
You can give additional information in the Notes section.
-
Click Send to forward the event.
Propose a New Time
You can propose a mew time for an event. You can propose a new time when you receive the invitation, or later from your calendar.
- Propose a new time from invitation email
-
Click Propose a new time
 in your invitation email’s RSVP section.
On the Propose new time screen, set a preferred time and click Send.
in your invitation email’s RSVP section.
On the Propose new time screen, set a preferred time and click Send. - Propose a new time from calendar
-
-
Locate the appointment, for which you want to propose a new time, in your calendar.
-
Right-click the event to bring up the context menu and choose Propose new time.
-
If the event is a recurring event, choose if you are proposing new time for This event only or All Events.
-
On the Propose new time screen, set a preferred time and click Send.
-
A toast notification confirms when proposed time is sent.
-
Event (Appointment/Meeting) Recurrence
| When setting a recurring event without any End Date or Occurrence limit, a default limit can be enforced by the Administrator. In such cases, a limit may be applied accordingly. This is applicable for Daily, Weekly, Monthly and Yearly recurring events. |
You can set the event to repeat every day, every week, every month, or every year. These repetitions can be customized as well, e.g., every third Friday, or third Friday of every month, and so forth.
Below are a few example scenarios and possible event recurrence settings.
You want to take your pet to the vet, on the 4th of every month, at 11:00 AM, for a routine checkup. You would like to set a reminder. Next appointment is on the 4th of May.
- Start Date and Time
-
05/04/20XX 11:00 AM
- End Date and Time
-
05/04/20XX 11:30 AM
- Repeat
-
Every month
Smiths' anniversary is on the 20th of July. You would like to set a reminder to wish them "Happy Anniversary!"
- Start Date and Time
-
07/20/20XX 07:00 PM. Check the box All Day.
- Show as
-
Free
- Repeat
-
Every year
Today, you meet your team to discuss an exciting idea. You then want to schedule your meeting every second Friday.
- Start Date and Time
-
07/20/20XX 07:00 PM
- End Date and Time
-
07/20/20XX 07:30 AM
- Repeat
-
Custom — Every 2 Weeks
On Friday Ends Never
You can set similar other recurrence patterns.
Edit Recurring Event
-
Locate the event to be edited in your calendar.
-
Hover the mouse pointer to bring up the options — Details,
, , and . -
Click
(Edit). -
You can choose to edit just this instance of the event or all recurrences.
-
An interface similar to Schedule an event appears.
-
Edit the relevant information and click Save.
Delete Recurring Event
-
Locate the event to be deleted in your calendar.
-
Hover the mouse pointer to bring up the options — Details,
, , and . -
Click
(Delete). -
You can choose to delete just this instance of the event or all recurrences.
-
A notification on the top of the calendar pane confirms the deletion of the event.
Respond to an invitation
An invitation appears in the Inbox with ![]() .
There are three responses to an event when you are an invitee.
In the RSVP section of an invitation, you have an option to send a response email or propose a new time.
Clicking RSVP actions — Accept, Tentative, or Decline — brings up a checkbox and a text area.
Check the box, type in your response, and click Save to send a response to the sender.
.
There are three responses to an event when you are an invitee.
In the RSVP section of an invitation, you have an option to send a response email or propose a new time.
Clicking RSVP actions — Accept, Tentative, or Decline — brings up a checkbox and a text area.
Check the box, type in your response, and click Save to send a response to the sender.
Accept ![]() : Zimbra saves the event in your calendar.
A notification reminds you before that event starts.
: Zimbra saves the event in your calendar.
A notification reminds you before that event starts.
Tentative ![]() : Zimbra saves the event in your calendar.
A notification reminds you before that event starts.
However, you can revisit the event anytime to mark it as Accept or Decline.
: Zimbra saves the event in your calendar.
A notification reminds you before that event starts.
However, you can revisit the event anytime to mark it as Accept or Decline.
Decline ![]() : Zimbra deletes the event, and the event does not make it to your calendar.
: Zimbra deletes the event, and the event does not make it to your calendar.
Propose a new time ![]() : Zimbra launches the edit event dialog to Propose a New Time for that event.
: Zimbra launches the edit event dialog to Propose a New Time for that event.
| Event organizers have an option to accept or decline the proposed time. |
Zimbra marks the invitations that you have not yet responded with a bar on the left. You may respond to the invitation in the calendar or the Mail section. Once you have responded, Zimbra deletes the invitation email.
Turn off or Postpone a Reminder
The Reminder dialog box pops up when an appointment or meeting is coming up, or when it’s time to finish a task.
You can turn off the reminder by clicking Dismiss or pause it for a minute by clicking Snooze
A reminder box may list multiple events. To turn off all reminders, click Dismiss All.
Similarly, Snooze All pauses all reminders for a minute.
Manage Calendars
Share a Calendar
If enabled for your account, you can share your calendars with its events, appointments, and meetings with others.
-
Click Calendar tab.
-
Right-click the calendar you want to share and choose Share.
-
Click Invite people by email (most flexible).
-
Choose appropriate permission from Anyone with the link can drop-down.
- View
-
Users can view all appointments, except the private ones.
- View free/busy times only
-
Users can only view when your calendar is free or busy. They cannot see the appointment details.
- View (including private events)
-
Users can view all appointments, including private ones.
- View and edit
-
Users can view and edit all appointments, except private ones.
- View, edit, add and remove
-
Users can view and edit all appointments, except private ones. They can also add and delete events (except private events) from your calendar.
- View, edit, add and remove (including private events)
-
Users can view and edit all appointments, including private ones. They can also add and remove events (including private events) from your calendar.
-
Type in the email address of people with whom you want to share this calendar.
-
Click Change next to invitees and edit their permissions — or remove the invitees altogether.
-
Click Save.
-
Zimbra sends a link to receivers who have an option to accept or decline the invitation.
Accept a Shared Calendar
Whenever someone shares their calendar with you, you receive an email notifying about it.
-
Click Add Calendar to add it to your calendars. Your friend’s calendar now appears under Others.
-
Click Decline to reject the share invitation.
Add Calendars
Add a new calendar by any of these methods.
Manually
-
Click Calendar and hover over My Calendars.
-
Click
. -
Type a name for this calendar.
-
Choose a color to mark it differently from the other calendars.
Subscribe to a Calendar
-
Click Calendar and hover over Others.
-
Click the gear icon and select Add a Friend’s Calendar.
-
Enter your friend’s email address.
-
Click Save.
| You can add your friend’s calendar only when they have shared it. |
Tasks
Create a New List
-
Click Calendar.
-
Click
-
Click Create List…
-
Type in a name for that list, and click Create List.
-
The new list appears below your name in the task pane.
Create a Task
You can combine various lists into one, get reminders, and track task progress.
-
Click Calendar.
-
Click
and choose New Task.This option is disabled in Done View. -
Set a due date of the task in Due Date field.
-
Set a priority from the drop-down. The options available are Low, Normal, and High.
-
Choose a list to assign the task.
-
Any extra information related to the task goes in Notes section.
Alternatively,
-
in tasks pane, hover over a list in which to create the task and click it.
-
In the field that appears, type in your task.
-
Press Enter — or click anywhere else in the task pane — to save the task with a check-box.
-
To set a due date or change the default priority, edit that task.
Edit a Task
-
Click the task created to bring up the options — Edit and Delete.
-
Click Edit.
The interface and options are the same as that of Create a Task.
Delete a Task
-
Click the task created to bring up the options — Edit and Delete.
-
Click Delete.
-
A notification on the top of the calendar pane confirms the deletion of the task.
Task list View orders
You can view the tasks list in the task pane as per a general list of tasks — list, priority, due date, or status.
List View
It shows all the tasks and the lists in which they belong. Lists appear in alphabetical order. Tasks within the list appear in the same order they were created; the latest task appears first.
Priority View
Tasks with decreasing order of priorities — High being first — are listed here.
Due Date View
This view shows the tasks in order of their due dates. Tasks that are past due appear first, followed by tasks that are needed later.
Done View
This pane lists tasks that are marked done.
Briefcase
This section will give an overview of Zimbra’s Briefcase feature.
Navigating to Briefcase
Click Cloud Storage → Briefcase to access the Briefcase tab.
It has
-
A left sidebar.
-
A list pane.
-
A file preview pane.
To disable preview pane, click ![]() at the top right hand corner and select the "No preview pane" option.
at the top right hand corner and select the "No preview pane" option.
You can drag to change the width of the left pane.
Left Sidebar
The left pane contains a button to upload files, and lists folders.
- Upload
-
To upload files in Briefcase.
- Briefcase
-
To view the uploaded files in Briefcase.
- Trash
-
To view the deleted files.
- Folders
-
To create separate folders.
List pane
This pane displays the list of the uploaded files.
File Preview pane
When any file is selected, the preview is generated and displayed in this pane.
A toolbar displays the actions which can be taken on the selected file.
| The toolbar buttons become functional after user selects a file. |
Uploading a file to Briefcase
-
Click Cloud Storage → Briefcase.
-
Click Upload. It will open a file explorer.
-
In the file explorer, select the file to be uploaded and click Open.
The upload button stays disabled till a file upload is completed. -
Upon successful file upload, the file will be displayed in the list pane.
| Navigating away from the Briefcase tab to any other tab, while the file upload is in progress, will cancel the upload. |
| The maximum file size allowed for upload is the same which is set by the Administrator for uploading the attachments in Mail. |
Downloading a file from Briefcase
-
Click Cloud Storage → Briefcase.
-
In the file list pane, select a file to be downloaded.
-
Click on the Download present in the toolbar above the preview pane.
-
From the file browser window, choose a location to save the file.
-
The file is downloaded at the specified location.
-
The download option is also available in right-click context menu of the file, as well as on mouse hover on a file.
Previewing a Briefcase file
-
Click Cloud Storage → Briefcase.
-
In the file list pane, select a file for preview.
-
Preview is generated in the preview pane.
| If preview is not supported for the file type, then the preview will not be generated and an option to download the file will be displayed. |
| If multiple files are selected, then the count of the selected files is displayed in the preview pane. |
Sorting Briefcase Files
Briefcase files can be sorted according to Date, Name, Starred. The default sorting is based on Date.
Sorting files by Name
-
Click Cloud Storage → Briefcase.
-
From the toolbar above the file list pane, click
 .
. -
Select Name.
-
Clicking
 or
or  will apply the sorting in ascending or descending order.
Sorting files by Starred
-
Click Cloud Storage → Briefcase.
-
From the toolbar above the file list pane, click
. -
Select Starred.
-
Clicking
or will apply the sorting in ascending or descending order.
Sorting files by Date
-
Click Cloud Storage → Briefcase.
-
From the toolbar above the file list pane, click
. -
Select Date.
-
Clicking
or will apply the sorting in ascending or descending order.
Briefcase Search
You can type the name of the file or extension of the file in the Search box at the top of the Briefcase page.
Briefcase Search box
-
Click Cloud Storage → Briefcase.
-
Type few words of the file or file extension and click
 .
. -
A new search tab will display the files matching the search criterion.
| Advanced Search option is not available for Briefcase. |
Creating Briefcase Folders
New folders can be created to organize files.
-
Click Cloud Storage → Briefcase
-
In the left sidebar, hover over the Folders and click
. -
Enter the name for the new folder and press Enter.
-
The folder will be created and appear under Folders.
Creating Subfolders
Subfolders can be created under Briefcase.
-
Click Cloud Storage → Briefcase.
-
In the left sidebar, right-click on Briefcase or any other folder, and then click on "Create subfolder" option.
-
Enter the name for the subfolder and press Enter.
-
The subfolder will be created and appear under its parent folder.
Share Briefcase Folders
The default Briefcase folder or any newly created folder appearing under Folders can be shared with the other users.
Steps to share a folder
-
Click Cloud Storage → Briefcase.
-
In the left pane, right-click a folder to share.
-
From the context menu, choose Share.
-
Choose appropriate permission from Sharing Permissions dropdown.
- View
-
Users can view all files under the shared folder but cannot make any changes to that folder.
- View, edit, add and remove
-
Users have permission to view and edit the contents of a folder, create new subfolders, upload files, and delete items from the folder.
- View, edit, add, remove, and administer
-
Users have permission to view and edit the content of a shared folder, create new subfolders, upload files, delete items from the shared folder, and share the folder with others.
-
Enter the email address(s) with whom you want to to share the folder.
-
Click Save for changes to take effect.
| The folders shared with the user, will appear under Shared Folders |
| If the folder is shared with View only permission, the Upload and Delete buttons are disabled. |
Move Briefcase files
If custom folders are created, then Uploaded files can be moved from one folder to another.
Move files using drag and drop
-
Click Cloud Storage → Briefcase.
-
Select the file in list pane and drag it onto a folder in left pane and drop it.
-
The file is moved to that folder.
Move files using Move option
-
Click Cloud Storage → Briefcase.
-
Select a file to be moved.
-
Click the Move option in the toolbar above Preview Pane.
-
Select the destination folder.
-
The file is moved to that folder.
If there are a lot of folders, then a folder can be searched by typing the name in .
Star a Briefcase file
This feature is like flagging the file so that it stands out and appears with a star in the file list.
Star from Right-click menu
-
Click Cloud Storage → Briefcase.
-
Right-click a file and select Star from the context menu. You may also mouse hover a file, and click the Star icon.
-
A
will appear next to the file name.
Star from More menu
-
Click Cloud Storage → Briefcase.
-
Select a file.
-
Click on More in the toolbar above the preview pane.
-
Select Star.
-
A
will appear next to the file name.
Unstar a Briefcase file
This feature removes the flag set for a file.
Unstar from right-click menu
-
Click Cloud Storage → Briefcase.
-
Right-click a file and select Clear Star from the context menu.
-
A
will disappear for the file.
Unstar from More menu
-
Click Cloud Storage → Briefcase.
-
Select a file.
-
Click on More in the toolbar above the preview pane.
-
Select Clear Star.
-
A
will disappear for the file.
Deleting a Briefcase file
A briefcase file can be deleted in two ways.
From Right-click menu
-
Click Cloud Storage → Briefcase.
-
Right-click on a file select Delete.
-
The file is deleted and moved to the Trash folder.
Using Delete button
-
Click Cloud Storage → Briefcase.
-
Select a file.
-
Click Delete in the toolbar above the preview pane.
-
The file is deleted and moved to the Trash folder.
Move custom Briefcase folders/subfolders
If custom folders/subfolders are created, then those folders can be moved to other folders.
-
Click Cloud Storage → Briefcase.
-
Right-click on a folder/subfolder and select Move folder from the context menu.
-
Select the destination folder.
Rename custom Briefcase folders/subfolders
-
Click Cloud Storage → Briefcase.
-
Right-click on a folder/subfolder and select Rename from the context menu.
-
Type the new name for the folder/subfolder in the text box.
-
Press Enter to save.
|
If there are a lot of folders, then a folder can be searched by typing the name in |
Attaching files from briefcase to email
| This option will only be available when Briefcase feature is enabled for the user. |
Files available in Briefcase can be attached to an Email.
-
In the mail composer, click
to open file attach options. -
Clicking Attach files from Briefcase brings up a file explorer.
-
Navigate to the folder, select the file to attach and click Attach. The selected file now appears as an attachment.
| Inline images cannot be added from Briefcase. |
Uploading files from email to briefcase
Files from the email can be directly uploaded to Briefcase.
-
Select the email which has attachments.
-
In the reading pane, hover over the file and click
 .
. -
In the file explorer, select a folder and click Save.
-
Upon successful file upload, a message will be displayed Attachment added to Briefcase.
Managing your Profile
This feature in Zimbra helps change your login password and upload a profile image. Recipients of your email, however, may not see your image when they receive your emails.
Change Password
This feature helps you change your password.
-
In the top right, click
 and choose Change Password. The Change Password dialog appears.
Change Password dialog also appears when your password has expired, and you attempt to login. -
Enter the current password in the Current Password field.
-
Type in the new password in New Password field.
-
Type in the new password again in Confirm Password field.
-
Click Continue to apply the changes.
Change Profile Image
-
In the top right, click
and choose Change Profile Image. The Change Profile Image dialog appears. -
Click inside the bordered area to launch a file browser window. Navigate to the image’s location and click Open.
-
Alternatively, you can drag and drop your image inside the bordered area.
-
-
Select the portion of the photo you want to show. The frame with dashed borders can be resized and repositioned.
-
Click
 or
or  to rotate the picture a quarter turn left or right.
 -
Click Save to apply the changes.
Settings
Settings in Zimbra have multiple features like changing signatures, creating filters, and mail reading behavior being a few among many.
General
This section deals with storage, date & time format, and the default app version which you see after login.
Storage
This section of the Modern Web App displays the storage and the allocated space that you are using on the Zimbra server.
Date & Time
This section manages the date and time format used throughout the Modern Web App.
Date Format
There are 4 date formats to choose from:
- mm/dd/yyyy
-
January 9, 2021 appears as 01/09/2021.
- dd/mm/yyyy
-
January 9, 2021 appears as 09/01/2021.
- yyyy-mm-dd
-
January 9, 2021 appears as 2021-01-09.
- dd-mmm-yy
-
January 9, 2021 appears as 09-Jan-21.
Time Format
There are 4 time formats to choose from:
- h:mm
-
The time 9:21 AM appears as 9:21 AM.
- hh:mm
-
The time 9:21 AM appears as 09:21 AM.
- H:MM
-
The time 9:21 AM appears as 9:21.
- HH:MM
-
The time 9:21 AM appears as 09:21.
Zimbra Version
Here you choose the Zimbra version you want to use.
- Modern
-
Choose this option to use the Modern Web App.
- Classic
-
Choose this option to use the Classic Web App.
Viewing Email
Group emails into conversations
When you reply to an email, Zimbra groups responses together in conversations with the newest email on the top.
A conversation breaks off into a new conversation if the subject line changes.
-
Select
→ Settings. -
Under Viewing Email, check the box Enable Conversations to group the messages or uncheck this box to ungroup the messages.
-
At the bottom of the page, click Save.
Show Email Snippets
By default, Zimbra shows you snippets, or previews, of your messages in the email pane. If you do not need the snippets or feel that they make your Inbox look cluttered, you can turn the snippets off.
-
Select
→ Settings. -
Under Viewing Email, uncheck the box Show snippets to turn them off.
-
At the bottom of the page, click Save.
Group Emails by date
Zimbra, by default, groups your email conversations by date. So you see email groups like Today, Yesterday, Last week, and so on. You can disable this setting.
-
Select
→ Settings. -
Under Viewing Email, uncheck the box Group by date to ungroup the messages. Your emails appear sorted by date, but they do not appear in groups.
-
At the bottom of the page, click Save.
Email Preview Pane
The preview pane in Zimbra displays the selected email’s content.
-
Select
→ Settings. -
Under Viewing Email, click the Preview Pane drop-down.
- The preview pane on the right
-
The selected email’s content appears on the right of the email list.
- The preview pane on the bottom
-
The selected email appears in a pane on the bottom of the email list.
- None
-
The preview pane is disabled.
-
At the bottom of the page, click Save.
Message List Density
This setting controls the spacing between each email in the email list. Slim is the lowest, and Relaxed is the highest possible spacing between two emails in the email list.
-
Select
→ Settings. -
Under Viewing Email, click the Message list density drop-down.
-
At the bottom of the page, click Save.
Mark Emails as Read
Zimbra immediately marks a message as read when you select it. To change this behavior:
-
Select
→ Settings. -
Under Viewing Email, click the Mark as read drop-down.
- Immediately
-
The selected email is marked read the moment you click it.
- After 2 seconds
-
The selected email is marked read after 2 seconds.
- After 5 seconds
-
The selected email is marked read after 5 seconds.
- Never
-
The selected email stays unread until you mark it as read manually. For details, refer to reading pane tools.
-
At the bottom of the page, click Save.
Check for New Emails
Zimbra checks for new emails at regular intervals. You can, however, override the default settings.
-
Select
→ Settings. -
Under Viewing Email, click the Check for new mail drop-down.
-
You can choose a duration from the drop-down when Zimbra checks for new mail.
-
Click the reload icon beside Inbox to check for new emails Manually. This reload icon becomes visible when you hover the mouse on the Inbox.
-
Choose As new mail arrives to have Zimbra repeatedly check for new emails.
-
-
At the bottom of the page, click Save.
Sending Read Receipts
If requested by the sender, you can send a read receipt to confirm that you have opened their message.
In Zimbra, you can decline to send this read receipt, or have Zimbra ask you for confirmation.
-
Select
→ Settings. -
Under Viewing Email, click the Read receipts drop-down.
- Ask me
-
As soon as you open an email where a sender has requested a read receipt, you receive the prompt below.
-
Click
to decline to send a read receipt. -
Click Send read receipt to let the sender know that you have read the message.
-
- Ask Me
-
Choose this option to receive a confirmation before sending a read receipt.
- Always Send
-
Choose this option to send a read receipt every time to recipients.
- Never Send
-
Choose this option, so Zimbra does not send a read-receipt to recipients.
-
At the bottom of the page, click Save.
Email Notifications
You can choose when Zimbra notifies you of new emails.
- No notification
-
Zimbra does not notify you of new mail.
- When a new message arrives in Inbox
-
When you choose this option, Zimbra notifies you of new emails only when they arrive in Inbox. You are not notified of emails arriving in other folders due to filters.
- When a new message arrives in any folder
-
When you choose this option, Zimbra notifies you of each new email, irrespective of the folder in which they are arriving.
Writing Emails
Recall a sent message
You can recall an email you just sent, using the Undo Send feature. When enabled, as soon as you send an email, you get a notification with an UNDO button. This notification stays for only a few seconds. Once this notification disappears, recall is not possible.
The email remains in Drafts folder as long as this notification stays on the screen. When you click Undo, a notification informs you that sending has been canceled, and the email remains in your Drafts folder.
-
Select
→ Settings. -
Under Writing Email, check Enable against Undo send to enable this feature.
-
At the bottom of the page, click Save.
Request Read Receipts
You can ask readers for an acknowledgment every time they open your email.
-
Select
→ Settings. -
Under Writing Email, check Always against Request read receipts to enable this feature.
-
At the bottom of the page, click Save.
| Check Request Read Receipts on how to request your recipients for a read receipt on the fly — while composing emails. |
Save a Copy to Sent Folder
You can choose to not save your sent emails in Sent folder.
-
Select
→ Settings. -
Under Writing Email, uncheck Enable against Save a copy to Sent folder to disable saving emails in the Sent folder.
-
At the bottom of the page, click Save.
Delegation
You can let someone else manage your email account using Zimbra. Your delegates can read, send, and delete messages on your behalf. Messages your delegates send on your behalf show you as the sender.
-
Select
→ Settings. -
Under Writing Email, click Add delegates against Delegates.
-
Enter the name or email address of the delegate. Autocomplete feature lists suggestions; choose one that applies.
-
Choose whether delegates can Send As or Send on behalf of
- Send As
-
Delegates can send an email as you. Receivers of this email see your email address as the sender.
- Send on behalf of
-
Delegates send an email on your behalf. Receivers of this email see the delegate’s email address, as well as yours, as the sender.
Delegate’s Sent Email Settings
When a delegate sends an email, as you or on your behalf, you can manage where the sent messages are stored.
- Save sent messages to my Sent folder
-
The email sent by your delegate goes in your sent items folder.
- Save sent messages to delegate’s Sent folder
-
The email sent by your delegate goes in the delegate’s sent items folder.
- Save sent messages to my Sent folder, and delegate’s Sent folder
-
The email sent by your delegate goes in your sent items folder, and delegate’s Sent Items folder as well.
- Don’t save sent messages
-
Zimbra does not save the email sent by your delegate.
Account Settings
Add an Account
The Modern Web App can help you manage emails that you receive on other email addresses. Through the Modern Web App you can send and receive emails using these email addresses.
-
Select
→ Settings. -
Click Accounts in the left pane and choose
Add an account. -
Enter your email address in the Email Address field.
-
Enter the password for this email address in the Password field.
You may need to generate an app password, if your email provider mandates it. Once generated, use the app password in the Password field. -
Choose an account type, from POP or IMAP, that you want to configure with the Modern Web App.
-
Enter the username associated with this email address.
-
Type the mail server name in Mail Server field.
Please check with your email provider for this information.
Following are the details of some of the top service providers:
| Email Provider | IMAP Host / Port | POP Host / Port | Requires SSL | Requires Separate App Password | Enable "Less Secure App" Settings |
|---|---|---|---|---|---|
Gmail |
imap.gmail.com / 993 |
pop.gmail.com / 995 |
Yes |
No |
Yes |
Yahoo |
imap.mail.yahoo.com / 993 |
pop.mail.yahoo.com / 995 |
Yes |
Yes |
No |
AOL |
imap.aol.com / 993 |
pop.aol.com / 995 |
Yes |
Yes |
No |
Change the name on your Zimbra account
You can choose what name people see when you send them an email.
-
Select
→ Settings. -
Click Accounts in the left pane and choose an account from the right pane.
-
Under Your Name type in a name that you want people to see when they receive your emails.
-
At the bottom of the page, click Save.
Add a Persona
A persona helps you create a separate email identity to manage different types of email. E.g., you can create a persona for your business email and one for your personal email. By using a persona, you can specify a different From address or a Reply-To address for emails sent using that persona. All outgoing email displays the email address of the persona that you are using.
-
Select
→ Settings. -
Click Accounts in the left pane and choose
Add a persona. -
Type a name under Persona Name to identify your persona.
-
Choose an account from Send from this account.
-
Type in From name which recipients see as the sender’s name.
If this box is empty, persona will use From name of the sending account. -
Check Enable against Direct replies to a different email address, to receive replies on a different email address.
-
Enter a Reply-to address.
-
Type in a Reply-to name.
-
-
Click Add Persona to create this persona.
Two-factor Authentication
2FA Enabled
If two-factor authentication is only enabled but not enforced, you have the option to set up two-factor authentication at your convenience. Application usage is not affected.
-
Select
→ Settings. -
Click Accounts in the left pane and choose an account from the right pane to enable 2FA.
-
Click Set up two-factor authentication.
-
Enter your password when prompted.
-
Install an authentication app on your mobile device. Check supported apps.
-
Once installed, configure it on your smartphone.
-
Click Next on the Zimbra screen to begin the process of adding this account to the authentication app.
-
On the authenticator app, enter the code generated on the Zimbra screen.
-
Click Next.
-
Enter the code generated by your authenticator app and click Verify to complete the two-factor authentication setup.
Login Screen
Once set up, Zimbra prompts you to enter a code as part of every login. Enter the code displayed in your authenticator app at that time and click Verify.
Adding Trusted Devices
Once you have set up 2FA, Zimbra requires a code from the authenticator app on each login. You can set a device as a trusted device, so you do not have to enter an authentication code.
-
Launch Zimbra.
-
Enter an authorized username and password.
-
Check the box, Always trust this device.
-
Enter the two-factor authentication code from the authentication app.
-
Click Verify to login.
Next time when logging in from this device, you do not need to enter the authentication code.
Removing Trusted Devices
When you remove a device from the list of trusted devices, Zimbra prompts you to enter the authentication code next time you attempt to login using that device. To remove a device from the list of trusted devices, login from the device you wish to remove from the trusted devices' list.
-
Select
→ Settings. -
Click Accounts in the left pane and choose an account from the right pane.
-
Scroll down to Two-factor authentication segment.
-
Click Don’t trust this device.
| To remove all your devices from the list of trusted devices, except the one you have logged in from, click Don’t trust all other devices. |
Zimbra removes the target device from the list of trusted devices with immediate effect.
One-time codes
One-time codes are a set of ten codes used to complete the two-factor authentication when you do not have access to the authentication app. You can use each of these unique codes only once. Zimbra has an option to regenerate a new set of codes. We recommend that you copy and keep the codes in a safe place on the first available opportunity.
| You cannot log in to Zimbra if you do not have the codes or access to the authenticator app. |
Generate One-time Codes
-
Select
→ Settings. -
Click Accounts in the left pane and choose an account from the right pane.
-
Scroll down to Two-factor authentication segment.
-
Click 10 unused codes.
-
Click Copy to clipboard to copy the codes, paste in a text file, and save the file in a safe place.
| Once clicked, Copy to clipboard changes to Copied. The codes can be copied again by clicking Copied. |
Adding an App Passcode
Most desktop email programs have no way to ask for or enter the unique code to complete the two-factor authentication. Zimbra helps you generate a passcode that you can use instead of your real account password when configuring your email program.
-
Select
→ Settings. -
Click Accounts in the left pane and choose an account from the right pane.
-
Scroll down to Two-factor authentication segment.
-
Click Add a passcode.
-
Enter a name that helps you identify the app password you create and click Next.
-
Copy the code, paste in a text file, and save the file in a safe place. You need this code when configuring your email program.
-
Enter this passcode instead of your account password when configuring an email client with Zimbra.
Removing an App Passcode
-
Select
→ Settings. -
Click Accounts in the left pane and choose an account from the right pane.
-
Scroll down to Two-factor authentication segment.
-
Hover over the email application you want to remove.
-
Click
to remove the targeted application.
Disable 2FA
-
Select
→ Settings. -
Click Accounts in the left pane and choose an account from the right pane.
-
Scroll down to Two-factor authentication segment.
-
Click the button Remove two-factor authentication.
You can now log in without the need to enter an authentication code.
| You can disable 2FA only if the administrator has allowed this option for you. |
Reply-to Address
You can receive replies to your emails on a different address using this feature.
-
Select
→ Settings. -
Click Accounts in the left pane and choose an account from the right pane.
-
Scroll down to Reply-to-Address segment.
-
Check the box Receive replies to your sent emails at a different address.
-
Enter an email address where you’d like to receive replies for your emails.
-
Type in a name corresponding to the above email address.
-
At the bottom of the page, click Save.
Access your emails elsewhere
You can set a forwarding address in Zimbra. Zimbra forwards all your emails to the address specified here.
-
Select
→ Settings. -
Click Accounts in the left pane and choose an account from the right pane.
-
Scroll down to Access your mail elsewhere segment.
-
Check the box Forward: Zimbra forwards all your emails to the specified address so that you can check it there.
-
Enter an email address where you’d like to forward your emails.
-
From the drop-down, choose if Zimbra should keep a copy of the email received.
- Store and Forward
-
Zimbra keeps a copy of the email before forwarding it to the specified address.
- Delete and Forward
-
Zimbra deletes the email after forwarding it to the specified address.
-
At the bottom of the page, click Save.
Export
You can export all your emails, contacts, and calendars as a .tgz file.
To export individual folders, emails, contacts, or calendars, right-click those items and choose Export from the context menu.
-
Select
→ Settings. -
Click Accounts in the left pane and choose an account from the right pane.
-
Scroll down to Export and click Export.
Import
You can import all your emails, contacts, and calendars from a .tgz file.
-
Select
→ Settings. -
Click Accounts in the left pane and choose an account from the right pane.
-
Scroll down to Import and click Import.
Mobile or Desktop Configuration
IMAP, CalDav, and CardDav are an open set of rules for synchronizing your emails, contacts, calendars, and tasks with mobile or desktop devices. Zimbra creates mobile profiles which you can download, configure, and sync your mobile devices.
Android OS natively (without the help of external apps) supports IMAP for managing email; however, CalDAV and CardDAV require installation of apps like OpenSync. Mac and iOS have provisions for working with CalDAV and cardDAV; hence, you do not need any Mac or iOS app to work with them.
This section explains how to export profiles. To import these profiles to your mobile devices, you may want to look at below help articles:
Export Profiles
There are five profiles available to download and sync with devices that support this.
- Email, Calendar, and Tasks, Contacts
-
This profile syncs Email, Calendar, Tasks, and Contacts on mobile devices with Zimbra.
- Calendar and Tasks, Contacts
-
This profile syncs only Calendar, Tasks, and Contacts on mobile devices, with Zimbra; it does not sync emails.
- Calendar and Tasks
-
This profile syncs only Calendar and Tasks on mobile devices, with Zimbra; it does not sync emails and contacts.
- Contacts
-
This profile syncs only contacts on mobile devices, with Zimbra; it does not sync emails, calendars, and tasks.
-
This profile syncs only emails on mobile devices, with Zimbra; it does not sync contacts, calendars, and tasks.
-
Select
→ Settings. -
Click Accounts in the left pane and choose an account from the right pane.
-
Scroll down to Mobile or Desktop configuration segment.
-
Choose one of the profiles from the drop-down and click Download.
-
Choose a location to save the downloaded file. Zimbra requires this file when importing profiles to iOS or Android devices.
-
Import profiles to iOS
Import profiles to Android
Since Android — without external apps — supports IMAP only, you may need to check the instructions specific to the app you use for CardDAV and CalDAV.
ActiveSync
-
To setup ActiveSync on Outlook, refer to this guide :- https://wiki.zimbra.com/wiki/Exchange_ActiveSync(EAS)_Outlook_2013
-
To setup ActiveSync on Apple Devices, refer to this guide :- https://wiki.zimbra.com/wiki/Zimbra_Mobile_Installation_and_Setup_for_iPhone
Account Recovery
We always recommend adding an alternate email address to get account recovery instructions if you forget the login credentials to your email account.
-
Select
→ Settings. -
Click Account Recovery in the left pane.
-
Enter an email address where you would like to receive account recovery instructions.
-
Click Continue.
-
You receive a code on this alternate email address. Check your email and copy the verification code.
-
Paste in the above prompt to verify the alternate email address.
Password reset using "Forgot Password" feature
-
On the login page, click "Forgot Password?".
-
Enter the email address for which password needs to be reset and click Submit.
-
Click Request Code. The code is sent to alternate email address provided in Account Recovery section.
-
Copy the code and paste in the above prompt. Click Verify Code.
-
Click Reset Password and specify the new password for the user. Click Submit.
-
On successful password reset, "Password Reset Success!" is displayed on the screen.
-
Click Back to sign in to login with the new password for the user.
Signatures
With Zimbra, you can have two default signatures per account, plus additionals that you may choose to apply.
-
Select
→ Settings. -
Click Signatures in the left pane.
-
To set a signature to be used while composing an email, draft your signature against the Standard signature field.
-
To set a signature to be used while replying to or forwarding an email, draft your signature against the Reply or forward signature field.
-
Add a New Signature
-
Click
Add a signature. -
Specify a name of the signature.
-
Type in the signature’s contents and click Save.
-
To delete a signature click
Remove signature.
-
Out of Office settings
With Zimbra, you can send out-of-office replies for any duration you specify.
-
Select
→ Settings. -
Click Out Of Office in the left pane.
-
Check the box Enable automatic response during these dates (inclusive).
-
Specify a From date.
-
Specify an Until date.
-
If the until date is uncertain, check the box No end date.
-
-
Type a response that you’d want to send while you are out of office.
-
Test out the response by clicking Send sample copy to me.
-
Out of Office replies for external senders
You can choose if you want to send an out-of-office response to senders who are not in your organization (external senders).
Against External Senders there are three options in the dropdown.
- Send standard automatic response
-
Choose this option to send the same response specified above, to external senders.
- Send external automatic response
-
Choose this option to bring up a text box and type a separate response to external senders. Click Send sample copy to me to test out this response.
- Do not send automatic response
-
Choose this option to avoid sending out-of-office response to external senders.
Filters — Automate management of your email
Zimbra allows you to create filters through which you can sort incoming messages into folders by defining some rules.
Create New Filter
-
Select
→ Settings. -
Click Filters in the left pane.
-
Click Add to create a new filter.
-
Set a Filter Name.
-
There are two filter editors — Basic and Advanced. By default, when creating a new filter Basic editor opens.
Zimbra takes these actions when it encounters mails that meet the defined criteria.
- Move to folder
-
You can move the filtered email to either Junk or Trash
- Mark as read
-
Leave the message in the inbox but mark it as read.
- Permanently delete
-
Discard the email, so it does not appear in the Trash folder.
- Forward to
-
Redirect the email to another email address.
- Star
-
Flag the email so that it stands out and appears with a star in the email list.
- Tag With
-
Mark an email with tags that you have created. For more information check tags.
Basic
In the basic editor, you can specify only one action to affect emails that meet the filter criteria. E.g., you can only mark it read or move it to trash; you can’t do both. To perform multiple actions on emails matching specific criteria, check advanced mode.
-
Choose if the incoming mails have to meet any one or all of the defined criteria.
-
Define the conditions that an email has to meet for the defined action to take effect.
-
Under Then choose what happens with the filtered email. You can choose only one action.
Advanced
In the advanced editor, you can specify multiple actions to affect emails that meet the filter criteria. E.g., you can mark it read and move it to trash.
-
Click Switch to advanced.
-
Choose if the incoming mails have to meet any one or all of the defined criteria.
-
Define the conditions that an email has to meet for the defined action to take effect.
-
To add more conditions, click + Add a condition.
-
-
Under Then choose what happens with the filtered email. You can choose only one action.
-
To add more actions click + Add an action
-
| And do not process additional filters check-box stops other filters from running on a message which meets the criteria for multiple filters. |
Managing Filters
-
Select
→ Settings. -
Click Filters in the left pane.
-
The right pane lists all the filters that you have created so far.
-
Click and drag
 to raise or lower the filter priority.
 -
Check or uncheck a filter to enable or disable it.
-
Click
against a filter to bring up options like Details, Run, Edit, and Delete.- Details
-
Lists the conditions for an email to meet and the action to take when an email meets the filter criteria.
- Run
-
Choose an account and then folder(s) on which to run the filter.
- Edit
-
Opens the appropriate editor — Basic or Advanced — to edit a filter.
- Delete
-
Prompts a confirmation dialog before deleting a filter.
-
Block and Allow senders
You can block messages from specific email addresses or domains from reaching your inbox; you can also allow specific email addresses and domains, so their emails reach you every time. When you add an email address or domain to your blocked senders' list, Zimbra blocks all messages from that sender.
Block senders from sending you email
-
Select
→ Settings. -
Click Blocked and Allowed Senders in the left pane.
-
Under Blocked Senders and Domains, enter the email address or domain that you want to block and click Block.
| Zimbra removes emails by blocked senders from the server; they do not appear in either Junk or Trash. |
Allow senders
If you want to remove someone from the blocked senders' list, follow the instructions below.
-
Select
→ Settings. -
Click Blocked and Allowed Senders in the left pane.
-
Under Blocked Senders and Domains, select the email address or domain that you want to unblock and click Remove.
Stop messages from going into your Junk Email folder
Messages from these senders and domains bypass spam filters and are always delivered.
-
Select
→ Settings. -
Click Blocked and Allowed Senders in the left pane.
-
Under Allowed Senders and Domains, enter the email address or domain that you want to receive emails from and click Allow.
| If the same email address is in the whitelist and the blacklist, whitelisting takes precedence. |
Offline mode
With Zimbra, you can work offline to avoid incurring cellular data charges or to stop Modern Web App from attempting to send and receive messages over a slow network connection. You can manage and compose mail, contacts, and appointments when you are offline. The changes sync when you are back online.
-
Select
→ Settings. -
Click Offline Mode in the left pane.
- Enable offline mode
-
Copies of recent items are saved locally. They are synchronized with the server when Modern Web App goes online.
- Disable offline mode
-
Modern Web App is online, and all changes synchronize in real-time.
Security and Activity
This setting enables viewing of emails and shows the list of devices where Zimbra is open with your credentials. You have the option to sign out from all other instances except this one.
Security
-
Select
→ Settings. -
Click Security and Activity in the left pane.
-
To block images from appearing everywhere choose Never by default.
-
To block images from appearing only in Junk folder choose Always, except in Junk folder.
-
Activity
-
Select
→ Settings. -
Click Security and Activity in the left pane.
-
Click Sign out against sessions that you are no longer using or you don’t recognize.
Calendar and Reminder Settings
This setting controls,
-
default calendar to create events in,
-
the day when a week starts,
-
time when a typical workday starts and ends,
-
calendar events time zone,
-
if the calendar, when shared, a delegate can manage through a mobile device, and
-
the email address to send event reminders.
General Calendar Settings
-
Select
→ Settings. -
Click Calendar and Reminder Settings in the left pane.
-
Choose a Default Calendar from the drop-down. If you have not added a calendar, the drop-down does not have any other entries.
-
Choose a Start of Week from the drop-down.
-
Choose a time when your workday starts from Start of Workday drop-down.
-
Specify a time when your workday ends from the End of Workday drop-down.
-
Set a time zone for your workdays under Workday Time Zone.
-
Alternatively, check the box Show timezones for start and end times to set time zones on the fly.
-
-
Check the box Enable delegation for CALDav clients against Sharing to allow delegated users to manage your shared calendars using their mobile devices.
Event Reminders
You can specify an email address to receive event reminders.
-
Select
→ Settings. -
Click Calendar and Reminder Settings in the left pane.
-
Enter the email address in Send reminders by email to field to send event reminders to that email address.
-
Check the box Show Browser Notifications to receive event reminders via browser notifications.
-
Specify a Default Reminder Time before which to receive event reminders.
-
Check the box to enable Show Reminders for Past-Due Events to receive reminders for events that are past due. This way, you receive reminders for events that you might have unknowingly missed.
Free Busy Permission
You can use this setting to control who can see when you are free or busy. Event organizers can click on Show Availability when scheduling an event to see when you are available for a meeting.
Choose an option from the dropdown.
- Everyone
-
All organizers can view the time when you are free or busy.
- Internal users only
-
Your Free/Busy information is available to all users within your organization.
- Internal users on my domain only
-
Your Free/Busy information is available only to users within your domain. Users in your organization who have email addresses on another domain can not view your Free/Busy information.
- These internal users only
-
Enter email addresses, below this dropdown, of users who can view your free/busy information. Click Add after entering each email address. The field Enter an email address is active only for this option.
- None
-
Your free/busy information is hidden from everyone, without exception.
Language Settings
Zimbra now offers these languages as the display language.
-
Chinese
-
English (United States)
-
French
-
German
-
Hindi
-
Indonesian
-
Italian
-
Japanese
-
Portuguese
-
Spanish
-
Thai
To change the Zimbra display language to one of the above languages, perform the following steps.
-
Select
→ Settings. -
Select Language.
-
Choose a language you prefer.
-
Click Save.
Zimbra display language changes to the selected language.
| If the system’s language and the user’s Zimbra account language are different, then it is recommended that users turn off the browser’s translation feature since it may cause translation issues. |
Activating Zimlets in Modern Web App
| To enable zimlets, please get in touch with your organization’s Zimbra Collaboration administrator. |
This section discusses how to activate zimlets for your account once an administrator enables them.
Dropbox
With this integration you can connect your Dropbox account to Zimbra for saving and sharing files from your Dropbox.
Activate the Dropbox Zimlet
| During the activation process, you may encounter a Not Found error. The error goes away automatically and does not require any intervention. |
-
Select
→ Settings. -
Select Dropbox Integration from the left pane.
-
Click Activate
-
Sign In to your Dropbox account.
-
Click Allow to authorize Zimbra to access your Dropbox.
Dropbox’s authentication works in the background and hence you may have to wait for sometime before Dropbox activates. -
Click Save.
Save all Attachments to your Dropbox
| Some Users may not see the download link above their attachments. In such a case, please follow the steps mentioned in Save an Attachment to your Dropbox |
Once this zimlet is activated, emails containing attachments appear with links to save the attachments.
-
On an email containing attachments, click the Save to Dropbox link — just above the attachments.
-
Sign In to your Dropbox account, if requested.
-
Click Save to save all attachments to Dropbox.
-
Click Remove against an attachment to remove it.
-
A notification confirms file upload to Dropbox.
Save an Attachment to your Dropbox
-
Click
 on an attachment.
 -
Click Dropbox from the list of download locations.
-
Sign In to your Dropbox account.
-
Click Save to save all attachments to Dropbox.
-
A notification confirms file upload to Dropbox.
Attaching a file from Dropbox
-
When composing an email, click
and select Add files from Dropbox. -
Click Select files to attach to add the files as attachments in your email.
-
Click Select files to link to add the files as links in your email.
-
-
Sign In to your Dropbox account.
-
From the Dropbox window, select the files to attach.
-
Compose your message and click Send to send the email with attachment from Dropbox.
Send Large files via Dropbox
-
When composing an email, click
and select Add from my Computer. -
Select the file you want to attach and click Open.
-
Select Dropbox from the presented options.
-
Click Save in the Dropbox window to save your file to be shared from Dropbox.
-
The Inserting Link window appears while the file saves to your Dropbox. Once completed, the link appears in your email message.
-
Compose your message and click Send to send the email with the Dropbox link.
Google Drive
With this integration you can connect your Google Drive account to Zimbra for saving and sharing files from your Google Drive.
Activate the Google Drive Zimlet
| During the activation process, you may encounter a Not Found error. The error goes away automatically and does not require any intervention. |
-
Select
→ Settings. -
Select Google Drive Integration from the left pane.
-
Click Activate
-
Sign In to your Google Drive account.
-
Click Allow to authorize Zimbra to access your Google Drive.
Google Drive’s authentication works in the background and hence you may have to wait for sometime before Google Drive activates. -
Click Save.
Save all Attachments to your Google Drive
| Some Users may not see the download link above their attachments. In such a case, please follow the steps mentioned in Save an Attachment to your Google Drive |
Once this zimlet is activated, emails containing attachments appear with links to save the attachments.
-
On an email containing attachments, click the Save to Google Drive link — just above the attachments.
-
Sign In to your Google Drive account, if requested.
-
Click Save to save all attachments to Google Drive.
-
Click Remove against an attachment to remove it.
-
A notification confirms file upload to Google Drive.
Save an Attachment to your Google Drive
-
Click
on an attachment. -
Click Google Drive from the list of download locations.
-
Sign In to your Google Drive account.
-
Click Save to save all attachments to Google Drive.
-
A notification confirms file upload to Google Drive.
Attaching a file from Google Drive
-
When composing an email, click
and select Add files from Google Drive. -
Click Select files to attach to add the files as attachments in your email.
-
Click Select files to link to add the files as links in your email.
-
-
Sign In to your Google Drive account.
-
From the Google Drive window, select the files to attach.
-
Compose your message and click Send to send the email with attachment from Google Drive.
Send Large files via Google Drive
-
When composing an email, click
and select Add from my Computer. -
Select the file you want to attach and click Open.
-
Select Google Drive from the presented options.
-
Click Save in the Google Drive window to save your file to be shared from Google Drive.
-
The Inserting Link window appears while the file saves to your Google Drive. Once completed, the link appears in your email message.
-
Compose your message and click Send to send the email with the Google Drive link.
Onedrive
With this integration you can connect your Onedrive account to Zimbra for saving and sharing files from your Onedrive.
Activate the Onedrive Zimlet
| During the activation process, you may encounter a Not Found error. The error goes away automatically and does not require any intervention. |
-
Select
→ Settings. -
Select Onedrive Integration from the left pane.
-
Click Activate
-
Sign In to your Onedrive account.
-
Click Allow to authorize Zimbra to access your Onedrive.
Onedrive’s authentication works in the background and hence you may have to wait for sometime before Onedrive activates. -
Click Save.
Save all Attachments to your Onedrive
| Some Users may not see the download link above their attachments. In such a case, please follow the steps mentioned in Save an Attachment to your Onedrive |
Once this zimlet is activated, emails containing attachments appear with links to save the attachments.
-
On an email containing attachments, click the Save to Onedrive link — just above the attachments.
-
Sign In to your Onedrive account, if requested.
-
Click Save to save all attachments to Onedrive.
-
Click Remove against an attachment to remove it.
-
A notification confirms file upload to Onedrive.
Save an Attachment to your Onedrive
-
Click
on an attachment. -
Click Onedrive from the list of download locations.
-
Sign In to your Onedrive account.
-
Click Save to save all attachments to Onedrive.
-
A notification confirms file upload to Onedrive.
Attaching a file from Onedrive
-
When composing an email, click
and select Add files from Onedrive. -
Click Select files to attach to add the files as attachments in your email.
-
Click Select files to link to add the files as links in your email.
-
-
Sign In to your Onedrive account.
-
From the Onedrive window, select the files to attach.
-
Compose your message and click Send to send the email with attachment from Onedrive.
Send Large files via Onedrive
-
When composing an email, click
and select Add from my Computer. -
Select the file you want to attach and click Open.
-
Select Onedrive from the presented options.
-
Click Save in the Onedrive window to save your file to be shared from Onedrive.
-
The Inserting Link window appears while the file saves to your Onedrive. Once completed, the link appears in your email message.
-
Compose your message and click Send to send the email with the Onedrive link.
Slack
The Slack integration helps you connect your Slack account to Zimbra for quickly initiating conversations using Slack. With this integration you can see if other users in your organization are online (if they have set the Slack integration up), launch private chat with users, and even continue an email thread in a conversation on Slack.
Getting Started by Authorizing Slack
| During the activation process, you may encounter a Not Found error. The error goes away automatically and does not require any intervention. |
-
Select
→ Settings. -
Select Slack Integration from the left pane. Here you can add or remove your Slack workspaces to integrate them with the Modern Web App.
-
Click Sign In To Workspace.
Slack’s authentication works in the background and hence you may have to wait for sometime before Onedrive activates. -
Select a workspace from the dropdown in the top-right corner of the window and click Allow to add it.
-
The workspace name and logo will then appear in the Settings panel. You will have to repeat this process for each workspace you would like to add, in order for any integration features to work properly with that workspace.
-
To remove a workspace, simply click the Trash icon next to it. It will disappear from the window.
Checking User Presence and Sending Direct Messages
You can check the active / away status of users in your contacts, calendar items, or email conversations for each of the workspaces you belong to. From there, you can easily start a direct message conversation with that user.
-
Hover over a name / email in the address bar of a sent or received email message or draft, or in the Invitees section of a calendar item.
If no Slack indicator appears, the user is not a member of any of your Slack workspaces. A green dot indicates that they are active on at least one of your workspaces, while an orange dot indicates they are away from all workspaces.
-
If the user is a member of only one of your workspaces, clicking on the indicator button will start a direct message conversation with that user and send you to it in the Slack app.
-
If the user is a member of more than one of your workspaces, a down caret will appear when you hover over the indicator button. Clicking the button displays a list of the common workspaces between you and the user, and their presence status for each. Clicking on any of these workspaces will start a direct message conversation in that workspace and send you to it in the Slack app.
-
You can also check a user’s workspace presence status in the Contacts tab.
-
Click Contacts.
-
Select a contact.
-
If the contact is a member of one of your workspaces, a presence indicator for that workspace appears under 'Slack' on the contact card.
-
Click a workspace to start a direct message conversation with your contact.
-
Converting an Email Conversation to a Private Slack Channel
You can generate a new channel in a Slack workspace to continue an email conversation.
-
Click
More at the bottom of an email conversation. -
Click Start Slack Conversation.
-
A modal displays your workspaces and the number of users in the email conversation that are members of each workspace.
-
Click one of the membership tallies that is not 'full' (green) to view the list of users from the email conversation who do not belong to that workspace.
-
Click the workspace where you would like to start the new channel.
-
You will be sent to that workspace in your Slack app, where a new private channel will be created under the subject of the email conversation and the current date and time (subject_date). A bot will start the channel by posting the content of the email message, and all of the users from the conversation that are members of that workspace will be invited to join.
Zoom
This integration offers you the opportunity to connect your Zoom account to Zimbra Cloud so that you can automatically create a Zoom Meeting linked to your calendar event. Any changes made to your calendar event will be reflected in the Zoom meeting automatically.
Activate the Zoom Zimlet
| During the activation process, you may encounter a Not Found error. The error goes away automatically and does not require any intervention. |
-
Select
→ Settings. -
Select Zoom Integration from the left pane.
-
Click Activate
-
Sign In to your Zoom account.
-
Click Allow to authorize Zimbra to access your Onedrive.
Zoom’s authentication works in the background and hence you may have to wait for sometime before Onedrive activates. -
Click Save.
Create a Zoom Meeting for your Calendar Event
-
Select the Calendar tab.
-
Click the New Event in the top left.
-
Fill out the event details.
-
Click Make it a Zoom Meeting.
-
The Location field now contains a Zoom Meeting URL.
-
Click Save.
Edit a Zoom Meeting
-
Select the Calendar tab.
-
Click Event, and click Edit.
-
Update the event details and click Save.
Join a Zoom Meeting
-
Select the Calendar tab.
-
Click Event, and click Edit.
-
To join the meeting, click Join Zoom Meeting.
Jitsi
This integration helps you to update the details of Jitsi meeting URL in the Calendar Events.
Create a Jitsi Meeting for your Calendar Event
Admin has setup the Jitsi server for your organization
-
Select the Calendar tab.
-
Click the New Event in the top left.
-
Fill out the event details.
-
Click Make it a Jitsi Meeting.
-
The Location field now contains a Jitsi Meeting URL.
-
You may join the Jitsi meeting now by clicking Join Jitsi meeting
-
Click Save to save the event details.
Admin has not setup the Jitsi server for your organization
| Please make sure your organization’s policy allows you to use public video conferencing solution. |
-
Select the Calendar tab.
-
Click the New Event in the top left.
-
Fill out the event details.
-
Click Make it a Jitsi Meeting.
-
Location field now contains a Jitsi meeting URL. This URL is created using the Jitsi’s publicly available free video conferencing solution.
-
Click Save to save the event details.
Video Call Preferences
The Video Call Preferences integration helps you to setup Video Call providers, which can be used for your calendar events. Using this intergration, users can configure details of thier existing accounts with video call providers like Jitsi, WebEx, Google Hangouts, Zoom, Skype, Lifesize, or others. Please note that this is only an integration and users need to have an existing account with these video call providers.
Setup Video Call Preference for your meetings
Steps for selecting pre-populated providers:
-
Select
→ Settings → Calendars and Reminders → Video Call Settings. -
Specify the name of the Video Call provider and Meeting URL by clicking Add a Video Call Provider
-
Select the provider from the Name: field. For example, if you want to setup Webex Event, select Webex.
-
Update the meeting room URL provided by the Video Call provider in the URL text box. Below is an example:
If the company Webex URL is https://abc.webex.com and user is john.doe, and the meeting room URL is "https://abc.webex.com/john.doe", then specify "https://abc.webex.com/john.doe" in the URL text box.
-
Click Save
Steps for specifying new provider:
-
Select
→ Settings → Calendars and Reminders → Video Call Settings. -
Click Add a Video Call Provider
-
In the Name: field, specify the name of the provider
-
Update the meeting URL provided by the Video Call provider in the URL text box.
-
Click Save
Update video call provider details in a Calendar Event
-
Select the Calendar tab.
-
Click the New Event in the top left.
-
Fill out the event details.
-
Click on the button of the video call provider.
-
The Location field now contains the Meeting URL which was setup by the user in Video Call Preference setting.
-
Click Save.
Zimbra Connector for Outlook (ZCO)
This section will guide you to download Zimbra Connector for Outlook and its Setup.
Downloading ZCO
You can download the ZCO installer in two ways:
Through Download Zimbra Connector for Outlook Zimlet
-
Login to Modern UI.
-
Select
. -
Click on "Outlook Connector". You will be redirected to the ZCO Download page.
| If this option is not available on your system, please contact your system administrator. |
Through ZCO Download link
You can refer to ZCO Download’s Page :- https://www.zimbra.com/downloads/zimbra-connector-for-outlook/
Setup and Installation
-
You can refer to the admin guide for customizing the ZCO installer :- https://zimbra.github.io/zm-windows-comp/latest/ZCS_Connector_For_Outlook_Admin_Guide.html
-
You can refer to the user guide for setup, installation and ZCO Features :- https://zimbra.github.io/zm-windows-comp/latest/ZCS_Connector_For_Outlook_User_Guide.html