This document is applicable for Zimbra Daffodil versions 10.0 and 10.1.0.
License
 Synacor, Inc., 2022-2023
© 2022-2023 by Synacor, Inc. Zimbra Daffodil (v10) NG Modules Migration Guide
This work is licensed under the Creative Commons Attribution-ShareAlike 4.0 International License unless another license agreement between you and Synacor, Inc. provides otherwise. To view a copy of this license, visit http://creativecommons.org/licenses/by-sa/4.0 or send a letter to Creative Commons, PO Box 1866, Mountain View, CA 94042, USA.
Synacor, Inc., 2022-2023
505 Ellicott Street, Suite A39
Buffalo, NY 14203
US
Beta Warning: This migration utility is being released as a beta utility and should be tested on dev/test environment(s) before using it on production data.
Before you migrate
Please review the following information before you decide on migration.
-
There are certain pre-requisites that needs to be completed before migration. Please refer to Pre-requisites section for more details.
-
Order of migration is very important. Please refer to Order of migration section for more details.
-
ActiveSync calendar sharing will not be supported until all 9.0./8.8.15 NG accounts are moved to Zimbra Daffodil (v10).
-
While migrating ActiveSync module, we need to execute additional steps. Please refer to Zimbra Mobile section for more details on Local Migration approach or refer to Zimbra Mobile section for more details on Remote Migration approach.
Supported Migration Paths
|
As of now, Migration of only the Rolling-Upgrade environment running on 8.8.15/9.0.0 versions with NG modules is supported. Migration of all the other types of environment - Single-Node or Multi-Node is currently not supported.
Introduction
The NG Migration Utility will help the customer’s who are running Zimbra 8.8.15/9.0.0 servers with NG modules to migrate the NG data to Zimbra Collaboration Daffodil (v10) servers. This utility is completely CLI based utility and has to be executed as zimbra user.
Zimbra Collaboration when installed with NG modules installs the following modules:
-
Hierarchical Storage Management.
-
Backup & Restore.
-
Mobile - ActiveSync.
-
Device Management - ABQ.
-
Delegated Admin.
-
Drive.
-
Connect.
This migration guide is a quick start guide that describes the steps needed to migrate the NG modules to Zimbra Collaboration Daffodil (v10).
| The migration is only supported from Zimbra Collaboration 8.8.15 and 9.0.0 versions running the latest patch release. |
| This migration utility currently does not support the migration of Zimbra Connect data. |
This guide will not cover the upgrade of the setup. Please refer to the upgrade guide to upgrade the servers. Please note that the mailbox nodes should not be upgraded. The data from the mailbox nodes will be migrated to Zimbra Daffodil (v10) mailbox nodes through this utility.
Audience
This migration guide assumes you have a thorough understanding of system administration concepts and tasks and are familiar with email communication standards, security concepts, directory services, and database management.
Details and Pre-requisites of Your Server Environment
Supported server architecture
A multi-node environment, where Zimbra MTA, the Zimbra LDAP server, and the Zimbra mailbox are installed on separate nodes.
Following is the graphical presentation of the setup:
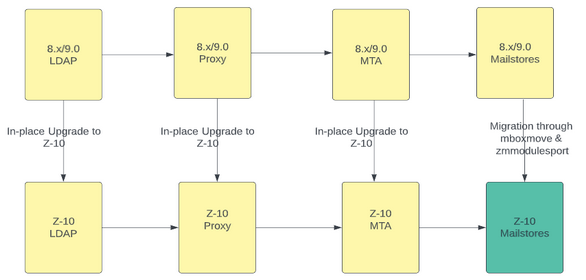
Pre-requisites
With reference to above setup, following would be the pre-requisites to migrate the data from 8.8.15/9.0.0 NG mailbox server to Zimbra Collaboration Daffodil (v10) mailbox server:
-
Perform an in-place upgrade of the following servers from 8.8.15/9.0.0 to Daffodil (v10):
-
LDAP
-
Proxy
-
MTA
-
-
Create a new Daffodil (v10) mailbox server. Please note that no configuration or user accounts should be created on this node. We would be migrating the user accounts from the 8.8.15/9.0.0 NG Mailbox server to this server.
| The single server architecture is not supported for NG Migration. |
Migration Utility
The migration utility will need to be installed on the 8.8.15/9.0.0 source server (NG) and destination (Zimbra Daffodil (v10)) mailbox servers.
Though the utility can be executed remotely, it is highly recommended to execute it locally. Meaning the data can be exported and imported from the destination server, but to avoid any issues that may arise due to the network, execute the export on source server locally and import on the destination server locally.
Retrying a failed/interrupted execution for Storage Management (SM)
The SM module implements a failure-recovery mechanism to retry failed items in case something fails during import and also resumes the execution if the process was interrupted (for example, after a power outage).
If the execution is interrupted, you can re-run the exact same command with the same parameters, and the import process will resume from where it left off.
If the execution was successful, the following message will be shown: "HSM module import completed successfully", otherwise, a list of errors will be displayed.
After fixing these errors, if no changes were made in the source server, just re-run the import command with the same parameters used last time. If you made any changes to the source server, please create a new migration file by running the export command using the same value for the --filename parameter so that the migration file is overwritten. Then, use this new migration file to import to the destination server by running the import command with the same parameters. During import, a message will display that the execution is being re-run, and only failed items will be processed.
The status of each execution is tied to the --filename parameter. If you want to retry/resume a previous migration process, you must use the same value for this parameter.
Download and install
The migration utility package is available on Zimbra’s public repository.
Following are the steps to download and install the migration utility.
-
On RHEL/CentOS system, execute as root:
yum install zimbra-modules-porter
-
On Ubuntu system, execute as root:
apt-get install zimbra-modules-porter
After successful installation, a command zmmodulesport will be available on the server.
| This utility is version independent and can be installed on an 8.8.15 or 9.0.0 server. |
Following are the details on the supported migration modules:
NG Module |
Replaced by Zimbra-10 module |
Option in utility |
Hierarchical Storage Management |
Storage Management |
hsm |
Backup & Restore |
Backup & Restore |
backup |
Mobile |
Zimbra Mobile Sync |
mobile |
ABQ |
Zimbra Device Management |
mobile |
Delegated Admin |
Delegated Admin |
admin |
Drive |
Zimbra Briefcase |
drive |
Migration Data
The migration is divided in two parts:
-
System level modules.
-
Account level modules.
Following are the details on these modules:
-
System level modules:
-
Hierarchical Storage Management:
-
Volume details.
-
S3 Bucket details.
-
Policies.
-
-
Backup & Restore:
-
Backup & Restore settings for cos.
On Zimbra Daffodil (v10) destination server, you will need to create the cos and enable backup for it through Admin Console.
-
-
Mobile:
-
ActiveSync Sharing enabled/disabled flag for the users.
-
ABQ rules and states of devices.
-
-
Delegated Admin:
-
Delegated Admin’s with their assigned rights.
-
-
-
Account level modules:
-
Drive:
-
User’s Drive data.
-
-
Utility options
Option |
Short name |
Description |
Default value |
system / account |
Use this option to migrate system-level modules: admin, backup, hsm, mobile Or account-level modules: drive |
||
export/import |
Use export to gather data from the source server and create a migration file. Then, use import on the Zimbra 10 destination server |
||
--filename (required) |
-f |
The name of the file to use for the export or import process. The migration file(s) will be saved to /opt/zimbra/tmp/modules/{module_name}/{filename}.tgz |
|
--server |
-s |
Specify the server from which the import/export process will be executed. If import, this is the target server; if export, this is the source server. |
localhost |
--username |
-u |
The source or target server’s admin username |
admin |
--password |
-p |
The source or target server’s admin password |
|
--modules |
-m |
A list of modules to process separated by a comma |
* (All modules) |
--accounts |
-a |
A list of accounts to process separated by a comma |
(All account). This option is applicable for *drive module only. |
Exporting the data
The data can be exported by using the export option with the utility. When executed, the file containing the data is created under /opt/zimbra/tmp/modules/. These command needs to be executed as zimbra user.
Exporting system data
The system data can be exported by using the system option with the utility.
Following are a few examples of exporting the system data:
-
Exporting HSM data:
su - zimbra
zmmodulesport system export --modules=hsm --filename hsm-data
This will create a file hsm-data.tgz under /opt/zimbra/tmp/modules/hsm.
-
Exporting Mobile data:
su - zimbra
zmmodulesport system export --modules=mobile --filename mobile-data --server=source.server.com
This will create a file mobile-data.tgz under /opt/zimbra/tmp/modules/mobile.
-
Exporting Delegated Admin data:
su - zimbra
zmmodulesport system export --modules=admin --filename delegated-admin-data --server=source.server.com
This will create a file delegated-admin-data.tgz under /opt/zimbra/tmp/modules/admin.
-
Exporting multiple modules - HSM, Mobile, Backup:
su - zimbra
zmmodulesport system export --modules=hsm,mobile,backup --filename multi-modules-data --server=source.server.com
This will create a file for each module under /opt/zimbra/tmp/modules/{module_name}/multi-modules-data.tgz.
For example, it would create 3 files as:
-
/opt/zimbra/tmp/modules/hsm/multi-modules-data.tgz.
-
/opt/zimbra/tmp/modules/mobile/multi-modules-data.tgz.
-
/opt/zimbra/tmp/modules/backup/multi-modules-data.tgz.
| If the --modules option is not specified, the utility will export data for all the modules and create the data files in their respective modules' directory. |
Exporting Drive data for accounts
The Drive data for the accounts can be exported by using the account option with the utility.
The account option supports following:
Option |
Description |
--accounts=* |
Export all accounts. |
--accounts=name@domain |
Export a single account. |
--accounts=name1@domain1,name2@domain2 |
Export multiple accounts |
--accounts=/path/to/accounts-file.txt |
Export accounts listed in the file. The accounts have to be listed on new lines. |
--accounts=domain |
Export all available accounts for the specified domain on the server. |
Following are few examples of exporting the account data:
-
Exporting Drive data for all accounts:
su - zimbra
zmmodulesport account export --modules=drive --filename all-drive-data --accounts=* --server=source.server.com
This command will create a file at /opt/zimbra/tmp/modules/drive/all-drive-data.tgz containing all the information related to the Drive module for all the accounts on the server.
-
Exporting Drive data for specific accounts:
su - zimbra
zmmodulesport account export --modules=drive --filename accounts-drive-data --accounts=jane@domain.com,doe@domain.com --server=source.server.com
This command will create a file at /opt/zimbra/tmp/modules/drive/accounts-drive-data.tgz containing all the information related to the Drive module for comma-separated accounts on the server.
| If the --accounts option is not specified, the utility will export data for all the accounts present on the server. |
-
Exporting Drive data for accounts to a file:
-
Execute migration utility and specify the filename in --accounts parameter:
su - zimbra zmmodulesport account export --modules=drive --filename account-drive-data --accounts=/path/to/account-file.txt --server=source.server.com -
This command will export accounts to /path/to/account-file.txt file in the following format:
-
account1@domain.com
account2@domain.com
account3@domain.com
-
Exporting Drive data by domain:
su - zimbra
zmmodulesport account export --modules=drive --filename account-drive-data --accounts=domain.com --server=source.server.com
This command will export accounts belonging to the specified domain in the accounts-drive-data.tgz file under the /opt/zimbra/tmp/modules/drive folder.
Importing the data
The data can be imported by using the import option with the utility. When executed, it will search for the files under /opt/zimbra/tmp/modules/. These commands needs to be executed as zimbra user.
It is recommended to copy the export files over to the destination server under /opt/zimbra/tmp/modules/ in their respective modules folder and then start importing the data. For example when copying over the hsm-data.tgz file, it has to be copied under /opt/zimbra/tmp/modules/hsm
Importing system data
The system data can be imported by using the system option with the utility.
Following are a few examples of importing the system data
-
Importing HSM data:
su - zimbra
zmmodulesport system import --modules=hsm --filename hsm-data --server=dest.server.com
This will search for a file hsm-data.tgz under /opt/zimbra/tmp/modules/hsm and start the import.
-
Importing Mobile data:
su - zimbra
zmmodulesport system import --modules=mobile --filename mobile-data --server=dest.server.com
This will search for file mobile-data.tgz under /opt/zimbra/tmp/modules/mobile and start the import.
-
Importing Delegated Admin data:
su - zimbra
zmmodulesport system import --modules=admin --filename delegated-admin-data --server=dest.server.com
This will search for file delegated-admin-data.tgz under the /opt/zimbra/tmp/modules/admin and start the import.
-
Importing multiple modules - Backup, Mobile, HSM:
su - zimbra
zmmodulesport system import --modules=hsm,mobile,backup --filename multi-modules-data --server=dest.server.com
This will search for file multi-modules-data.tgz under each module directory the /opt/zimbra/tmp/modules/{module_name}/ and start the import.
Importing Drive data for accounts
The Drive data for the accounts can be imported by using the account option with the utility.
The account option supports following:
Option |
Description |
--accounts=* |
Import all accounts. |
--accounts=name@domain |
Import a single account. |
--accounts=name1@domain1,name2@domain2 |
Import multiple accounts |
--accounts=/path/to/accounts-file.txt |
Import accounts listed in the file. The accounts have to be listed on new lines. |
--accounts=domain |
Imports all available accounts for the specified domain on the server. NOTE: Errors would be seen for accounts not available on the destination server. |
Following are a few examples of importing the account data:
-
Importing Drive data for all accounts:
su - zimbra
zmmodulesport account import --modules=drive --filename all-drive-data --accounts=* --server=dest.server.com
This command will search for the all-drive-data.tgz file under the /opt/zimbra/tmp/modules/drive folder and start the import.
-
Importing Drive data for specific accounts:
su - zimbra
zmmodulesport account import --modules=drive --filename account-drive-data --accounts=jane@domain.com,doe@domain.com --server=dest.server.com
This command will search for the accounts-drive-data.tgz file under the /opt/zimbra/tmp/modules/drive folder and start the import.
-
Importing Drive data for accounts from a file:
-
Following is the format of the file - account-file.txt
account1@domain.com
account2@domain.com
account3@domain.com
-
Execute migration utility and specify the filename in --accounts parameter:
-
su - zimbra
zmmodulesport account import --modules=drive --filename account-drive-data --accounts=/path/to/account-file.txt --server=dest.server.com
This command will import accounts present in for the /path/to/account-file.txt file and start import.
-
Importing Drive data by domain:
su - zimbra
zmmodulesport account import --modules=drive --filename account-drive-data --accounts=domain.com --server=dest.server.com
This command will search for the accounts-drive-data.tgz file under /opt/zimbra/tmp/modules/drive folder and start the import for the users of the specified domain.
Order of migration
The order of migrating the modules is very important as the system needs to ensure that the required data is present on the destination server when migrating the modules.
Following is the order you need to follow:
-
Migration of data - Step-1:
-
Storage Management - Export & Import.
-
Backup & Restore - Export & Manual Import.
-
Mobile - Export only.
-
Delegated Admins - Export.
-
Drive - Export only.
-
-
Migration of Accounts - Step-2:
-
Move users from Zimbra 9.0.0 or 8.8.15 mailbox nodes to Zimbra-10 mailbox node.
-
-
Migration of data - Step-3.
-
Mobile - Import.
-
Delegated Admins - Import.
-
Drive - Import.
-
Migrating the data - Through the Local Approach
In this approach, you will be executing the export operation on source server i.e. the 8.8.15/9.0 NG mailbox server and the import operations on the destination server, i.e. the Zimbra Daffodil (v10) mailbox server.
We will assume the following:
-
You are migrating the data on a rolling-upgrade setup comprising separate nodes of LDAP, Proxy, MTA, and Mailbox
-
In-place upgrade has been done for LDAP, Proxy and MTA nodes.
-
You have installed Zimbra Daffodil (v10) mailbox server and it does not have any accounts/configs created on it.
-
You will be performing the export and import operations locally.
-
Make sure the permissions of the data files are correct so that the
zimbrauser can read them. -
For the source server, we will use the hostname
source.server.com. -
For the destination server, we will use the hostname
dest.server.com.
With reference to our Order of migration section, we will be executing the export/import operation in that order.
Migration of Data — Step-1
We will now begin with migrating the data.
| The information is currently logged on the screen. It is recommended to use redirection for logging when performing export and import operations. |
Storage Management - Export & Import
Execute the migration utility on the source server and export the HSM data:
su - zimbra
zmmodulesport system export --modules=hsm --filename hsm-data --server=source.server.com >> /opt/zimbra/log/export.log
Copy the file /opt/zimbra/tmp/modules/hsm/hsm-data.tgz from the source server to the destination server under /opt/zimbra/tmp/modules/hsm/.
Execute the migration utility on the destination server and import the HSM data:
su - zimbra
zmmodulesport system import --modules=hsm --filename hsm-data --server=dest.server.com >> /opt/zimbra/log/import.log
This will start importing the data and start logging the information in the /opt/zimbra/log/import.log file.
Backup & Restore - Export & Manual Import
Execute the migration utility on the source server and export the Backup & Restore data:
su - zimbra
zmmodulesport system export --modules=backup --filename backup-data --server=source.server.com >> /opt/zimbra/log/export.log
Copy the file /opt/zimbra/tmp/modules/backup/backup-data.tgz from the source server to the destination server under /opt/zimbra/tmp/modules/backup/. When at Migration Data - Step-3 section, you will have to refer this file to get the list of cos and manually enable Backup for them through the Admin Console on Zimbra Collaboration Daffodil (v10).
| NG only supports Backup & Restore for cos. So the export file will only have cos for which Backup & Restore was enabled. |
Zimbra Mobile - Export Only
| If there are no Device Management(ABQ) rules applied OR mobile sharing is disabled for ActiveSync users, you can skip the steps to export/import the mobile data. |
| It is recommended to not make any changes in Device Management (ABQ) rules once you start the migration. |
To make sure the server is not loaded in handling the ActiveSync requests, you need to export/import the Mobile data in batches. Depending upon multiple factors like the number of users, size of the users, hardware resources, or network bandwidth, you can decide the user batch size.
Following are the steps you need to follow:
-
Using the migration utility, export mobile data for all the accounts on the source NG server.
-
Disable the ActiveSync feature for the batch of accounts on the NG mailbox server.
-
Using
zmmboxmove, move the batch of accounts from the NG mailbox server to Zimbra Daffodil (v10) mailbox server. -
Repeat steps 1-3 until all the accounts from the NG mailbox server are migrated to Zimbra Daffodil (v10) mailbox server.
-
Enable the ActiveSync feature in batches for the accounts.
| You will have to move the accounts to the destination server when you are at Step-2 of the migration process. |
Following are the instructions:
-
Execute the migration utility on the source server and export all the mobile data for all the users:
su - zimbra zmmodulesport system export --modules=mobile --filename mobile-data --server=source.server.com >> /opt/zimbra/log/export.log -
Copy the file /opt/zimbra/tmp/modules/mobile/mobile-data.tgz from the source server to the destination server under /opt/zimbra/tmp/modules/mobile/.
-
Disable the ActiveSync feature for the batch of users on the source server:
zmprov ma account@domain zimbraFeatureMobileSyncEnabled FALSE
| After the accounts are moved to destination server and mobile data is imported, please refer to After the Migration is complete section for post migration steps for the mobile users. |
Delegated Admins - Export Only
Execute the migration utility on the source server and export the Delegated Admin data:
su - zimbra
zmmodulesport system export --modules=admin --filename admin-data --server=source.server.com >> /opt/zimbra/log/export.log
Copy the file /opt/zimbra/tmp/modules/admin/admin-data.tgz from the source server to the destination server under /opt/zimbra/tmp/modules/admin/
Drive - Export Only
Execute the migration utility on the source server and export the Drive data:
su - zimbra
zmmodulesport account export --modules=drive --filename drive-data --server=source.server.com >> /opt/zimbra/log/export.log
Copy the file /opt/zimbra/tmp/modules/drive/drive-data.tgz from the source server to the destination server under /opt/zimbra/tmp/modules/drive/
Migration of Accounts to Zimbra Daffodil (v10) server — Step-2
Depending upon whether you have configured Secondary Storage as internal or external, you will have to define the strategy to migrate the users
Please refer to the section which matches your storage configurations:
Default Storage setup - Primary Storage - Internal and Secondary Storage is not setup)
In this type of setup, there is no additional storage configuration done on the mailbox server.
Using the zmmboxmove utility, migrate the users you disabled in the Zimbra Mobile section above.
zmmboxmove -a account@domain -f <Source NG server> -t <Destination 10.0 server> --sync| Repeat the Mobile migration and account migration till all the accounts are migrated to the destination server. |
| You will also have to move the Delegated Admins from source NG server to destination Zimbra Daffodil (v10) server before importing the data using the migration utility. |
Primary & Secondary storage - Internal
In this type of setup, the Primary and Secondary storage are setup as Internal.
You will have to disable the zimbraMailboxMoveSkipBlobs and zimbraMailboxMoveSkipHsmBlobs attributes on the source(NG) server before initiating the account migration. Due to an open issue, the data from the Secondary storage will be moved to the Primary storage on the destination server. After the migration is complete, you will have to run the Storage Management policy to move the data to the Secondary storage.
zmprov ms <server_name> zimbraMailboxMoveSkipBlobs FALSE
zmprov ms <server_name> zimbraMailboxMoveSkipHsmBlobs FALSE
Using the zmmboxmove utility, migrate the users you disabled in the Zimbra Mobile section above.
zmmboxmove -a account@domain -f <Source NG server> -t <Destination 10.0 server> --sync| Repeat the Mobile migration and account migration till all the accounts are migrated to the destination server. |
| You will also have to move the Delegated Admins from source NG server to destination Zimbra Daffodil (v10) server before importing the data using the migration utility. |
Primary Storage - Internal and Secondary Storage - External
In this type of setup, the Primary storage is on Internal and Secondary storage is on External.
You will have to disable the zimbraMailboxMoveSkipBlobs attribute and enable zimbraMailboxMoveSkipHsmBlobs attribute on the source(NG) server before initiating the account migration. Due to an open issue, the data from the Secondary storage will be moved to the Primary storage on the destination server. After the migration is complete, you will have to run the Storage Management policy to move the data to the Secondary storage.
zmprov ms <server_name> zimbraMailboxMoveSkipBlobs FALSE
zmprov ms <server_name> zimbraMailboxMoveSkipHsmBlobs TRUE
Using the zmmboxmove utility, migrate the users you disabled in the Zimbra Mobile section above.
zmmboxmove -a account@domain -f <Source NG server> -t <Destination 10.0 server> --sync --ngMigration| Repeat the Mobile migration and account migration till all the accounts are migrated to the destination server. |
| You will also have to move the Delegated Admins from source NG server to destination Zimbra Daffodil (v10) server before importing the data using the migration utility. |
Primary Storage - External and Secondary Storage is not setup
In this type of setup, the Primary storage is setup on External and Secondary storage is not setup.
You will have to enable the zimbraMailboxMoveSkipBlobs attribute and disable zimbraMailboxMoveSkipHsmBlobs attribute on the source(NG) server before initiating the account migration.
zmprov ms <server_name> zimbraMailboxMoveSkipBlobs TRUE
zmprov ms <server_name> zimbraMailboxMoveSkipHsmBlobs FALSE
Using the zmmboxmove utility, migrate the users you disabled in the Zimbra Mobile section above.
zmmboxmove -a account@domain -f <Source NG server> -t <Destination 10.0 server> --sync --ngMigration| Repeat the Mobile migration and account migration till all the accounts are migrated to the destination server. |
| You will also have to move the Delegated Admins from source NG server to destination Zimbra Daffodil (v10) server before importing the data using the migration utility. |
Migration of Data - Step-3
Backup & Restore - Manual
-
Pre-requisite:
-
The exported cos is created on Zimbra Daffodil (v10) server.
-
You cannot import the Backup & Restore data using the utility. You will have to manually create the cos. Execute following steps on Zimbra Collaboration Daffodil (v10) server:
-
Check the cos in the exported file and create those on Zimbra Collaboration Daffodil (v10) server.
-
Login to Zimbra Daffodil (v10) Admin Console.
-
Go to Configure → Global Settings → Backup/Restore.
-
In Select users for backup, select Domain and cos
-
Add COS for which backup needs to be enabled and Save.
Mobile - Import
After the accounts are migrated to Zimbra Daffodil (v10) server as per Migration of accounts section, import the Mobile data using the migration utility:
su - zimbra
zmmodulesport system import --modules=mobile --filename mobile-data --server=dest.server.com >> /opt/zimbra/log/import.log
This will start importing the data and start logging the information in the /opt/zimbra/log/import.log file.
-
Enable the ActiveSync feature for the batch of users on the destination server:
zmprov ma account@domain zimbraFeatureMobileSyncEnabled TRUE
| After the import is completed successfully, please refer to After the Migration is complete section for post migration steps for the mobile users. |
Delegated Admins - Import
| Make sure the Delegated Admins are moved to the Zimbra Daffodil (v10) mailbox server. |
Execute the migration utility on the destination server and import the Delegated Admin data:
su - zimbra
zmmodulesport system import --modules=admin --filename admin-data --server=dest.server.com >> /opt/zimbra/log/import.log
This will start importing the data and start logging the information in the /opt/zimbra/log/import.log file.
| After the import is completed successfully, please refer to After the Migration is complete section for post migration validation for Delegated Admin. |
Drive to Zimbra Briefcase - Import
On Destination server, import the Drive data:
su - zimbra
zmmodulesport account import --modules=drive --filename drive-data --server=dest.server.com >> /opt/zimbra/log/import.log
This will start importing the data and start logging the information in the /opt/zimbra/log/import.log file.
| After the import is completed successfully, please refer to After the Migration is complete section for post migration validation of user’s Briefcase data. |
Migrating the data - Through the Remote Approach
In this approach, you will be executing the export and import operations from the destination server, i.e. the Zimbra Daffodil (v10) mailbox server.
We will assume the following:
-
You are migrating the data on a rolling-upgrade setup comprising separate nodes of LDAP, Proxy, MTA, and Mailbox
-
In-place upgrade has been done for LDAP, Proxy and MTA nodes.
-
Make sure the permissions of the data files are correct so that the
zimbrauser can read them. -
For the source server, we will use the hostname
source.server.com. -
For the destination server, we will use the hostname
dest.server.com.
With reference to our Order of migration section, we will be executing the export/import operation in that order.
Migration of Data — Step-1
We will now begin with migrating the data.
| The information is currently logged on the screen. It is recommended to use redirection for logging when performing export and import operations. |
Storage Management - Export & Import
Execute the migration utility on the destination server and export the HSM data from the source server:
su - zimbra
zmmodulesport system export --modules=hsm --filename hsm-data --server=source.server.com >> /opt/zimbra/log/export.log
File /opt/zimbra/tmp/modules/hsm/hsm-data.tgz will be created on the destination server under /opt/zimbra/tmp/modules/hsm/.
Execute the migration utility on the destination server and import the HSM data:
su - zimbra
zmmodulesport system import --modules=hsm --filename hsm-data --server=dest.server.com >> /opt/zimbra/log/import.log
This will start importing the data and start logging the information in the /opt/zimbra/log/import.log file.
Backup & Restore - Export & Manual Import
Execute the migration utility on the destination server and export the Backup & Restore data from the source server:
su - zimbra
zmmodulesport system export --modules=backup --filename backup-data --server=source.server.com >> /opt/zimbra/log/export.log
File /opt/zimbra/tmp/modules/backup/backup-data.tgz will be created on the destination server under /opt/zimbra/tmp/modules/backup/. When at Migration Data - Step-3 section, you will have to refer this file to get the list of cos and manually enable Backup for them through the Admin Console on Zimbra Collaboration Daffodil (v10).
| NG only supports Backup & Restore for cos. So the export file will only have cos for which Backup & Restore was enabled. |
Zimbra Mobile - Export Only
| If there are no Device Management(ABQ) rules applied OR mobile sharing is disabled for ActiveSync users, you can skip the steps to export/import the mobile data. |
| It is recommended to not make any changes in Device Management (ABQ) rules once you start the migration. |
To make sure the server is not loaded in handling the ActiveSync requests, you need to export/import the Mobile data in batches. Depending upon multiple factors like the number of users, size of the users, hardware resources, or network bandwidth, you can decide the user batch size.
Following are the steps you need to follow:
-
Using the migration utility, export mobile data for all the accounts on the source NG server.
-
Disable the ActiveSync feature for the batch of accounts on the NG mailbox server.
-
Using
zmmboxmove, move the batch of accounts from the NG mailbox server to Zimbra Daffodil (v10) mailbox server. -
Repeat steps 1-3 until all the accounts from the NG mailbox server are migrated to Zimbra Daffodil (v10) mailbox server.
-
Enable the ActiveSync feature in batches for the accounts.
| You will have to move the accounts to the destination server when you are at Step-2 of the migration process. |
Following are the instructions:
-
Execute the migration utility on the destination server and export all the mobile data for all the users from the source server:
su - zimbra zmmodulesport system export --modules=mobile --filename mobile-data --server=source.server.com >> /opt/zimbra/log/export.log -
File /opt/zimbra/tmp/modules/mobile/mobile-data.tgz will be created on the destination server under /opt/zimbra/tmp/modules/mobile/.
-
Disable the ActiveSync feature for the batch of users on the source server:
zmprov ma account@domain zimbraFeatureMobileSyncEnabled FALSE
| After the accounts are moved to destination server and mobile data is imported, please refer to After the Migration is complete section for post migration steps for the mobile users. |
Delegated Admins - Export Only
Execute the migration utility on the destination server and export the Delegated Admin data from the source server:
su - zimbra
zmmodulesport system export --modules=admin --filename admin-data --server=source.server.com >> /opt/zimbra/log/export.log
File /opt/zimbra/tmp/modules/admin/admin-data.tgz will be created on the destination server under /opt/zimbra/tmp/modules/admin/
Drive - Export Only
Execute the migration utility on the destination server and export the Drive data from the source server:
su - zimbra
zmmodulesport account export --modules=drive --filename drive-data --server=source.server.com >> /opt/zimbra/log/export.log
File /opt/zimbra/tmp/modules/drive/drive-data.tgz will be created on the destination server under /opt/zimbra/tmp/modules/drive/
Migration of Accounts to Zimbra Daffodil (v10) server — Step-2
Depending upon whether you have configured Secondary Storage as internal or external, you will have to define the strategy to migrate the users
Please refer to the section which matches your storage configurations:
Default Storage setup - Primary Storage - Internal and Secondary Storage is not setup)
In this type of setup, there is no additional storage configuration done on the mailbox server.
Using the zmmboxmove utility, migrate the users you disabled in the Zimbra Mobile section above.
zmmboxmove -a account@domain -f <Source NG server> -t <Destination 10.0 server> --sync| Repeat the Mobile migration and account migration till all the accounts are migrated to the destination server. |
| You will also have to move the Delegated Admins from source NG server to destination Zimbra Daffodil (v10) server before importing the data using the migration utility. |
Primary & Secondary storage - Internal
In this type of setup, the Primary and Secondary storage are setup as Internal.
You will have to disable the zimbraMailboxMoveSkipBlobs and zimbraMailboxMoveSkipHsmBlobs attributes on the source(NG) server before initiating the account migration. Due to an open issue, the data from the Secondary storage will be moved to the Primary storage on the destination server. After the migration is complete, you will have to run the Storage Management policy to move the data to the Secondary storage.
zmprov ms <server_name> zimbraMailboxMoveSkipBlobs FALSE
zmprov ms <server_name> zimbraMailboxMoveSkipHsmBlobs FALSE
Using the zmmboxmove utility, migrate the users you disabled in the Zimbra Mobile section above.
zmmboxmove -a account@domain -f <Source NG server> -t <Destination 10.0 server> --sync| Repeat the Mobile migration and account migration till all the accounts are migrated to the destination server. |
| You will also have to move the Delegated Admins from source NG server to destination Zimbra Daffodil (v10) server before importing the data using the migration utility. |
Primary Storage - Internal and Secondary Storage - External
In this type of setup, the Primary storage is on Internal and Secondary storage is on External.
You will have to disable the zimbraMailboxMoveSkipBlobs attribute and enable zimbraMailboxMoveSkipHsmBlobs attribute on the source(NG) server before initiating the account migration. Due to an open issue, the data from the Secondary storage will be moved to the Primary storage on the destination server. After the migration is complete, you will have to run the Storage Management policy to move the data to the Secondary storage.
zmprov ms <server_name> zimbraMailboxMoveSkipBlobs FALSE
zmprov ms <server_name> zimbraMailboxMoveSkipHsmBlobs TRUE
Using the zmmboxmove utility, migrate the users you disabled in the Zimbra Mobile section above.
zmmboxmove -a account@domain -f <Source NG server> -t <Destination 10.0 server> --sync --ngMigration| Repeat the Mobile migration and account migration till all the accounts are migrated to the destination server. |
| You will also have to move the Delegated Admins from source NG server to destination Zimbra Daffodil (v10) server before importing the data using the migration utility. |
Primary Storage - External and Secondary Storage is not setup
In this type of setup, the Primary storage is setup on External and Secondary storage is not setup.
You will have to enable the zimbraMailboxMoveSkipBlobs attribute and disable zimbraMailboxMoveSkipHsmBlobs attribute on the source(NG) server before initiating the account migration.
zmprov ms <server_name> zimbraMailboxMoveSkipBlobs TRUE
zmprov ms <server_name> zimbraMailboxMoveSkipHsmBlobs FALSE
Using the zmmboxmove utility, migrate the users you disabled in the Zimbra Mobile section above.
zmmboxmove -a account@domain -f <Source NG server> -t <Destination 10.0 server> --sync --ngMigration| Repeat the Mobile migration and account migration till all the accounts are migrated to the destination server. |
| You will also have to move the Delegated Admins from source NG server to destination Zimbra Daffodil (v10) server before importing the data using the migration utility. |
Migration of Data - Step-3
Backup & Restore - Manual
-
Pre-requisite:
-
The exported cos is created on Zimbra Daffodil (v10) server.
-
You cannot import the Backup & Restore data using the utility. You will have to manually create the cos. Execute following steps on Zimbra Collaboration Daffodil (v10) server:
-
Check the cos in the exported file and create those on Zimbra Collaboration Daffodil (v10) server.
-
Login to Zimbra Daffodil (v10) Admin Console.
-
Go to Configure → Global Settings → Backup/Restore.
-
In Select users for backup, select Domain and cos
-
Add COS for which backup needs to be enabled and Save.
Mobile - Import
After the accounts are migrated to Zimbra Daffodil (v10) server as per Migration of accounts section, import the Mobile data using the migration utility:
su - zimbra
zmmodulesport system import --modules=mobile --filename mobile-data --server=dest.server.com >> /opt/zimbra/log/import.log
This will start importing the data and start logging the information in the /opt/zimbra/log/import.log file.
-
Enable the ActiveSync feature for the batch of users on the destination server:
zmprov ma account@domain zimbraFeatureMobileSyncEnabled TRUE
| After the import is completed successfully, please refer to After the Migration is complete section for post migration steps for the mobile users. |
Delegated Admins - Import
| Make sure the Delegated Admins are moved to the Zimbra Daffodil (v10) mailbox server. |
Execute the migration utility on the destination server and import the Delegated Admin data:
su - zimbra
zmmodulesport system import --modules=admin --filename admin-data --server=dest.server.com >> /opt/zimbra/log/import.log
This will start importing the data and start logging the information in the /opt/zimbra/log/import.log file.
| After the import is completed successfully, please refer to After the Migration is complete section for post migration validation for Delegated Admin. |
Drive to Zimbra Briefcase - Import
On Destination server, import the Drive data:
su - zimbra
zmmodulesport account import --modules=drive --filename drive-data --server=dest.server.com >> /opt/zimbra/log/import.log
This will start importing the data and start logging the information in the /opt/zimbra/log/import.log file.
| After the import is completed successfully, please refer to After the Migration is complete section for post migration validation of the user’s Briefcase data. |
After the Migration is complete
After the migration is complete, the following might need to be addressed:
-
IMPORTANT: All ActiveSync users will have to resync their accounts.
-
For Storage Management, verify configurations on Zimbra Daffodil (v10) server is similar to the NG server. The volumes and buckets are created correctly.
-
For ABQ, verify the device status are correctly migrated.
-
For Delegated Admins, verify the rights are correctly migrated.
-
For the users, verify the documents are correctly migrated from Drive to Briefcase.