This document is applicable for Zimbra Daffodil versions 10.0 and 10.1.0.
IMPORTANT: Zimbra Daffodil (v10.1) Licensing Changes
|
Zimbra Daffodil (v10.1) introduced an automated licensing and entitlement system for better flexibility in managing licenses and allows for future growth. It continues to support the Automatic and Manual license methods. Zimbra Daffodil (v10.1) onwards, the terms has been changed to Online Activation and Offline Activation.
Following are the Zimbra Daffodil (v10.1) licensing changes:
Licensing Changes
-
An 18-26 alphanumeric character key is required which replaces the older license.xml file.
-
Zimbra Collaboration licenses are restrictive to the entitlement defined within the license and do not support multiple activations.
-
Once the Zimbra Collaboration license is activated no future license management by the user is required. License management is real-time and is managed by Zimbra Collaboration. Any changes required in the license, it will be done by Zimbra Collaboration team and the updates will be reflected on the server in approximately 5-15 minutes.
-
For environments that don’t have access to the public network, a separate offline service named Offline Daemon Service has to be set up that acts as a locally run license manager. Please refer to the Offline License Activation section for more details.
-
All data gathered is based on license requirements and total usage which meets GDPR and other legal regulations.
The LDAP and LDS hostname are recorded for license registration and activation. -
Independent lab licenses are available. Contact Zimbra Sales or Support team.
Installer Changes
-
A new license daemon service (LDS) is now part of the Zimbra installation. It gets displayed as
zimbra-license-daemonin the packages list and required for the normal functioning of Zimbra. -
You also have a flexibility of setting up a dedicated LDS node.
-
In case you plan to setup a dedicated LDS server, please note that it has to be installed after upgrading the LDAP server and before upgrading the mailbox server.
-
If you attempt to upgrade the mailbox server before installing LDS, the installer will exit with the following message -
zimbra-license-daemon should be installed prior to zimbra-store. -
Online Activation
-
When upgrading the LDAP / Mailbox server(s) to Zimbra Daffodil (v10.1), you will be prompted to enter the license key. The installer will validate whether the provided license key is valid or not. If valid, it will continue with the upgrade else it will give an error and abort the upgrade.
-
When upgrading mailbox node, DO NOT use --skip-activation-check if you are using Online/Automatic license. In case you use it, network features will not be available until you activate Zimbra Daffodil (v10.1) Online License.
-
When upgrading the LDAP node, if you do not have internet access, you will have to use --skip-activation-check to continue the upgrade.
-
-
-
Offline Activation
-
If you are using an Offline License, you will have to pass the parameter
--skip-activation-checkto skip the license check.After the upgrade, perform the Offline License Activation immediately else there will be downtime for the users until the license is activated. Please refer to the Offline License Activation section for more details.
-
-
When upgrading, a new menu of License Activation, Store Configuration → zimbra-store has been added. Under License Activation, it will display following options:
-
Activate license with installation - This is an online method of activation. You need to specify the 18-26 alphanumeric character license key.
-
Activate license after installation - In case you have not received the license key or want to use the offline method of license activation, you can choose this option. The installation will be completed but the services will not be started.
-
| If the LDS is not installed or not running, Zimbra’s network features will not be able to validate and will be disabled which will affect Zimbra’s functionality. |
LDS service deployment:
LDS service deployment depends on the mode of the license activation. Refer to License Activation section for more information.
-
Online Activation:
-
LDS service should be installed on a server having outgoing internet access. Incoming internet traffic is not required.
-
Zimbra recommends installing LDS on a dedicated node.
-
If you cannot install LDS on a dedicated node, then it can be installed on a Proxy or MTA node.
For more information on LDS and how to setup a separate node, please refer to LDS section.
-
-
Offline Activation:
-
LDS service can be installed on any server and does not require internet access.
-
Offline Daemon service should be installed on server having LDS service.
-
Zimbra recommends installing LDS and Offline Daemon service on a dedicated node.
-
If you cannot install LDS and Offline Daemon service on a dedicated node, then it can be installed on any other node.
-
Order of LDS node installation:
-
For Online mode, LDS service should be installed before upgrading the first mailbox server.
-
For Offline mode, LDS and Offline Daemon service should be installed before upgrading the first mailbox server.
Before you upgrade
Please review the following information to decide if Zimbra Daffodil (v10) is suitable for you.
-
Zimbra Touch Client, Zimbra Mobile Client, and Zimbra HTML (Standard) Client are no longer a part of Zimbra starting from Version 9.0.0.
-
A Zimbra Network Edition license is required to use Zimbra Daffodil (v10).
-
The customizations implemented for SAML and SPNEGO will be overridden during updrade. It is recommended to backup these configurations before upgrade.
-
In case of rolling upgrades, if some mailstore nodes are upgraded to Zimbra 10 and some mailstore nodes are on Zimbra 9.0.x or Zimbra 8.8.15 then,
zimbraReverseProxyUpstreamLoginServers -
Zimbra 10 continues to support two versions of Zimbra Web Client — Modern and Classic.
-
To know more about highlights of the Modern Web App, please refer to Introducing the Modern Web Application
-
The Classic Web App offers the same functionality as the Advanced Web Client in Zimbra version 8.8.15.
-
Existing customized themes, logo branding changes, and crontab changes are incompatible with, and hence do not reflect in the Modern Web App. Branding needs to be re-configured to work with the Modern Web App. The Modern Web App does not currently support themes. Please refer to the Customizing Modern Web App section of Admin Guide for more information related to configuration.
-
Zimlets are supported on both the Web Clients.
-
Zimlets that work with the Classic Web App are incompatible with the Modern Web App. And due to technology changes, there is no way to migrate the Zimlets from the Classic Web App to the Modern Web App or vice-versa.
-
-
If you are using a RHEL based server (RHEL, Oracle Linux, Rocky Linux, Centos) then, please install pax/spax package on MTA node.
-
CentOS 7 and derivatives
yum install pax
-
CentOS 8 and derivatives
dnf install spax
-
-
Always take full backup before doing zmmailboxmove.
Be sure to read the release notes information before upgrading.
Supported Upgrade Paths
With this release the following upgrade paths are currently supported. Other upgrade paths will be supported in upcoming releases of Zimbra 10.
| Setup | Support |
|---|---|
Single Node, without NG modules, in-place upgrade |
Supported |
Single Node, with NG modules, in-place upgrade |
Supported** |
Multi-Node, without NG modules, in-place upgrade |
Supported |
Multi-Node, with NG modules, in-place upgrade |
Supported** |
Rolling upgrade, without NG modules |
Supported |
Rolling upgrade, with NG modules |
Supported** |
| ** For guidance on upgrade with NG Modules, please refer to Migration Resources for NG Users section at https://www.zimbra.com/product/documentation/. |
Database Integrity Checking
Some customers have had corrupted databases prior to upgrade, and the upgrade has in some of those cases exacerbated the problem.
In order to detect any corrupted databases as early as possible, we have added an optional step to check the MariaDB database with zmdbintegrityreport prior to making any system changes.
You are prompted to decide if you would like to run the zmdbintegrityreport.
zmdbintegrityreport can take minutes to an hour to run, depending on your system size and disk bandwidth.
|
|
Preparing your operating system
Before you upgrade, Zimbra recommends that the operating system is updated with the latest patches that have been tested with Zimbra Daffodil.
Ubuntu OS
-
Ubuntu 20.04 LTS Server Edition (64-bit)
-
Ubuntu 18.04 LTS Server Edition (64-bit)
Red Hat Enterprise Linux/CentOS Linux/Rocky Linux
|
-
RedHat® Enterprise Linux® 7 and 8 AS/ES (64-bit)
-
CentOS Linux® 7 (64-bit)
-
Oracle Linux® 7 and 8 (64-bit)
-
Rocky Linux® 8 (64-bit)
Zimbra Daffodil (v10.1) Licensing
With the introduction of the new license service within Zimbra Daffodil (v10.1) a new license service has been added named License Daemon Service (LDS) to allow enhanced and flexible license management.
The License Daemon is a required service to support the management of the license.
A Zimbra Collaboration license is required in order to create accounts and use Network features.
Following are the changes done to the licensing:
-
A new license daemon is now part of the Zimbra installation. It gets displayed as
zimbra-license-daemonin the modules list and is required for the normal functioning of Zimbra. -
A new format of the license, an 18-26 character alphanumeric key has been introduced replacing the older .xml file format.
When you purchase, renew, or change the Zimbra Collaboration license, you update the Zimbra Daffodil (v10.1) server with the new license information.
License Activation
|
All Zimbra Daffodil (v10.1) upgrades require license activation and continues to support the Automatic and Manual license methods. Zimbra Daffodil (v10.1) onwards, the terms has been changed to Online Activation and Offline Activation.
License activation is automatic during the upgrade with systems that have external access to the Zimbra license servers. A method of Offline License activations will be provided for systems that do not have external access to the Zimbra license servers. Please refer to the Offline License Activation section for more details.
When you upgrade to Zimbra Daffodil (v10.1) license, all the network features will now be enforced as per your licensing limit. Network features which are not part of your license, will not be available for use.
Update Default Proxy SSL Ciphers Attribute
Whenever upgrading, it is recommended that you check the values of the following attributes (zmprov gcf <attr>) and compare them with the current default values (zmprov desc -a <attr>).
zimbraReverseProxySSLCiphers
zimbraReverseProxySSLProtocols
zimbraSSLExcludeCipherSuites
zimbraMailboxdSSLProtocols
| If you have not performed any recent hardening of your settings, your config should already match the Zimbra 10 default; and no action would be required. |
In addition, it is recommended to make the following changes:
-
Remove the following from
zimbraReverseProxySSLCiphers:ECDHE-RSA-RC4-SHA ECDHE-ECDSA-RC4-SHA RC4-SHA
-
Add the following to
zimbraReverseProxySSLCiphers:!RC4
See https://wiki.zimbra.com/wiki/Cipher_suites for the most current information on cipher suite configuration.
Customizing ZCO Installations
Administrators who want to customize the ZCO installation MSI should use the unsigned version of the MSI (ZimbraConnectorOLK_nnnn_xnn-unsigned.msi), available in the Zimbra download directory.
The modified MSI should then replace the standard signed MSI (ZimbraConnectorOLK_nnnn_xnn.msi) in order to be available to end users from /downloads/index.html and the ZCO auto-upgrade process.
(Bug 85067).
Upgrade Instructions
Download the Software
Go to http://www.zimbra.com/downloads/zimbra-collaboration to access the downloads section.
|
Follow the instructions in this release note to perform the upgrade. For additional information, refer to the installation guide.
|
Zimbra recommends that an install or upgrade session be run with a UNIX command such as Example command usage: screen ./install.sh |
Single Server Upgrade Steps
You do not need to stop the services before upgrading. The upgrade process automatically stops and starts the services as required for the upgrade.
|
It is required to obtain a new license key before upgrading to Zimbra Daffodil (v10.1) to ensure the license features are enabled after the upgrade. |
| For guidance on upgrade with NG Modules, please refer to Upgrade & Migration Guides → NG Setup at https://www.zimbra.com/product/documentation/. |
Following error message is displayed if you try to upgrade when NG modules are installed.
NG Modules detected on this system. If you continue with this upgrade, NG module packages and the associated data will be deleted.
If you want to preserve NG data, consider migrating or a rolling upgrade strategy for upgrading your system. For more information, please contact Zimbra Support.
If you still want to continue, start upgrade using --skip-ng-check.
Process
-
Log in as
rootto the Zimbra 10 server andcdto the directory where the Zimbra Daffodil (v10) archive tar file is saved. For example,cd /var/tmp. Then type the following commands:Unpack the file
tar xzvf zcs.tgz
Change to the correct directory.
cd <expanded-directory>
Begin the upgrade installation.
./install.sh
|
-
At the start of the upgrade, you will be prompted to enter the license key:
# ./install.sh Operations logged to /tmp/install.log.0lN98RdO Checking for existing installation... zimbra-license-tools...FOUND zimbra-license-tools-8.8.15.1651485155-1 zimbra-license-extension...FOUND zimbra-license-extension-8.8.15.1562147113-1 zimbra-network-store...FOUND zimbra-network-store-8.8.15.1562147205-1 . . . ZCS upgrade from 8.8.15 to 10.1.0 will be performed. Validating whether an existing license is expired or not and checking if it qualifies for an upgrade Please enter the license key (an alphanumeric string of 18-24 characters without any special characters): -
A validation check will be done if the provided license key is valid or not. In case the license key is not valid, an error will be displayed and upgrade will be aborted:
# ./install.sh Operations logged to /tmp/install.log.0lN98RdO Checking for existing installation... zimbra-license-tools...FOUND zimbra-license-tools-8.8.15.1651485155-1 zimbra-license-extension...FOUND zimbra-license-extension-8.8.15.1562147113-1 zimbra-network-store...FOUND zimbra-network-store-8.8.15.1562147205-1 . . . ZCS upgrade from 8.8.15 to 10.1.0 will be performed. Validating whether an existing license is expired or not and checking if it qualifies for an upgrade Please enter the license key (an alphanumeric string of 18-24 characters without any special characters):123456789012345678 ERROR: VALIDATION ERROR: -5000 Error while validating license Error: License is expired or not authorized for upgrade or cannot be upgraded. Aborting upgrade -
If the provided license key is valid, the upgrade will proceed to next step:
# ./install.sh
Operations logged to /tmp/install.log.0lN98RdO
Checking for existing installation...
    zimbra-license-tools...FOUND zimbra-license-tools-8.8.15.1651485155-1
    zimbra-license-extension...FOUND zimbra-license-extension-8.8.15.1562147113-1
    zimbra-network-store...FOUND zimbra-network-store-8.8.15.1562147205-1
    .
    .
    .
ZCS upgrade from 8.8.15 to 10.1.0 will be performed.
Validating whether an existing license is expired or not and checking if it qualifies for an upgrade

Please enter the license key (an alphanumeric string of 18-24 characters without any special characters):5332567329720607741
SUCCESS: License valid
License is valid and supports this upgrade.  Continuing.
Validating ldap configuration
If you have a valid a license key, you can pass it with the ./install.shcommand -./install.sh --licensekey 5332567329720607741. If the validation is successful, the upgrade will continue and it will not prompt to enter the license key. -
The Zimbra 10 software agreement appears in 2 parts. Read this software license agreement and type Y when prompted.
-
When
Use Zimbra’s package repository [Y]appears, press Enter to continue. Your system will be configured to add the Zimbra packaging repository foryumorapt-getso it can install the Zimbra third party packages. -
When
Do you wish to upgrade? [Y]is displayed, press Enter to continue. The upgrade packages are unpacked. -
For
zimbra-license-daemonpackage, type Y.For single node upgrade, zimbra-license-daemonis required to be installed and the upgrade process will not continue if you type N. -
The packages are listed. The installer also lists packages that are not installed. If you want to install the packages at this time, type Y; otherwise press Enter. The upgrade checks that there is enough space to perform the upgrade. If there is not enough space, the upgrade stops.
-
When
The system will be modified. Continue? [N]is displayed, type Y and press Enter. The Zimbra 10 server is stopped, and the older packages are removed. The upgrade process verifies which version of Zimbra 10 is being run and proceeds to upgrade the services, restores the existing configuration files, and restarts the server. If you have a configuration with a large number of accounts created, this can take a while. -
If you have not set the time zone, you will be asked to set it. This sets the time zone in the default COS. The time zone that should be entered is the time zone that the majority of users in the COS will be located in.
-
When the Configuration completes, press Enter.
-
Once all the MTA nodes are upgraded to Zimbra Daffodil (v10), the following commands may be run to fix the default
globalconfigvalues, if necessary.zmprov mcf zimbraMtaCommandDirectory /opt/zimbra/common/sbin zmprov mcf zimbraMtaDaemonDirectory /opt/zimbra/common/libexec zmprov mcf zimbraMtaMailqPath /opt/zimbra/common/sbin/mailq zmprov mcf zimbraMtaManpageDirectory /opt/zimbra/common/share/man zmprov mcf zimbraMtaNewaliasesPath /opt/zimbra/common/sbin/newaliases zmprov mcf zimbraMtaSendmailPath /opt/zimbra/common/sbin/sendmail
-
It is recommended that you perform a full backup after a major upgrade, due to database schema changes.
-
In case you are using Offline License, please refer to Offline License section to activate your Offline License.
-
For the next steps after the upgrade, refer to the section After the Upgrade is Complete.
Multi-Server Environment Upgrade Steps
Before you begin the upgrade, please review the following details related to the license daemon service (LDS):
-
As part of upgrade, installer will do a validation check and confirm if you have a valid Zimbra Daffodil (v10.1) license key. The validation check has been added to make sure you have a valid Daffodil (v10.1) license before you start the upgrade.
-
This license validation is done on LDAP and mailbox nodes.
-
When you are upgrading the LDAP nodes, license key validation will work if LDAP node has internet access. If LDAP node does not have internet access, then do the upgrade with
--skip-activation-checkoption -./install.sh --skip-activation-check. -
When upgrading the mailbox node, it will get the LDS information from the LDAP.
Upgrade the servers in the following order. Update each server one at a time, following the instructions under Process below.
| The upgrade steps are documented assuming you will install LDS on a dedicated node. |
-
LDAP master server. The LDAP master servers must all be upgraded before proceeding, and they must be running as you upgrade the other servers.
-
LDAP replicas
-
MTA servers - see Using LMDB as the Supported Back-end for On-disk Database Maps.
-
Proxy servers
-
License Daemon Service
-
OnlyOffice server
-
Mailstore servers
Process
-
Log in as
rootto the Zimbra 10 server andcdto the directory where the Zimbra Daffodil (v10) archive tar file is saved. For example,cd /var/tmp. Then type the following commands:Unpack the file
tar xzvf zcs.tgz
Change to the correct directory.
cd <expanded-directory>
Begin the upgrade installation.
./install.sh
|
-
At the start of the upgrade, you will be prompted to enter the license key:
# ./install.sh Operations logged to /tmp/install.log.0lN98RdO Checking for existing installation... zimbra-license-tools...FOUND zimbra-license-tools-8.8.15.1651485155-1 zimbra-license-extension...FOUND zimbra-license-extension-8.8.15.1562147113-1 zimbra-network-store...FOUND zimbra-network-store-8.8.15.1562147205-1 . . . ZCS upgrade from 8.8.15 to 10.1.0 will be performed. Validating whether an existing license is expired or not and checking if it qualifies for an upgrade Please enter the license key (an alphanumeric string of 18-24 characters without any special characters): -
A validation check will be done if the provided license key is valid or not. In case the license key is not valid, an error will be displayed and upgrade will be aborted:
# ./install.sh Operations logged to /tmp/install.log.0lN98RdO Checking for existing installation... zimbra-license-tools...FOUND zimbra-license-tools-8.8.15.1651485155-1 zimbra-license-extension...FOUND zimbra-license-extension-8.8.15.1562147113-1 zimbra-network-store...FOUND zimbra-network-store-8.8.15.1562147205-1 . . . ZCS upgrade from 8.8.15 to 10.1.0 will be performed. Validating whether an existing license is expired or not and checking if it qualifies for an upgrade Please enter the license key (an alphanumeric string of 18-24 characters without any special characters):123456789012345678 ERROR: VALIDATION ERROR: -5000 Error while validating license Error: License is expired or not authorized for upgrade or cannot be upgraded. Aborting upgrade -
If the provided license key is valid, the upgrade will proceed to next step:
# ./install.sh
Operations logged to /tmp/install.log.0lN98RdO
Checking for existing installation...
    zimbra-license-tools...FOUND zimbra-license-tools-8.8.15.1651485155-1
    zimbra-license-extension...FOUND zimbra-license-extension-8.8.15.1562147113-1
    zimbra-network-store...FOUND zimbra-network-store-8.8.15.1562147205-1
    .
    .
    .
ZCS upgrade from 8.8.15 to 10.1.0 will be performed.
Validating whether an existing license is expired or not and checking if it qualifies for an upgrade

Please enter the license key (an alphanumeric string of 18-24 characters without any special characters):5332567329720607741
SUCCESS: License valid
License is valid and supports this upgrade.  Continuing.
Validating ldap configuration
If you have a valid a license key, you can pass it with the ./install.shcommand -./install.sh --licensekey 5332567329720607741. If the validation is successful, the upgrade will continue and it will not prompt to enter the license key. -
The Zimbra 10 software agreement appears in 2 parts. Read this software license agreement and type Y when prompted.
-
When
Use Zimbra’s package repository [Y]appears, press Enter to continue. Your system will be configured to add the Zimbra packaging repository foryumorapt-getso it can install the Zimbra third party packages. -
When
Do you wish to upgrade? [Y]is displayed, press Enter to continue. The upgrade packages are unpacked. -
For
zimbra-license-daemonpackage, type Y.For single node upgrade, zimbra-license-daemonis required to be installed and the upgrade process will not continue if you type N. -
The packages are listed. The installer also lists packages that are not installed. If you want to install the packages at this time, type Y; otherwise press Enter. The upgrade checks that there is enough space to perform the upgrade. If there is not enough space, the upgrade stops.
-
When
The system will be modified. Continue? [N]is displayed, type Y and press Enter. The Zimbra 10 server is stopped, and the older packages are removed. The upgrade process verifies which version of Zimbra 10 is being run and proceeds to upgrade the services, restores the existing configuration files, and restarts the server. If you have a configuration with a large number of accounts created, this can take a while. -
If you have not set the time zone, you will be asked to set it. This sets the time zone in the default COS. The time zone that should be entered is the time zone that the majority of users in the COS will be located in.
-
When the Configuration completes, press Enter.
-
Once all the MTA nodes are upgraded to Zimbra Daffodil (v10), the following commands may be run to fix the default
globalconfigvalues, if necessary.zmprov mcf zimbraMtaCommandDirectory /opt/zimbra/common/sbin zmprov mcf zimbraMtaDaemonDirectory /opt/zimbra/common/libexec zmprov mcf zimbraMtaMailqPath /opt/zimbra/common/sbin/mailq zmprov mcf zimbraMtaManpageDirectory /opt/zimbra/common/share/man zmprov mcf zimbraMtaNewaliasesPath /opt/zimbra/common/sbin/newaliases zmprov mcf zimbraMtaSendmailPath /opt/zimbra/common/sbin/sendmail
-
It is recommended that you perform a full backup after a major upgrade, due to database schema changes.
-
In case you are using Offline License, please refer to Offline License section to activate your Offline License.
-
For the next steps after the upgrade, refer to the section After the Upgrade is Complete.
Using LMDB as the Supported Back-end for On-disk Database Maps
|
Starting with Zimbra Collaboration 8.5 and later, Postfix is linked to LMDB, the same back-end Zimbra 10 uses with OpenLDAP. Prior to Zimbra Collaboration 8.0, Postfix was linked to Berkeley DB. Zimbra 10 has not officially supported using any Postfix on-disk database maps prior to Zimbra Collaboration 8.5.
However, these have been used through custom non-preserved modifications to the |
To restore the modifications post-upgrade, the following steps need to be performed:
-
Run postmap against the database input file to generate an LMDB database.
-
It will be necessary to iterate through the postconf keys that have
hash:/path/to/dbvalues and update them in LDAP to uselmdb:/path/to/dbvalues instead.
Many previously unsupported features that could be used with on-disk database maps are now fully supported by Zimbra 10. Check if your customizations are correctly carried forward when upgrading. See Bug 77586.
Installing dedicated LDS node
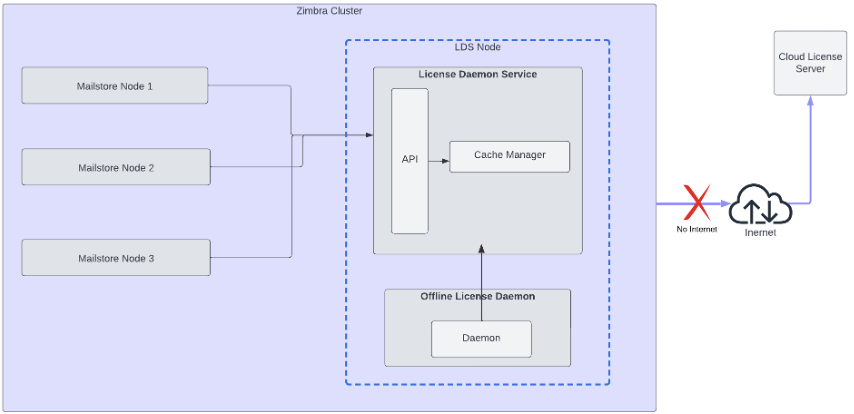
The License Daemon Service (LDS) is a new service that communicates with the Zimbra License Server in online mode and the Offline Daemon service (local installation) in offline mode. For more information, refer to admin guide LDS Overview section.
To separate the license daemon service from rest of the Zimbra services, you can setup a dedicated LDS node. You need to setup this node after installing/upgrading the LDAP server and before you begin to install/upgrade the Mailbox servers.
The package zimbra-license-daemon gets installed by default during Zimbra installation unless the administrator marks N for the package during Zimbra installation.
Unpack the Zimbra Daffodil (v10.1) and execute the installer script ./install.sh.
Type y and press Enter to install the zimbra-license-daemon package.
Select the packages to install

Install zimbra-ldap [Y] N

Install zimbra-logger [Y] N

Install zimbra-mta [Y] N

Install zimbra-dnscache [Y] N

Install zimbra-snmp [Y] N

Install zimbra-license-daemon [Y] Y

Install zimbra-store [Y] N

Install zimbra-apache [Y] N

Install zimbra-spell [Y] N

Install zimbra-convertd [Y] N

Install zimbra-memcached [Y] N

Install zimbra-proxy [Y] N

Install zimbra-archiving [N] N

Install zimbra-onlyoffice [Y] N

Install zimbra-patch [Y] N

Install zimbra-mta-patch [Y] N

Install zimbra-proxy-patch [Y] N
Complete the rest of the installation.
Offline License Activation
The method of generating and activating an Offline License in Zimbra Daffodil (v10.1) has changed. As a pre-requisite, a new package zimbra-nalpeiron-offline-daemon
| The Offline License activation will not work if the package is not installed or the offline daemon service is not running. |
| The Offline Daemon service is a critical and important service for the functioning of a Offline License and its management. You are recommended to have a service monitoring setup to check the state of the service. |
| The offline license may take upto 48 hours to be issued. |
Following is the architectural view of the Offline License process:
Pre-requisites
Following are the pre-requisites to be completed before installing the offline daemon packages:
Disable FIPS
FIPS should be disabled on the system before installing the packages.
Following are the steps to disable FIPS. Execute the commands as root user:
-
For RHEL/CentOS/Rocky Linux systems:
sudo fips-mode-setup --disable
sudo reboot
-
Verify FIPS is disabled. Check the /proc/sys/crypto/fips_enabled file. If disabled, following will be the output:
$ cat /proc/sys/crypto/fips_enabled
0
-
-
For Ubuntu systems:
sudo ua disable fips
sudo reboot
-
Verify FIPS is disabled. Check the /proc/sys/crypto/fips_enabled file. If disabled, following will be the output:
$ cat /proc/sys/crypto/fips_enabled
0
-
Disable SELinux
SELinux should be disabled on the system before installing the offline daemon packages. You will have to reboot the system to make the changes effective.
Following are the steps to disable SELinux. Execute the commands as root user:
-
For RHEL/CentOS/Rocky Linux systems:
-
Check the SELinux status. If the status appears
enabled, execute the further steps to disable:$ sestatus| grep 'SELinux status\|Current mode' SELinux status: enabled Current mode: enforcing
-
Edit
/etc/sysconfig/selinux:vi /etc/selinux/config
-
Change the SELINUX directive to disabled.
SELINUX=disabled
-
Save and exit the file. Reboot the system:
reboot
-
After the reboot, check the status. SELinux should appear disabled:
$ sestatus| grep 'SELinux status'
SELinux status:                 disabled
-
-
For Ubuntu systems:
-
Check the SELinux status. If the status appears
enabled, execute the further steps to disable:$ sestatus| grep 'SELinux status\|Current mode' SELinux status: enabled Current mode: enforcing
-
Edit
/etc/selinux/config:vi /etc/selinux/config
-
Change the SELINUX directive to disabled.
SELINUX=disabled
-
Save and exit the file. You will have to reboot the system:
reboot
-
After the reboot, check the status. SELinux should appear disabled:
$ sestatus| grep 'SELinux status'
SELinux status:                 disabled
-
Add locale en_US.utf8
Locale en_US.utf-8 is required for the offline daemon packages.
Following are the steps to check and add the locale. Execute the commands as root user:
-
For RHEL/CentOS/Rocky/Ubuntu Linux systems:
-
Check if the required locale
en_US.utf8is available on the system. If available, it will display as following:$ locale -a |grep 'en_US.utf8' en_US.utf8
-
If not available, add the locale:
$ localedef -i en_US -f UTF-8 en_US.UTF-8
-
Install offline daemon packages
Following are the steps to install the offline daemon packages. Execute the commands as a root user:
-
For RHEL/CentOS/Rocky Linux systems:
yum clean metadata
yum check-update
yum install zimbra-nalpeiron-offline-daemon
-
For Ubuntu systems:
apt-get update
apt-get install zimbra-nalpeiron-offline-daemon
-
Verify the nalpdaemon service is active:
$ systemctl status nalpdaemon
● nalpdaemon.service - Nalpeiron Licensing Daemon
   Loaded: loaded (/usr/lib/systemd/system/nalpdaemon.service; enabled; vendor preset: disabled)
   Active: active (running) since Sat 2024-06-08 02:03:37 EDT; 1s ago
In case the service is not active, restart the service:
$ systemctl restart nalpdaemon
As a zimbra user, restart the LDS and configdctl service:
$ su - zimbra
$ zmlicensectl --service restart
$ zmconfigdctl restart
Requesting and Activating Offline license
The method is supported through Admin Console and CLI.
Following are the steps:
Admin Console
-
Contact the Support team to get the Network Key and License Key.
-
Login to Admin Console and go to Home → Get Started → Install Licenses → Offline Activation
-
Under Step 1, specify the Network Key and License Key and click on Generate Activation Request.
-
After the network and product activation files are generated successfully, Download button will appear next to the text box.
-
Click on Download button next to the text box and save the files. The name and filetype will be pre-populated when saving - network_activation_fingerprint, product_activation_fingerprint.
-
Login to Support Portal and select the License tab.
-
Select Generate an Offline License Activation file for versions 10.1 or greater.
-
Specify the Product License Key and Network License Key.
-
Copy the contents of network_activation_fingerprint.txt file and paste in the Network Activation Fingerprint text box.
-
Copy the contents of product_activation_fingerprint.txt file and paste in Product Activation Fingerprint text box.
-
Specify the product version in Product Verstion text box.
-
Click on Generate License Certificate
-
Save the generated License Activation XML file.
-
Go back to the Admin Console License page.
-
Under Offline Activation → Step3, upload the License Activation XML file and click on Activate.
-
After successful activation, you will see a success message - Your license is successfully activated.
Command Line
-
Contact Sales and get the Network Key and License Key.
-
As a
zimbrauser, runzmlicensecommand to generate Network Key and License Keyzmlicense --offlineActivationRequestCert --network <network_key> --product <product_key>
-
Save the certificates printed on the screen as network_activation_fingerprint.txt, and product_activation_fingerprint.txt.
-
Login to Support Portal and select the License tab.
-
Select Generate an Offline License Activation file for versions 10.1 or greater.
-
Specify the Product License Key and Network License Key.
-
Copy the contents of network_activation_fingerprint.txt file and paste in the Network Activation Fingerprint text box.
-
Copy the contents of product_activation_fingerprint.txt file and paste in Product Activation Fingerprint text box.
-
Specify the product version in Product Verstion text box.
-
Click on Generate License Certificate
-
Save the generated License Activation XML file on the server.
-
As a
zimbrauser, runzmlicensecommand to activate the offline licensezmlicense -A /path_to_XML/activation_file.xml
-
After successful activation, you will see a success message - Your license is successfully activated.
If you have problems accessing the Support Portal or facing any issues when activating the Offline License, contact Zimbra Sales or Support.
After the Upgrade is Complete
After you completed the upgrade, the following might need to be addressed.
-
If you have configured the following keys, you will need to replace them as described here.
The following keys are deprecated:
httpclient_client_connection_timeout
httpclient_connmgr_connection_timeout
httpclient_connmgr_idle_reaper_connection_timeout
httpclient_connmgr_idle_reaper_sleep_interval
httpclient_connmgr_keepalive_connections
httpclient_connmgr_max_host_connections
httpclient_connmgr_max_total_connections
httpclient_connmgr_so_timeout
httpclient_connmgr_tcp_nodelay
They are replaced by the following keys:
httpclient_internal_client_connection_timeout
httpclient_internal_connmgr_connection_timeout
httpclient_internal_connmgr_idle_reaper_connection_timeout
httpclient_internal_connmgr_idle_reaper_sleep_interval
httpclient_internal_connmgr_keepalive_connections
httpclient_internal_connmgr_max_host_connections
httpclient_internal_connmgr_max_total_connections
httpclient_internal_connmgr_so_timeout
httpclient_internal_connmgr_tcp_nodelay
httpclient_external_client_connection_timeout
httpclient_external_connmgr_connection_timeout
httpclient_external_connmgr_idle_reaper_connection_timeout
httpclient_external_connmgr_idle_reaper_sleep_interval
httpclient_external_connmgr_keepalive_connections
httpclient_external_connmgr_max_host_connections
httpclient_external_connmgr_max_total_connections
httpclient_external_connmgr_so_timeout
httpclient_external_connmgr_tcp_nodelay
Installing External Zimlets for Modern Web App
These five zimlets are available.
-
Slack
-
Zoom
-
Dropbox
-
Google Drive
-
Onedrive
You have to install and configure them for users to integrate and use these zimlets. Once you are done installing the zimlet(s), you need to restart the mailbox service before configuring them.
Slack
-
As
rootrun the below command:- RHEL
-
yum install zimbra-zimlet-slack - Ubuntu
-
apt-get install zimbra-zimlet-slack
-
Restart mailbox service as a
zimbrauser:
su - zimbra
zmmailboxdctl restart
Zoom
-
As
rootrun the below command:- RHEL
-
yum install zimbra-zimlet-zoom - Ubuntu
-
apt-get install zimbra-zimlet-zoom
-
Restart mailbox service as a
zimbrauser:
su - zimbra
zmmailboxdctl restart
Dropbox
-
As
rootrun the below command:- RHEL
-
yum install zimbra-zimlet-dropbox - Ubuntu
-
apt-get install zimbra-zimlet-dropbox
-
Restart mailbox service as a
zimbrauser:
su - zimbra
zmmailboxdctl restart
Google Drive
-
As
rootrun the below command:- RHEL
-
yum install zimbra-zimlet-google-drive - Ubuntu
-
apt-get install zimbra-zimlet-google-drive
-
Restart mailbox service as a
zimbrauser:
su - zimbra
zmmailboxdctl restart
Onedrive
-
As
rootrun the below command:- RHEL
-
yum install zimbra-zimlet-onedrive - Ubuntu
-
apt-get install zimbra-zimlet-onedrive
-
Restart mailbox service as a
zimbrauser:
su - zimbra
zmmailboxdctl restart
Please visit Configuring Zimlets for Modern Web App for instructions for on how to configure zimlets for Modern Web App users.
Ephemeral Data Migration
Versions of Zimbra prior to 9.0.0 stored ephemeral data in LDAP. Examples of ephemeral data include:
-
zimbraAuthTokens -
zimbraCsrfTokenData -
zimbraLastLogonTimestamp
Zimbra Collaboration versions after 9.0.0 introduced the ability to store ephemeral data in an external service such as SSDB. This is an optional feature; however, it can improve LDAP performance and stability.
Please refer to the Zimbra Daffodil Administration Guide for more information. Migration of ephemeral data out of LDAP and into SSDB must be performed after an install or upgrade has been completed.
Remove Current Version and Perform Clean Install of Zimbra 10
If you do not want to upgrade, but prefer to install Zimbra Daffodil (v10) as a new installation, when you run the Zimbra Daffodil (v10) install script, enter N when asked Do you wish to upgrade?
A warning displays asking if you want to delete all existing users and mail.
If you enter Yes, all users, mail, and previous files are removed before proceeding with the new installation.
Refer to the installation guides for installation instructions.
|
Status of Your Customization after Upgrade
Upgrading to the newest release does not delete your accounts or change your configuration. Configuration settings stored in LDAP and localconfig are preserved during upgrades. Any files installed by Zimbra Daffodil might be deprecated and/or overwritten during upgrades, removing any customizations. This includes customized themes, logo branding changes, and crontab changes.
| Branding needs to be re-configured to work with the Modern Web App. And the Modern Web App currently does not support themes. |
Only the core Zimlets are enabled after the upgrade. Zimlets that you customized and/or deployed are preserved during the upgrade but will be disabled. As upgrading of customized Zimlets cannot be tested before the release, Zimbra recommends that you verify that your customized Zimlets work correctly before re-enabling them for your end-users after the upgrade.
| Zimlets are supported on both the Classic Web App and the Modern Web App. However, Zimlets used for Classic Web Client are not compatible with the Modern Web App. Currently, there is no way to migrate the zimlets from Classic to the Modern Web App or vice-versa. Existing zimlets need to be re-developed for them to work on the Modern Web App. |
All entries between the designated comments in the Zimbra 10 crontab file are overwritten with new defaults upon upgrade. Customized backup schedules stored in the Zimbra 10 crontab and customizations to the crontab entry outside the designated comments are preserved.