This document is applicable for Zimbra Daffodil versions 10.0 and 10.1.0.
IMPORTANT: Zimbra Daffodil (v10.1) Licensing Changes
|
Zimbra Daffodil (v10.1) introduced an automated licensing and entitlement system for better flexibility in managing licenses and allows for future growth. It continues to support the Automatic and Manual license methods. Zimbra Daffodil (v10.1) onwards, the terms has been changed to Online Activation and Offline Activation.
Following are the Zimbra Daffodil (v10.1) licensing changes:
Licensing Changes
-
An 18-26 alphanumeric character key is required which replaces the older license.xml file.
-
Zimbra Collaboration licenses are restrictive to the entitlement defined within the license and do not support multiple activations.
-
Once the Zimbra Collaboration license is activated no future license management by the user is required. License management is real-time and is managed by Zimbra Collaboration. Any changes required in the license, it will be done by Zimbra Collaboration team and the updates will be reflected on the server in approximately 5-15 minutes.
-
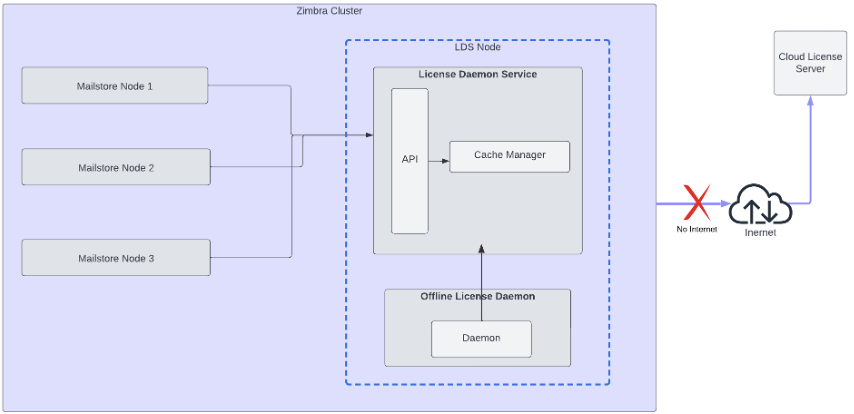
For environments that don’t have access to the public network, a separate offline service named Offline Daemon Service has to be set up that acts as a locally run license manager. Please refer to the Offline License Activation section for more details.
-
All data gathered is based on license requirements and total usage which meets GDPR and other legal regulations.
The LDAP and LDS hostname are recorded for license registration and activation. -
Independent lab licenses are available. Contact Zimbra Sales or Support team.
Installer Changes
-
A new license daemon service (LDS) is now part of the Zimbra installation. It gets displayed as
zimbra-license-daemonin the packages list and required for the normal functioning of Zimbra. -
You also have a flexibility of setting up a dedicated LDS node.
-
In case you plan to setup a dedicated LDS server, please note that it has to be installed after upgrading the LDAP server and before upgrading the mailbox server.
-
If you attempt to upgrade the mailbox server before installing LDS, the installer will exit with the following message -
zimbra-license-daemon should be installed prior to zimbra-store. -
Online Activation
-
When upgrading the LDAP / Mailbox server(s) to Zimbra Daffodil (v10.1), you will be prompted to enter the license key. The installer will validate whether the provided license key is valid or not. If valid, it will continue with the upgrade else it will give an error and abort the upgrade.
-
When upgrading mailbox node, DO NOT use --skip-activation-check if you are using Online/Automatic license. In case you use it, network features will not be available until you activate Zimbra Daffodil (v10.1) Online License.
-
When upgrading the LDAP node, if you do not have internet access, you will have to use --skip-activation-check to continue the upgrade.
-
-
-
Offline Activation
-
If you are using an Offline License, you will have to pass the parameter
--skip-activation-checkto skip the license check.After the upgrade, perform the Offline License Activation immediately else there will be downtime for the users until the license is activated. Please refer to the Offline License Activation section for more details.
-
-
When upgrading, a new menu of License Activation, Store Configuration → zimbra-store has been added. Under License Activation, it will display following options:
-
Activate license with installation - This is an online method of activation. You need to specify the 18-26 alphanumeric character license key.
-
Activate license after installation - In case you have not received the license key or want to use the offline method of license activation, you can choose this option. The installation will be completed but the services will not be started.
-
| If the LDS is not installed or not running, Zimbra’s network features will not be able to validate and will be disabled which will affect Zimbra’s functionality. |
LDS service deployment:
LDS service deployment depends on the mode of the license activation. Refer to License Activation section for more information.
-
Online Activation:
-
LDS service should be installed on a server having outgoing internet access. Incoming internet traffic is not required.
-
Zimbra recommends installing LDS on a dedicated node.
-
If you cannot install LDS on a dedicated node, then it can be installed on a Proxy or MTA node.
For more information on LDS and how to setup a separate node, please refer to LDS section.
-
-
Offline Activation:
-
LDS service can be installed on any server and does not require internet access.
-
Offline Daemon service should be installed on server having LDS service.
-
Zimbra recommends installing LDS and Offline Daemon service on a dedicated node.
-
If you cannot install LDS and Offline Daemon service on a dedicated node, then it can be installed on any other node.
-
Order of LDS node installation:
-
For Online mode, LDS service should be installed before upgrading the first mailbox server.
-
For Offline mode, LDS and Offline Daemon service should be installed before upgrading the first mailbox server.
Following are some example scenarios:
| Setup | Nodes to be upgraded | LDS Action | Results |
|---|---|---|---|
Node 1: LDAP ( 8.8.15 ) |
Node 1: LDAP |
Did not installed |
FAIL |
Node 1: LDAP ( 9.0.0 ) |
Node 1: LDAP |
Installed |
PASS |
Node 1: LDAP ( 9.0.0 ) |
Node 1: LDAP |
1. Upgraded LDAP, Proxy, MTA nodes. |
PASS |
Zimbra Daffodil (v10.1) Licensing
With the introduction of the new license service within Zimbra Daffodil (v10.1) a new license service has been added named License Daemon Service (LDS) to allow enhanced and flexible license management.
The License Daemon is a required service to support the management of the license.
A Zimbra Collaboration license is required in order to create accounts and use Network features.
Following are the changes done to the licensing:
-
A new license daemon is now part of the Zimbra installation. It gets displayed as
zimbra-license-daemonin the modules list and is required for the normal functioning of Zimbra. -
A new format of the license, an 18-26 alphanumeric character key has been introduced replacing the older .xml file format.
When you purchase, renew, or change the Zimbra Collaboration license, you update the Zimbra Daffodil (v10.1) server with the new license information.
License Activation
|
License activation is automatic during the upgrade with systems that have external access to the Zimbra license servers. A method of Offline License activations will be provided for systems that do not have external access to the Zimbra license servers. Please refer to the Offline License Activation section for more details.
When you upgrade to Zimbra Daffodil (v10.1) license, all the network features will now be enforced as per your licensing limit. Network features which are not part of your license, will not be available for use.
Offline License Activation
The method of generating and activating an Offline License in Zimbra Daffodil (v10.1) has changed. As a pre-requisite, a new package zimbra-nalpeiron-offline-daemon
| The Offline License activation will not work if the package is not installed or the offline daemon service is not running. |
| The Offline Daemon service is a critical and important service for the functioning of a Offline License and its management. You are recommended to have a service monitoring setup to check the state of the service. |
| The offline license may take upto 48 hours to be issued. |
Following is the architectural view of the Offline License process:
Pre-requisites
Following are the pre-requisites to be completed before installing the offline daemon packages:
Disable FIPS
FIPS should be disabled on the system before installing the packages.
Following are the steps to disable FIPS. Execute the commands as root user:
-
For RHEL/CentOS/Rocky Linux systems:
sudo fips-mode-setup --disable
sudo reboot
-
Verify FIPS is disabled. Check the /proc/sys/crypto/fips_enabled file. If disabled, following will be the output:
$ cat /proc/sys/crypto/fips_enabled
0
-
-
For Ubuntu systems:
sudo ua disable fips
sudo reboot
-
Verify FIPS is disabled. Check the /proc/sys/crypto/fips_enabled file. If disabled, following will be the output:
$ cat /proc/sys/crypto/fips_enabled
0
-
Disable SELinux
SELinux should be disabled on the system before installing the offline daemon packages. You will have to reboot the system to make the changes effective.
Following are the steps to disable SELinux. Execute the commands as root user:
-
For RHEL/CentOS/Rocky Linux systems:
-
Check the SELinux status. If the status appears
enabled, execute the further steps to disable:$ sestatus| grep 'SELinux status\|Current mode' SELinux status: enabled Current mode: enforcing
-
Edit
/etc/sysconfig/selinux:vi /etc/selinux/config
-
Change the SELINUX directive to disabled.
SELINUX=disabled
-
Save and exit the file. Reboot the system:
reboot
-
After the reboot, check the status. SELinux should appear disabled:
$ sestatus| grep 'SELinux status'
SELinux status:                 disabled
-
-
For Ubuntu systems:
-
Check the SELinux status. If the status appears
enabled, execute the further steps to disable:$ sestatus| grep 'SELinux status\|Current mode' SELinux status: enabled Current mode: enforcing
-
Edit
/etc/selinux/config:vi /etc/selinux/config
-
Change the SELINUX directive to disabled.
SELINUX=disabled
-
Save and exit the file. You will have to reboot the system:
reboot
-
After the reboot, check the status. SELinux should appear disabled:
$ sestatus| grep 'SELinux status'
SELinux status:                 disabled
-
Add locale en_US.utf8
Locale en_US.utf-8 is required for the offline daemon packages.
Following are the steps to check and add the locale. Execute the commands as root user:
-
For RHEL/CentOS/Rocky/Ubuntu Linux systems:
-
Check if the required locale
en_US.utf8is available on the system. If available, it will display as following:$ locale -a |grep 'en_US.utf8' en_US.utf8
-
If not available, add the locale:
$ localedef -i en_US -f UTF-8 en_US.UTF-8
-
Install offline daemon packages
Following are the steps to install the offline daemon packages. Execute the commands as a root user:
-
For RHEL/CentOS/Rocky Linux systems:
yum clean metadata
yum check-update
yum install zimbra-nalpeiron-offline-daemon
-
For Ubuntu systems:
apt-get update
apt-get install zimbra-nalpeiron-offline-daemon
-
Verify the nalpdaemon service is active:
$ systemctl status nalpdaemon
● nalpdaemon.service - Nalpeiron Licensing Daemon
   Loaded: loaded (/usr/lib/systemd/system/nalpdaemon.service; enabled; vendor preset: disabled)
   Active: active (running) since Sat 2024-06-08 02:03:37 EDT; 1s ago
In case the service is not active, restart the service:
$ systemctl restart nalpdaemon
As a zimbra user, restart the LDS and configdctl service:
$ su - zimbra
$ zmlicensectl --service restart
$ zmconfigdctl restart
Requesting and Activating Offline license
The method is supported through Admin Console and CLI.
Following are the steps:
Admin Console
-
Contact the Support team to get the Network Key and License Key.
-
Login to Admin Console and go to Home → Get Started → Install Licenses → Offline Activation
-
Under Step 1, specify the Network Key and License Key and click on Generate Activation Request.
-
After the network and product activation files are generated successfully, Download button will appear next to the text box.
-
Click on Download button next to the text box and save the files. The name and filetype will be pre-populated when saving - network_activation_fingerprint, product_activation_fingerprint.
-
Login to Support Portal and select the License tab.
-
Select Generate an Offline License Activation file for versions 10.1 or greater.
-
Specify the Product License Key and Network License Key.
-
Copy the contents of network_activation_fingerprint.txt file and paste in the Network Activation Fingerprint text box.
-
Copy the contents of product_activation_fingerprint.txt file and paste in Product Activation Fingerprint text box.
-
Specify the product version in Product Verstion text box.
-
Click on Generate License Certificate
-
Save the generated License Activation XML file.
-
Go back to the Admin Console License page.
-
Under Offline Activation → Step3, upload the License Activation XML file and click on Activate.
-
After successful activation, you will see a success message - Your license is successfully activated.
Command Line
-
Contact Sales and get the Network Key and License Key.
-
As a
zimbrauser, runzmlicensecommand to generate Network Key and License Keyzmlicense --offlineActivationRequestCert --network <network_key> --product <product_key>
-
Save the certificates printed on the screen as network_activation_fingerprint.txt, and product_activation_fingerprint.txt.
-
Login to Support Portal and select the License tab.
-
Select Generate an Offline License Activation file for versions 10.1 or greater.
-
Specify the Product License Key and Network License Key.
-
Copy the contents of network_activation_fingerprint.txt file and paste in the Network Activation Fingerprint text box.
-
Copy the contents of product_activation_fingerprint.txt file and paste in Product Activation Fingerprint text box.
-
Specify the product version in Product Verstion text box.
-
Click on Generate License Certificate
-
Save the generated License Activation XML file on the server.
-
As a
zimbrauser, runzmlicensecommand to activate the offline licensezmlicense -A /path_to_XML/activation_file.xml
-
After successful activation, you will see a success message - Your license is successfully activated.
If you have problems accessing the Support Portal or facing any issues when activating the Offline License, contact Zimbra Sales or Support.
What is a rolling upgrade?
Rolling upgrade is the recommended method to upgrade a cluster with the least interruption to the end user. At the highest level, a rolling upgrade will upgrade the LDAP, Proxy, MTA then add a new mailbox server’s with the latest version. Once the new mailbox is ready for users, you will move users from the old to the new mailbox server.
This method is very flexible with the least down time and minimal effect to the users. Rolling upgrade gives you the ability to also add or move to new hardware, upgrade or move to new OS instances, customize and test the new experience before migrating users.
This document will provide steps through the rolling upgrade process using a hypothetical scenario that can guide you through the needed procedures to move your instance to new hardware and OS while upgrading and older versions to 10.0 or latest ZCS version.
| This is a document that will provide steps and show examples for a define setup and should be used as a reference. Every environment is different and it is always recommended to test within the lab so you can become familiar with your own setup, build a rolling upgrade plan and be familiar with the commands needed to perform the upgrade that meets your needs. |
| This document will not provide sizing recommendations. There are many variables that go into sizing and performing a rolling upgrade, if you need assistance or would like someone to perform the upgrade for you, please contact the Zimbra Sales to schedule time with a Partner or Professional Service (PS). |
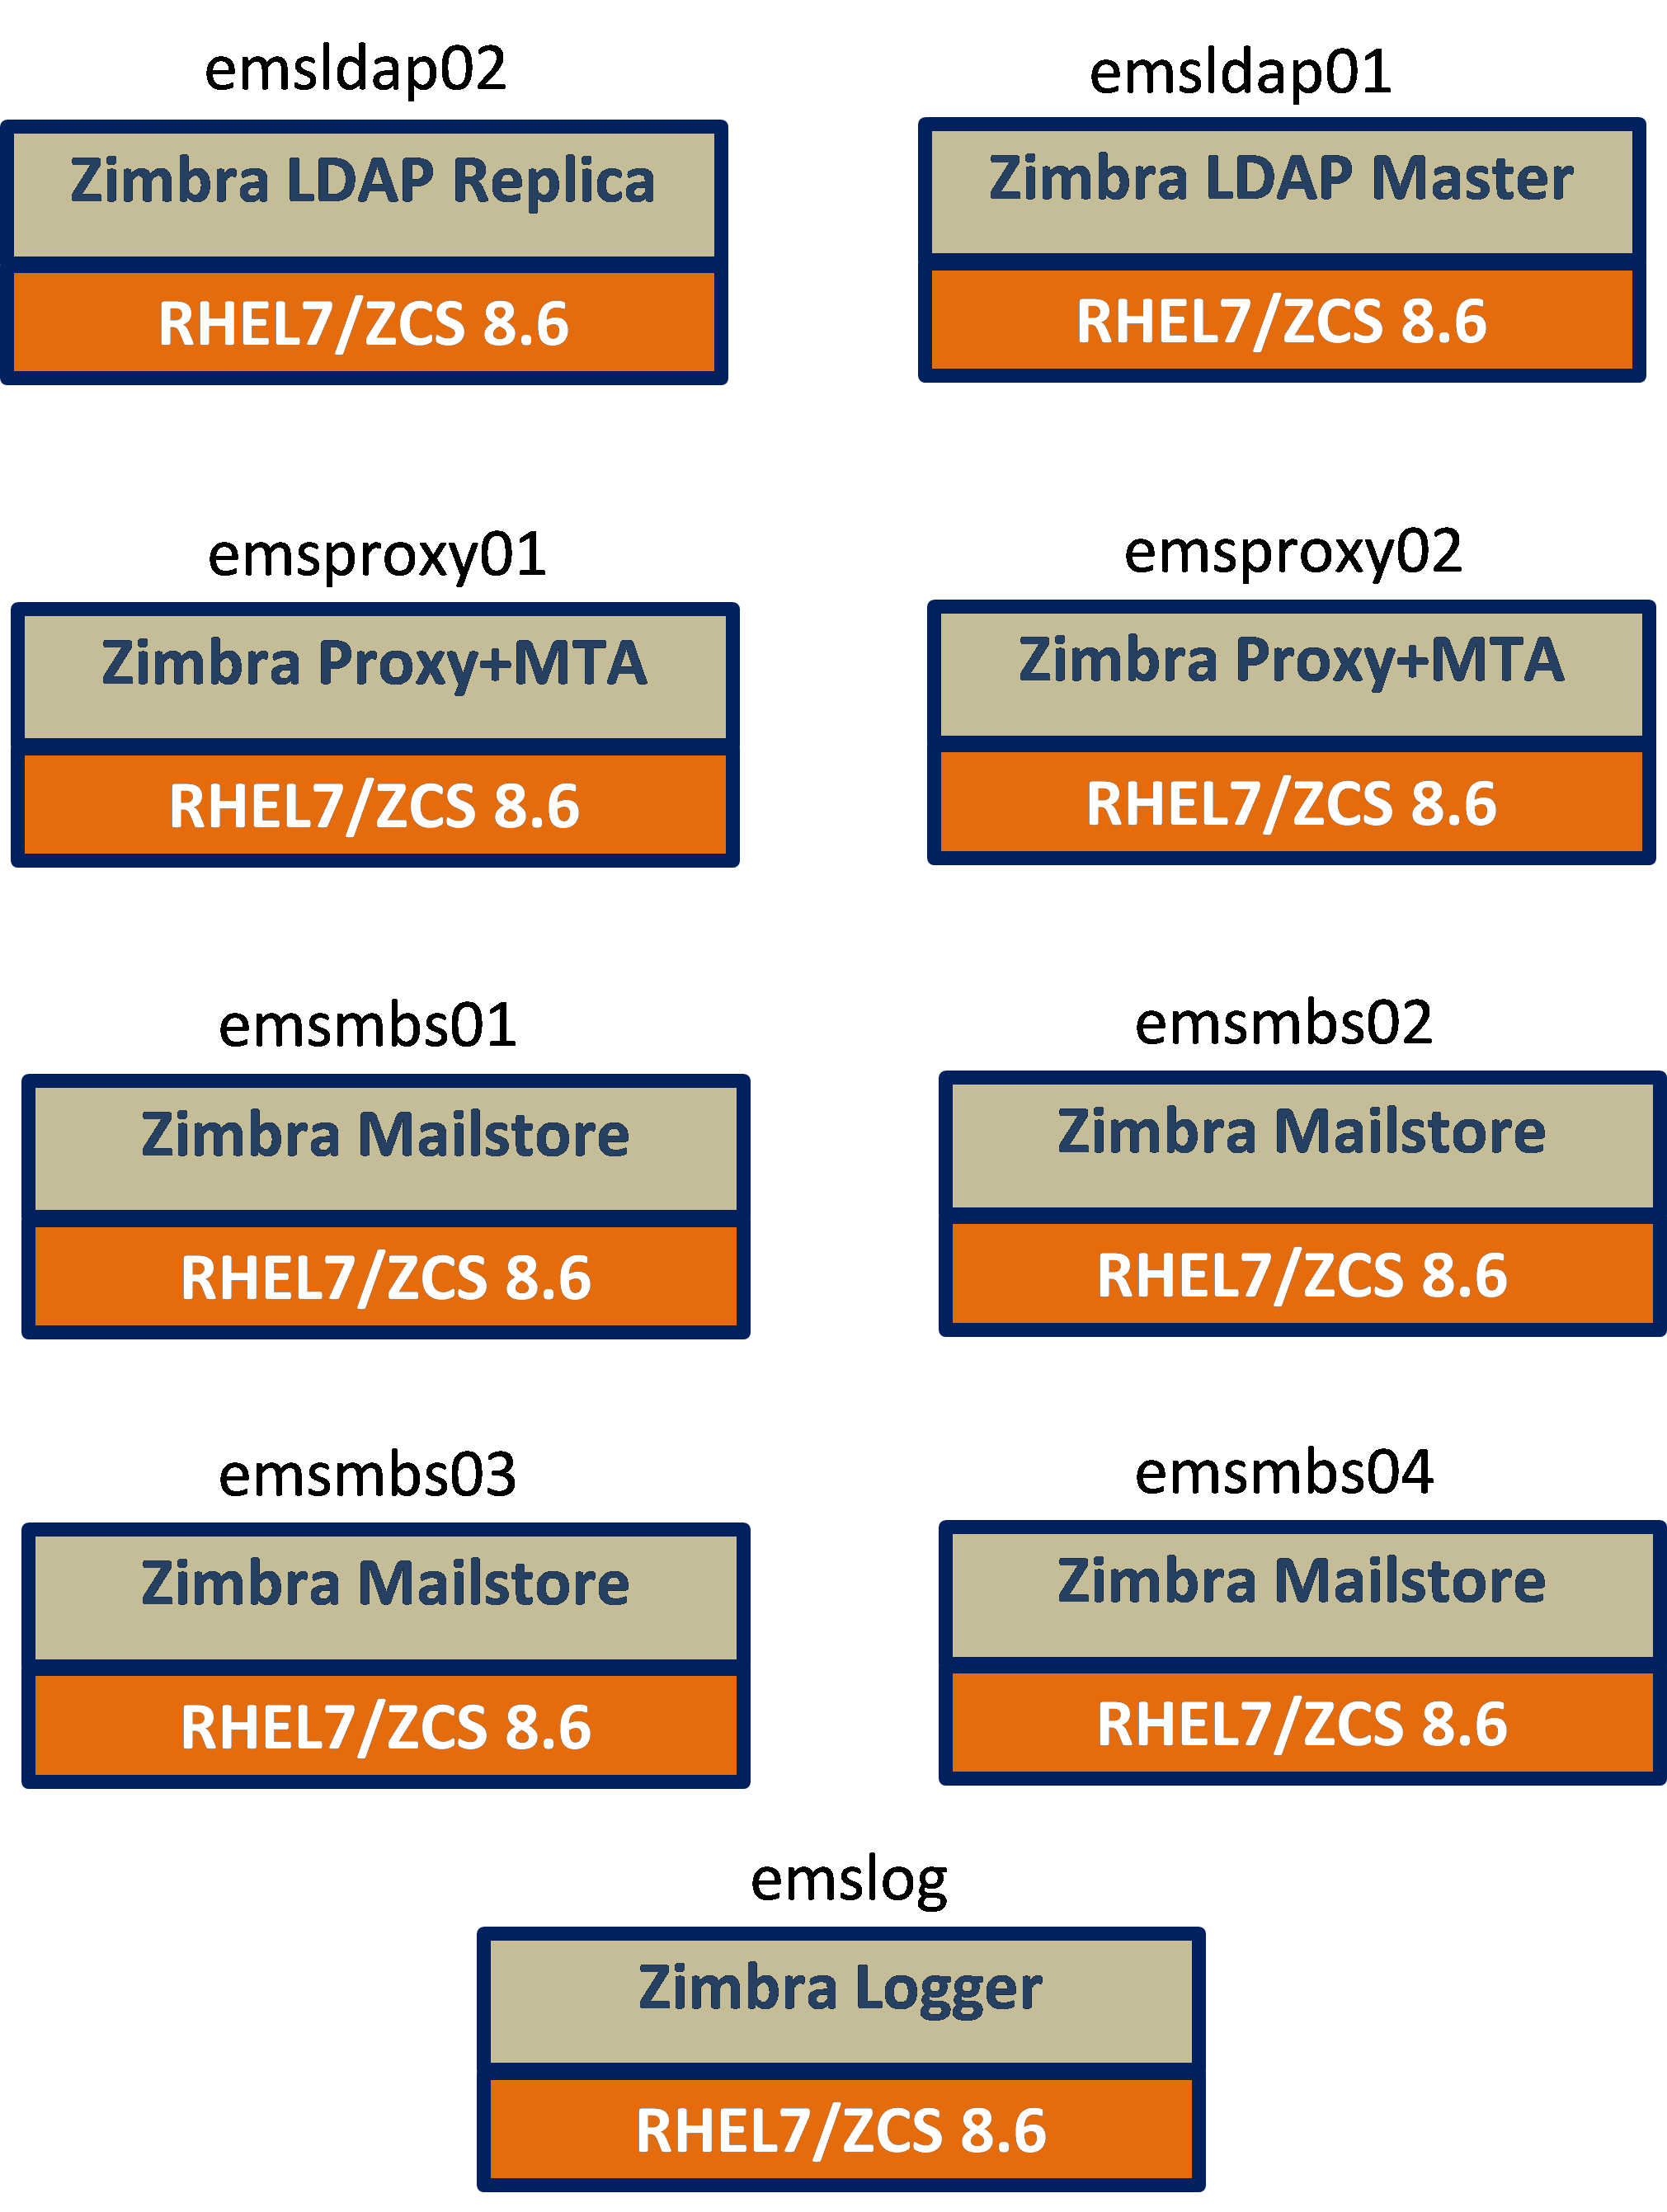
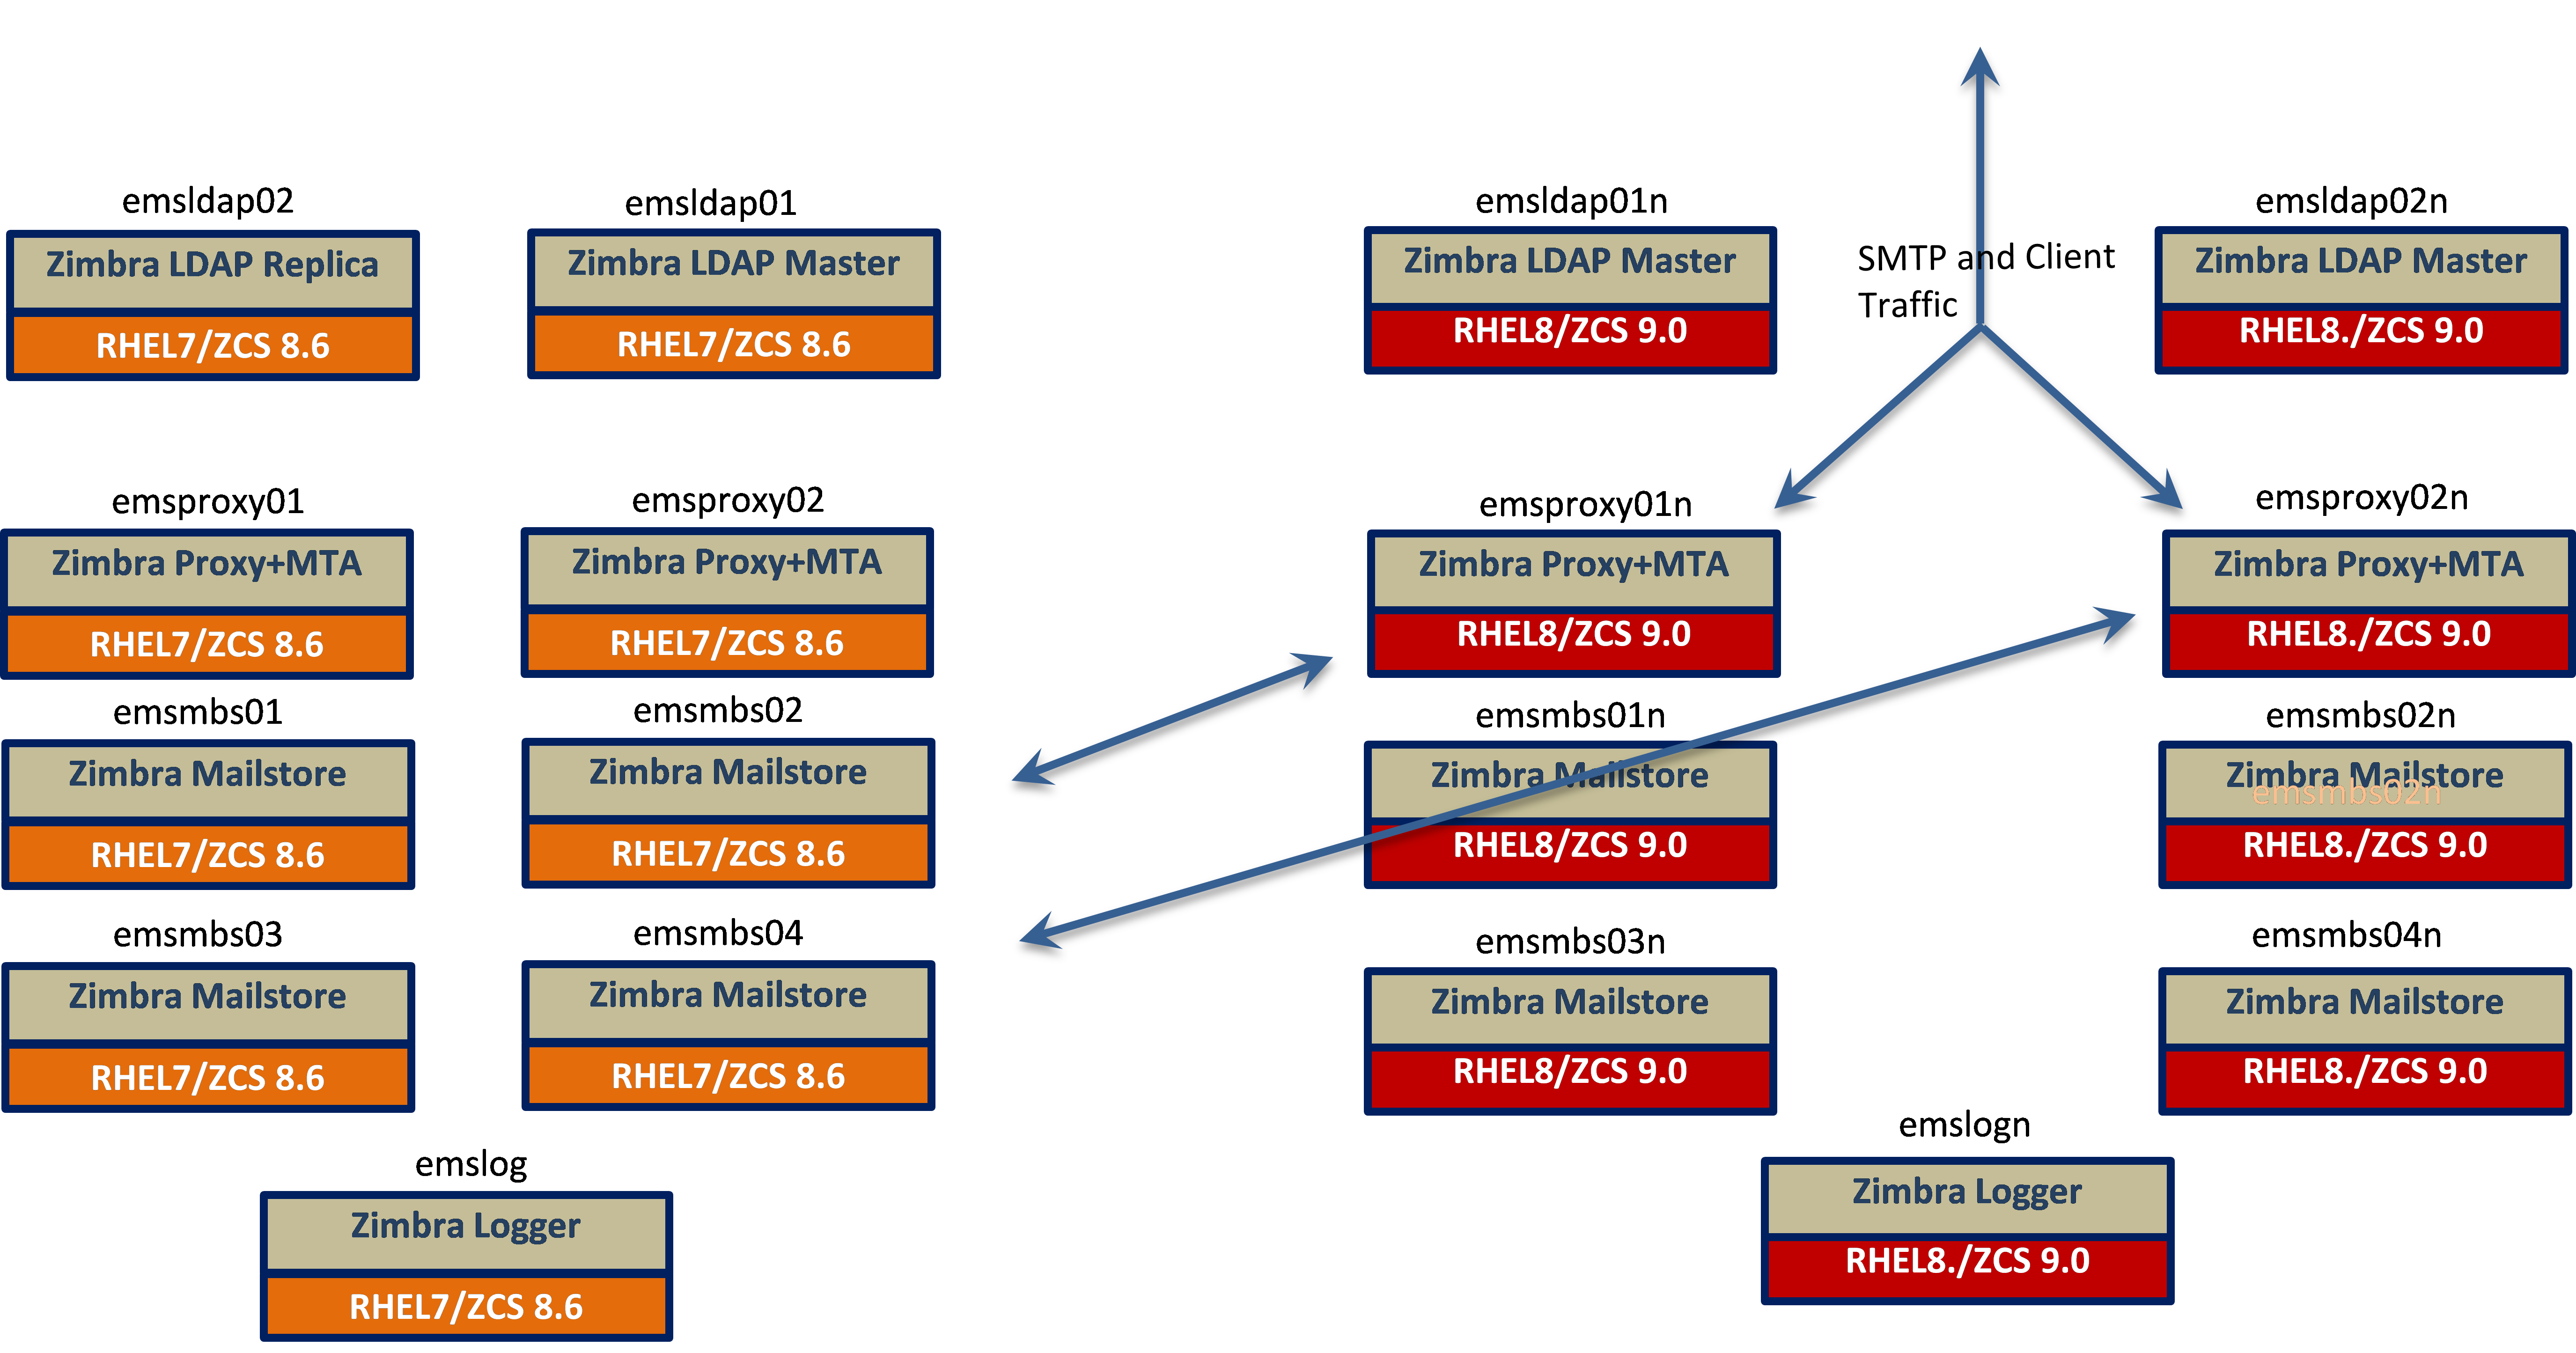
Environments Overview
The following is the hypothetical environment that we will upgrade:
-
Version: ZCS 8.8.15
-
RHEL 7.2
-
Approximately 11,000 mailboxes
-
Approximately 4 TB of mail data
-
2 LDAP servers (Multi-Master)
-
2 Proxy+MTA servers
-
4 Mailstore servers
-
1 Logger server
-
Running within VMWare
Upgrading
-
Version 10.0
-
RHEL 8
Upgrade Phases
While the actual schedule around the upgrade is different for each environment and each customer opinion is extremely significant, Synacor PS prefers to establish a starting point for the discussion, based on a best practice that’s been successful for these types of upgrades.
The Upgrade process should involve different types events (labeled as “Phases” below) based on the Zimbra server role. The proper upgrade order for any Zimbra multi-server environment is typically done in this order.
| Phases | Events |
|---|---|
Phase 0 |
Preliminary Tasks |
Phase 1 |
LDAP Tier Upgrade |
Phase 2 |
LDAP Master Additions |
Phase 3 |
Proxy+MTA Additions + LDS |
Phase 4 |
Mailstore Additions |
Phase 5 |
Traffic Cutover |
Phase 6 |
Migration |
| We will setup LDS in Phase 3 when adding Proxy+MTA. |
| Zimbra recommends installing LDS either on a dedicated server or on any of the server in the following order Proxy or MTA or Mailstore node.. |
In general, each of the phases must be analyzed with the following considerations:
-
Service impact (effect of the event on the current mail service).
-
Required technical procedures (exact steps necessary for the execution of the event).
-
Validation methods (how the execution can be checked for correctness).
-
Contingency plan (how to back out or implement a contingency should execution encounter unforeseen circumstances).
Best Practices
There should also be normal, accompanying best practices:
-
An established maintenance window before the LDAP Tier Upgrade, where any necessary restarts of hosts or Zimbra services or intensive processes can be executed in advance of the upgrade.
-
A time period that begins just before the LDAP Tier Upgrade and ends just after the upgrade where no other changes are permitted to the hosts, guest OS, the networks, the storage, on which the Zimbra VMs reside, or the Zimbra application itself (a standard blackout period so the only changes are that of the upgrade procedures).
-
An account modification/provisioning blackout period that starts just before the LDAP Tier Upgrade and terminates just after; thus in the event of a roll-back to the LDAP state just before the upgrade, there is the assurance of no lost LDAP data.
| Often for end-users, simply issuing an email notification of the blackout period is necessary as well, as ZWC preferences mods or emailed contacts could potentially be lost in a roll-back scenario. |
-
Full lab simulation been performed with the exact versions used.
-
The local backup of key configuration data needs to be created outside of /var/tmp so they are not automatically purged on reboot.
-
Sufficient backup and documenting of the method and associated files for any non-standard configuration outside of Zimbra (customizations to MTAs, Proxys, Mailstores, Branding, etc).
High-Level Upgrade Steps
Phase 0 - Preliminary Tasks
-
Validate connectivity to Zimbra Repo and Files
-
Pull Zimbra release files (.tgz files)
-
Backup certain files/directories
Phase 1 - In place upgrade existing ZCS 8.8.15 LDAP Servers to ZCS 10.0 or latest release.
-
Upgrade LDAP Master first, than any other (Replica or Master)
-
Maintenance window required (some downtime, typically about 25 minutes per LDAP server).
-
Upon conclusion of this step, all 8.8.15 non-LDAP Zimbra servers will continue to interoperate with LDAP servers that have now been upgraded to ZCS 10.0.
-
-
Enable Sync agreement in existing Master for MMR to first new RHEL8 Master.
-
Use the
zmldapenable-mmrtool, adding MMR agreement to future RHEL8/ZCS 10.0 LDAP Master (only need the FQDN). -
Modify
zmlocalconfig ldap_master_urlandldap_urlvalues appropriately. -
Execute zmcontrol restart (1-2 minutes downtime).
-
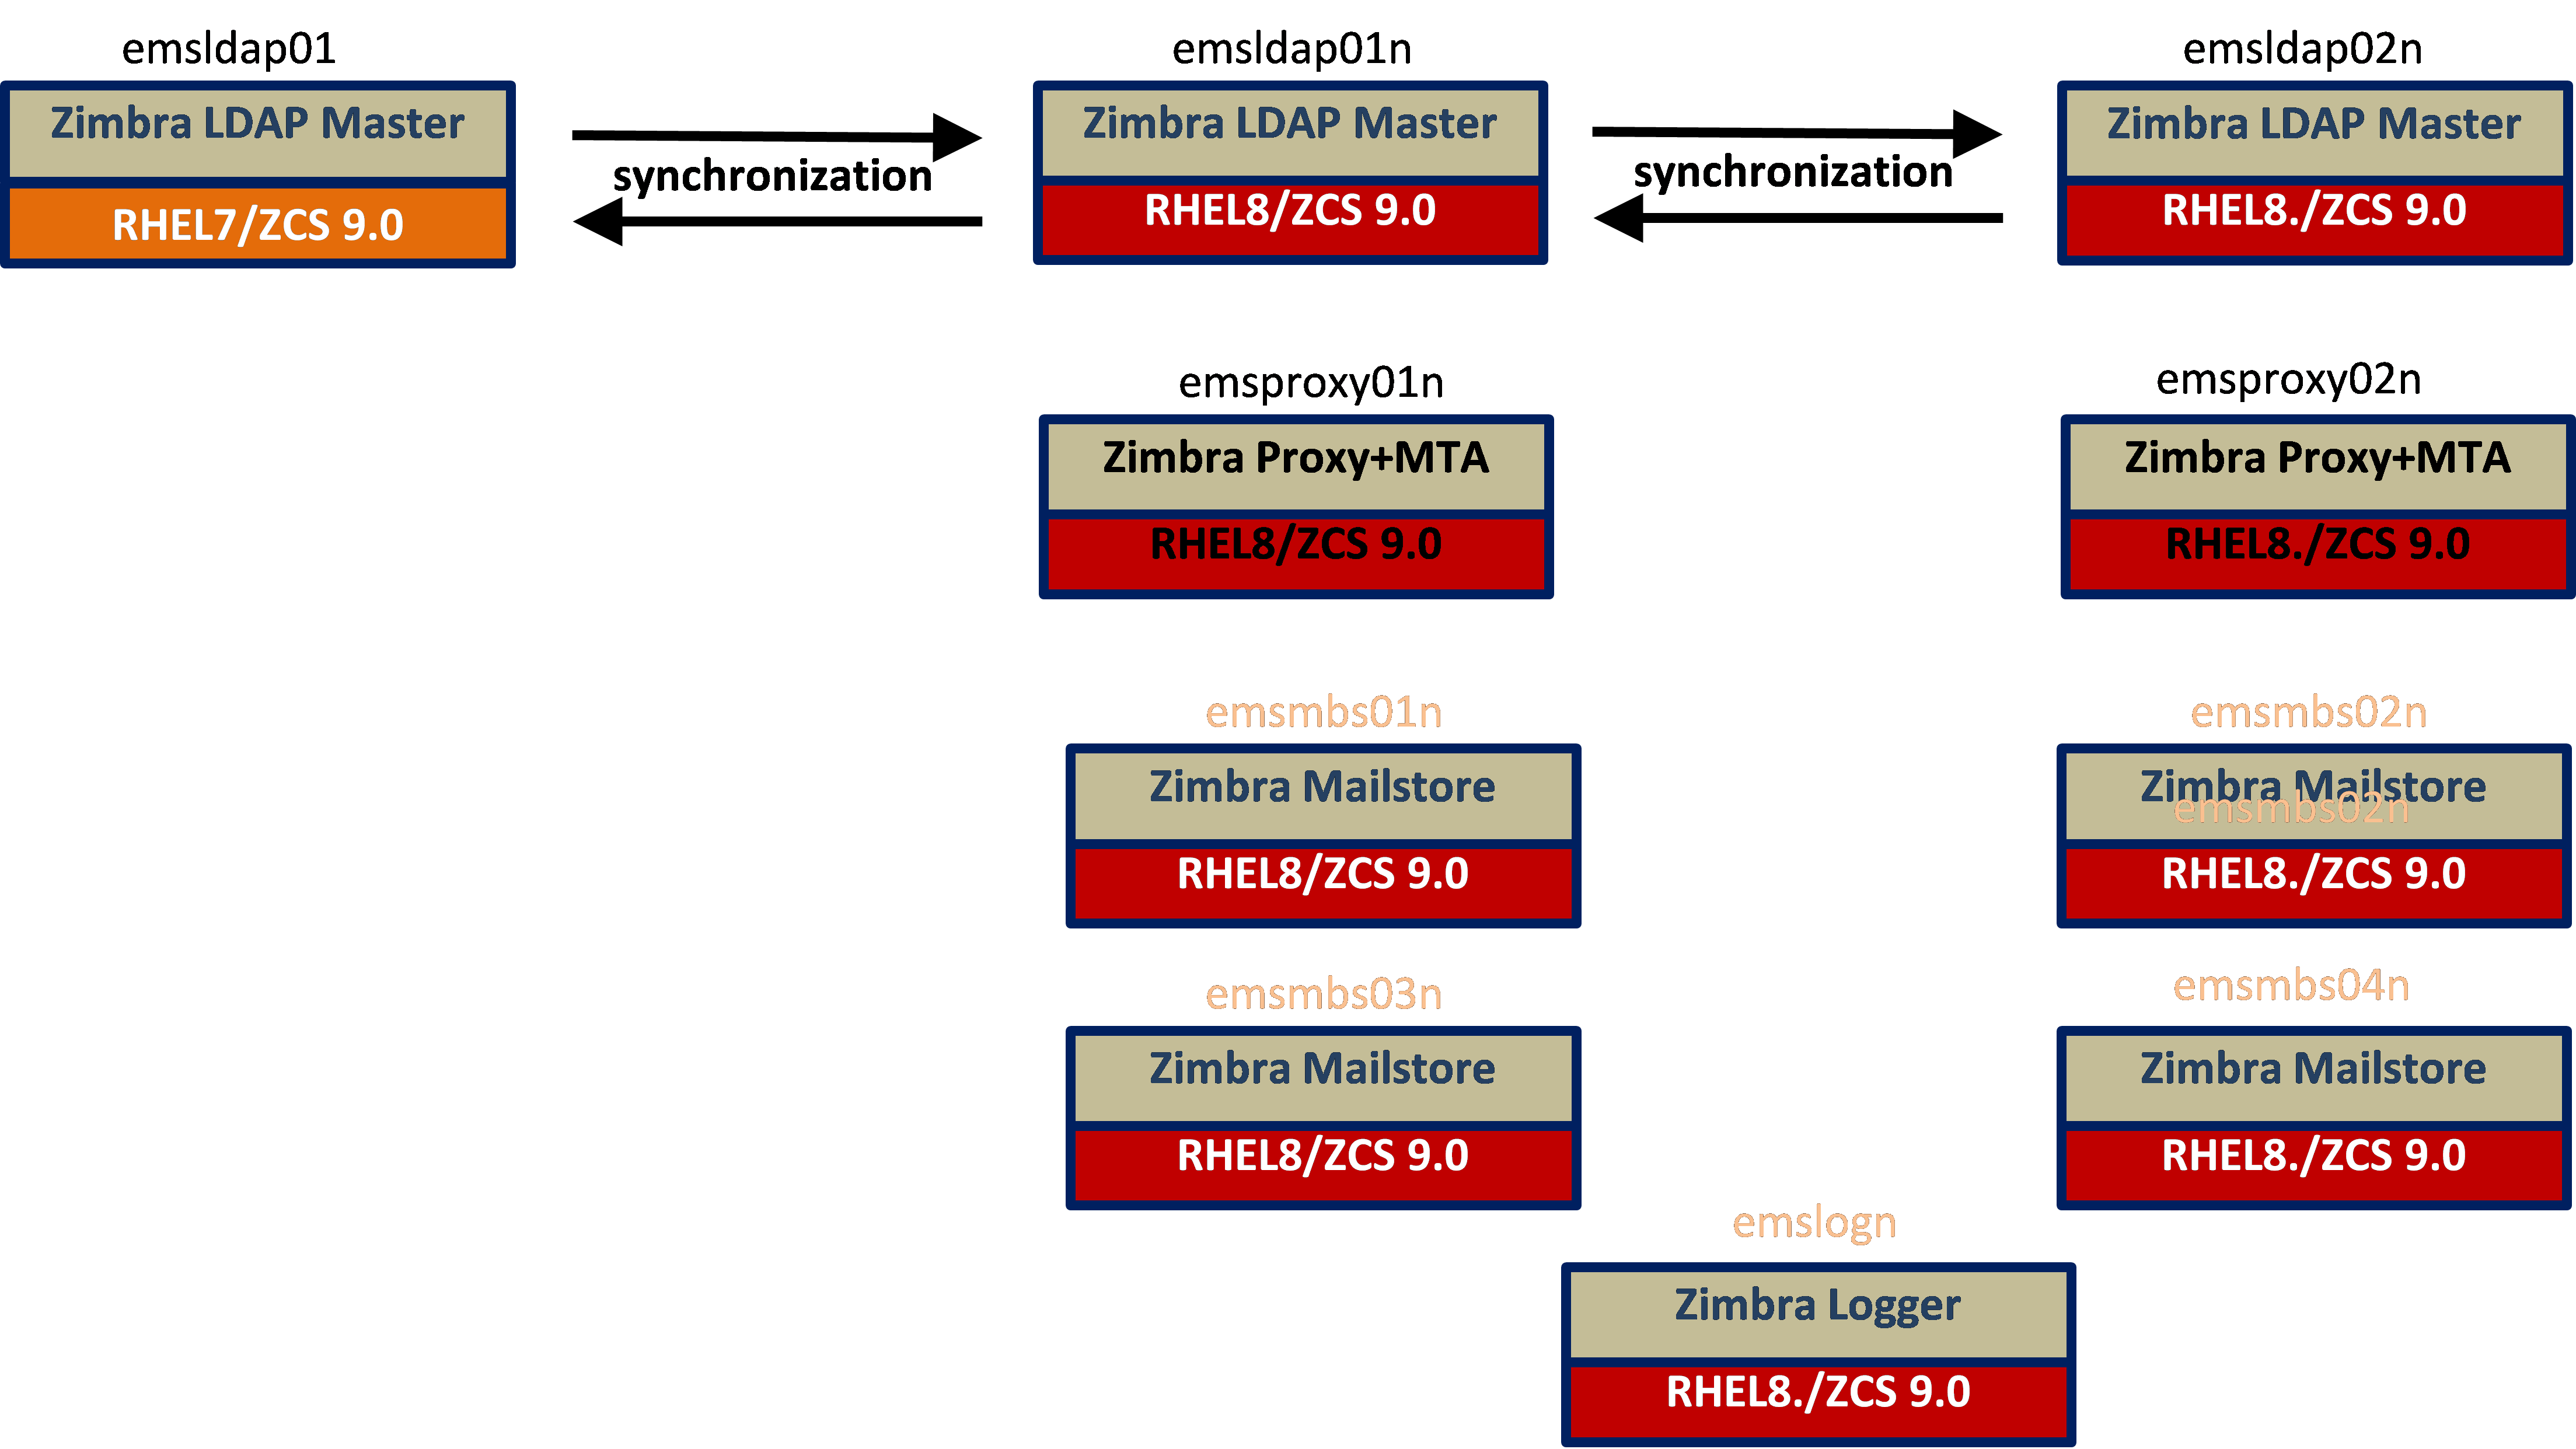
Phase 2 - Add two new LDAP Masters (RHEL8/ZCS 10.0)
-
Install/Config first RHEL8/ZCS 10.0 LDAP Master
-
Configure with reference to existing RHEL 7.2 LDAP Master.
-
Requires clean load of ldap.bak (zmslapcat/zmslapadd) from existing RHEL 7.2 LDAP Master.
-
No maintenance window is necessary.
-
-
Install/Config second RHEL8/ZCS 10.0 LDAP Master
-
Configure with reference to the first RHEL8/ZCS 10.0 LDAP Master
-
Requires clean load of ldap.bak (zmslapcat/zmslapadd) from existing RHEL 7.2 LDAP Master.
-
No maintenance window is necessary
-
Phase 3 - Add two new RHEL8/ZCS 10.0 Proxy+MTA servers and install LDS
-
Install/Config new RHEL8 Proxy+MTAs (ZCS v10.0)
-
LDAP source will be the new RHEL8 LDAP Masters.
-
Install
zimbra-license-daemonpackage. -
No maintenance window is necessary.
-
Phase 4 - Add new RHEL8/ZCS 10.0 Mailstores
-
Install/Config at least all RHEL8/ZCS 10.0 Mailstores.
-
LDAP source will be the new RHEL8 LDAP Masters.
-
No maintenance window is necessary.
-
Add customizations.
-
Phase 5 - Traffic Cutover to RHEL8/ZCS 10.0 Proxy+MTA servers
-
Validate in advance the SMTP and client traffic can successfully route through the new Proxy+MTA servers for mailboxes on both ZCS 8.8.15 and ZCS 10.0.
-
Verify Login Page and Portal Functionality through the new Proxy+MTA servers.
Phase 6 - Migration
-
Add Migration Server (RHEL6 or RHEL7)
-
Test account Migration
-
Pilot group Migration (friendlies)
-
Production Migration
Low-Level Upgrade Steps
Phase 0 - Preliminary Tasks
| These tasks should be executed immediately Prior to Phase 1 |
-
Validate access to the public Zimbra servers from 8815LDAP01 and 8815LDAP02 as the root user.
nc -zv files.zimbra.com 443 nc -zv repo.zimbra.com 443 yum search zimbra -
Obtain the ZCS 10.1.0 release for RHEL7 (as root), and download to 8815LDAP01 and 8815LDAP02 and unpack.
cd /usr/src wget https://files.zimbra.com/downloads/9.0.0_GA/zcs-NETWORK-10.1.0_GA_####.RHEL7_64.YYYYMMDD#######.tgz tar zxvf zcs-NETWORK-10.1.0_GA_####.RHEL7_64.YYYYMMDD#######.tgz -
Take VMware snapshots of the existing environment (RHEL7/ZCS 8.8.15 servers).
-
Setup firewall rules for all new RHEL8 servers.
Phase 1 - LDAP Tier Upgrade
Upgrading First Master (8815LDAP01)
-
Preparation (after the start of Zimbra application and OS modification blackout period)
-
Back up /opt/zimbra/conf directory on both LDAP hosts (as root)
cd /opt/zimbra/conf; tar -czvf /var/tmp/ozc.tgz * -
Backup LDAP databases on Masters
/opt/zimbra/libexec/zmslapcat /var/tmp /opt/zimbra/libexec/zmslapcat -c /var/tmp /opt/zimbra/libexec/zmslapcat -a /var/tmp -
Take VMWare Snapshot of VM.
-
-
Execute Upgrade
-
Disable Localconfig settings to get past the LDAP verification step
zmlocalconfig -e ldap_starttls_required=false zmlocalconfig -e ldap_starttls_supported=0 zmlocalconfig -e ssl_allow_untrusted_certs=true zmcontrol restart zmlocalconfig -s | grep -i bes_searcher zmldappasswd -b <password> -
Run the Zimbra install.sh program from the new release (as root)
cd /usr/src/zcs-NETWORK-10.1.0_GA_####.RHEL7_64.YYYYMMDD####### ./install.sh -
Enable multi-master replication to the first new RHEL8 Master then update the ldap_master_url and ldap_url to support LDAP redundancy.
-
| Enabling multi-master replication is needed before installing a new server. If you are planning to use existing LDAP servers, you can skip this section. |
[zimbra@8815LDAP01]#./libexec/zmldapenable-mmr -r 101 -m ldap://10LDAP01.hostname.com:389/ (run zmldapmmrtool -q first)
[zimbra@ 8815LDAP01]# zmlocalconfig -e ldap_master_url="ldap:// ldap://8815LDAP01.hostname.com:389 ldap://8815LDAP02.hostname.com:389"
[zimbra@ 8815LDAP01]# zmlocalconfig -e ldap_url="ldap:// ldap://8815LDAP01.hostman.com:389 ldap://8815LDAP02.hostname.com:389"
[zimbra@ 8815LDAP01]# zmcontrol restart
Upgrading Secondary Master (8815LDAP02)
-
Preparation (after the start of Zimbra application and OS modification blackout period)
-
Back up
/opt/zimbra/confdirectory on all four LDAP hosts (as root)cd /opt/zimbra/conf; tar -czvf /var/tmp/ozc.tgz * -
Backup LDAP databases on Masters
/opt/zimbra/libexec/zmslapcat /var/tmp /opt/zimbra/libexec/zmslapcat -c /var/tmp /opt/zimbra/libexec/zmslapcat -a /var/tmp -
Take VMWare Snapshot of VM.
-
-
Execute Upgrade
-
Disable localconfig settings to get past the LDAP verification step
zmlocalconfig -e ldap_starttls_required=false zmlocalconfig -e ldap_starttls_supported=0 zmlocalconfig -e ssl_allow_untrusted_certs=true zmcontrol restart -
Run the Zimbra install.sh program from the new release (as root)
cd /usr/src/zcs-NETWORK-10.1.0_GA_####.RHEL7_64.YYYYMMDD####### ./install.sh -
Then set localconfig parameters.
[zimbra@ 8815LDAP01]# zmlocalconfig -e ldap_master_url="ldap://
ldap://8815LDAP02.hostname.com:389 ldap://8815LDAP01.hostname.com:389"
[zimbra@ 8815LDAP01]# zmlocalconfig -e ldap_url="ldap:// ldap://8815LDAP02.hostname.com:389 ldap://8815LDAP01.hostname.com:389"
[zimbra@ 8815LDAP01]# zmcontrol restart
-
| If you have more than 2 master or replica ldap, repeat steps until all existing LDAP’s have been upgraded. |
-
Validate Phase 1
-
Check LDAP applications by verifying authentication against 8815LDAP01 and 8815LDAP02.
-
Validate Synchronicity between the two LDAP Masters.
for i in \{8815LDAP01,8815LDAP02};do echo - ldap-$i -- && ldapsearch -xLLLH ldap://$i.{domain.com}:389 -s base contextCSN | grep context | awk '\{print $2}' | cut -c1-18 |grep 2021 ;done -
Execute ldapsearch to count objects on the Master (must run zmlocalconfig -s | grep -i pass to get ldap password)
for i in \{8815LDAP01,8815LDAP02}; do echo -- $i -- && ldapsearch -LLL -x -h $i.{domain.com}:389 -D 'uid=zimbra,cn=admins,cn=zimbra' -w XXXXXXX '(&(objectclass=zimbraAccount)(mail=*))' mail | wc -l; done -
Monitor /var/log/zimbra.log cadence on Masters
tail -f /var/log/zimbra.log
-
-
Validate Mail
-
Login to ZWC and send email to internal (other Zimbra users) and outside (Yahoo/Gmail account).
-
Login with Thick client using IMAP, send mail to internal (other Zimbra users) and outside (Yahoo/Gmail account).
-
Validate Zimbra Mobile (phone-based send/receive).
-
Observe /opt/zimbra/log/mailbox.log on mailstores (verify operations are occurring)
-
Check
zimbrCsrfTokenCheckEnabled- makes sure it is still FALSE (like current production), if set to TRUE issuezmprov -l mcf zimbraCsrfTokenCheckEnabled FALSE
-
-
Phase 1 Revert Strategy
-
Shut down (shutdown now -r) for each of
8815LDAP01and8815LDAP02. -
Revert snapshot taken in step 1c for each of
8815LDAP01and8815LDAP02
-
Maintenance Window Estimates for Phase 1
| Estimated Upgrade Time | Estimated True Outage Time | Suggested Maintenance Window Time |
|---|---|---|
25 minutes for each LDAP Master, an estimate of 75 minutes total |
25 minutes |
2 hours |
Milestone - At this point, all RHEL7 LDAP servers are upgraded to ZCS 10.0 ie latest release.
| Estimation time is based on all steps being verified within a test lab. |
Phase 2 - LDAP Master Additions
The following steps will add two new master LDAP’s to the cluster which can be any supported OS but needs to be the version which you are upgrading to.
| If you are using existing LDAP servers and not planning to add new servers, your LDAP’s are currently upgraded and this section can be skipped. |
Adding 10LDAP01
-
Execute a zmslapcat from
8815LDAP01and copy the resulting ldap.bak file to /var/tmp on 2 new LDAP servers./opt/zimbra/libexec/zmslapcat /var/tmp -
Validate access to the public Zimbra servers from your internal server using the root user:
nc -zv files.zimbra.com 443 nc -zv repo.zimbra.com 443 yum search zimbra cd /usr/src -
Obtain and prepare the ZCS 10 release for RHEL8 (as root) and Install ZCS 10.0
cd /usr/src wget zcs-NETWORK-10.1.0_GA_####.RHEL7_64.YYYYMMDD#####.tgz tar zxvf zcs-NETWORK-10.1.0_GA_####.RHEL7_64.YYYYMMDD#####.tgz cd zcs-NETWORK-10.1.0_GA_####.RHEL7_64.YYYYMMDD##### ./install.sh-
Packages to Install
-
zimbra-ldap
-
zimbra-snmp
-
-
On the installation menu, choose "1" for common configuration
-
Change the LDAP master hostname to 8815LDAP01.
-
Change the LDAP admin password to that of the Zimbra LDAP admin password on 8815LDAP01.hostname.com.
-
-
On the installation menu, choose "2" for LDAP configuration
-
Choose "4" to change the replication type to mmr instead of replica.
-
The Server ID for this secondary master will default to 2, you must change it to a unique value (4).
-
Change "7" to match the replica password from 8815LDAP01.
-
Change "8" to match the postfix password from 8815LDAP01.
-
Change "9" to match the amavis password from 8815LDAP01.
-
Change "10" to match the Nginx password from 8815LDAP01.
-
-
-
Updating 10LDAP01 is required if it cannot connect to itself.
zmlocalconfig -e ldap_master_url="ldap:// ldap://10LDAP01.hostname.com:389 ldap://10LDAP02.hostname.com:389" zmlocalconfig -e ldap_url"ldap:// ldap://10LDAP01.hostname.com:389 ldap://10LDAP02.hostname.com:389" zmlocalconfig -e ldap_starttls_supported=0 zmlocalconfig -e ldap_starttls_required=false ./zmldapmmrtool -u -o 100 -t off Zmcontrol restart (validate it connects to 8815LDAP01) -
Enable
10LDAP01.hostname.comfor multi-master replication with10LDAP02.hostname.com,but keep the agreement with8815LDAP01.hostname.com, and appropriately modifyzmlocalconfigsettings.[zimbra@10LDAP01]#./libexec/zmldapenable-mmr -r 101 -m ldap://10LDAP02.hostname.com:389/ [zimbra@10LDAP01]# ./zmldapmmrtool -u -o 101 -t critical [zimbra@ 10LDAP01]# zmcontrol restart -
Reload the LDAP database using the ldap.bak copied in step 1
-
As root make sure the ldap.bak is owned by Zimbra:
chown zimbra:zimbra /var/tmp/ldap.bak -
Execute the following as a Zimbra user:
zmcontrol stop
cd /opt/zimbra/data/ldap
mv mdb mdb.orig
mkdir -p mdb/db
mv accesslog accesslog.orig
mkdir -p accesslog/db
cd /opt/zimbra/libexec
./zmslapadd /var/tmp/ldap.bak
zmcontrol start
-
-
Regenerate new 10-year Self-Signed Certs using the Zimbra user.
cd /opt/zimbra/ssl
mv zimbra zimbra.old
cd /opt/zimbra/bin
./zmcertmgr createca -new
./zmcertmgr deployca
zmcertmgr createcrt -new -days 3650
zmcertmgr deploycrt self
zmcertmgr viewdeployedcrt
zmcontrol restart
tail -f /var/log/zimbra.log
zmprov -l ma zimbra.test2 zimbraPrefVoiceItemsPerPage 27 (some test account)
    NOTE: verify on 8815LDAP01 that it gets to change
zmlocalconfig -e ldap_starttls_required=true
zmlocalconfig -e ssl_allow_untrusted_certs=false
zmlocalconfig -e ldap_starttls_supported=1
zmcontrol restart
Adding 10LDAP02
-
Validate access to the public Zimbra servers from your internal server using the root user:
nc -zv files.zimbra.com 443 nc -zv repo.zimbra.com 443 yum search zimbra cd /usr/src -
Obtain and prepare the ZCS 10 release for RHEL8 (as root) and Install ZCS 10.0
cd /usr/src wget zcs-NETWORK-10.1.0_GA_####.RHEL7_64.YYYYMMDD#######.tgz tar zxvf zcs-NETWORK-10.1.0_GA_####.RHEL7_64.YYYYMMDD#######.tgz cd zcs-NETWORK-10.1.0_GA_####.RHEL7_64.YYYYMMDD####### ./install.sh-
Packages to Install
-
zimbra-ldap
-
zimbra-snmp
-
-
On the installation menu, choose "1" for common configuration
-
Change the LDAP master hostname to 10LDAP01.hostname.com.
-
Change the LDAP admin password to that of the Zimbra LDAP admin password on 10LDAP01.hostname.com.
-
-
On the installation menu, choose "2" for LDAP configuration
-
Choose "4" to change the replication type to mmr instead of replica.
-
The Server ID for this secondary master will default to 2, you must change it to a unique value (5).
-
Change "7" to match the replica password from 10LDAP01.
-
Change "8" to match the postfix password from 10LDAP01.
-
Change "9" to match the amavis password from 10LDAP01.
-
Change "10" to match the Nginx password from 10LDAP01.
-
-
-
Reload the LDAP database using the ldap.bak copied in step 1
-
As root make sure the ldap.bak is owned by Zimbra:
chown zimbra:zimbra /var/tmp/ldap.bak -
Execute the following as a Zimbra user:
zmcontrol stop
cd /opt/zimbra/data/ldap
mv mdb mdb.orig
mkdir -p mdb/db
mv accesslog accesslog.orig
mkdir -p accesslog/db
cd /opt/zimbra/libexec
./zmslapcat /var/tmp/ldap.bak
zmcontrol start
-
-
Modify zmlocalconfig settings on 10LDAP02 to support the new LDAP replicas.
[zimbra@ 10LDAP02]# zmlocalconfig -e ldap_master_url="ldap:// ldap://10LDAP02.hostname.com:389 ldap://10LDAP01.hostname.com:389" [zimbra@ 10LDAP02]# zmlocalconfig -e ldap_url"ldap:// ldap://10LDAP02.hostname.com:389 ldap://10LDAP01.hostname.com:389" [zimbra@ 10LDAP02]# zmcontrol restart -
Validate LDAP servers configuration and connectivity:
-
Validate Synchronicity between the two LDAP Masters.
for i in \{8815LDAP01,8815LDAP02,10LDAP01,10LDAP02};do echo - ldap-$i -- && ldapsearch -xLLLH ldap://$i.hostname.com:389 -s base contextCSN | grep context | awk '\{print $2}' | cut -c1-18 |grep 2021 ;done -
Execute ldapsearch to count objects on the Master (must run
zmlocalconfig -s | grep -ipass to get ldap password)for i in \{8815LDAP01,8815LDAP02,10LDAP01,10LDAP02}; do echo -- $i -- && ldapsearch -LLL -x -h $i.hostname.com:389 -D 'uid=zimbra,cn=admins,cn=zimbra' -w XXXXXXX '(&(objectclass=zimbraAccount)(mail=*))' mail | wc -l; done -
Monitor /var/log/zimbra.log cadence on Masters
tail -f /var/log/zimbra.log
-
-
Validate Mail flow and Client connectivity:
-
Login to ZWC and send email to internal (other Zimbra users) and outside (Yahoo/Gmail account).
-
Login with Thick client using IMAP, send mail to internal (other Zimbra users) and outside (Yahoo/Gmail account).
-
Validate Zimbra Mobile (phone-based send/receive).
-
Observe /opt/zimbra/log/mailbox.log on mailstores (verify operations are occurring).
-
Check
zimbrCsrfTokenCheckEnabled- makes sure it is still FALSE (like current production), if set to TRUE issuezmprov -l mcf zimbraCsrfTokenCheckEnabled FALSE.
-
-
-
Revert Strategy
-
The addition of new ZCS 10 LDAP servers will not affect current production. To remove the new ZCS 10 LDAP servers, you would execute:
zmprov ds 10LDAP01.hostname.com
zmprov ds 10LDAP02.hostname.com
-
State After LDAP Master Additions

Maintenance Window Estimates for Phase 2
| Estimated Install Time (includes testing) | Estimated True Outage Time | Suggested Maintenance Window Time |
|---|---|---|
45 minutes for each LDAP Master, an estimate of 90 minutes total |
No outage |
Maintenance Window Not Required (can be done any time) |
| Estimation time is based on all steps being verified within a test lab. |
Phase 3: Proxy+MTA Additions
This phase will involve the creation of two new servers that contains the Proxy and MTA modules along with LDS:
| If you are planning to utilize your current Proxy and MTA servers, you can do an in-place upgrade. Please be aware that the server will be off line during the upgrade process. If you have a single Proxy and/or MTA setup, your system will be off line during the upgrade. If the cluster has more than one proxy and/or MTA, the remaining servers will handle the traffic until the upgrade is completed. Zimbra recommends reviewing, understanding and testing how your setup will handle this scenario before performing the upgrade. |
-
Validate access to the public Zimbra servers from your internal servers using the root user:
nc -zv files.zimbra.com 443 nc -zv repo.zimbra.com 443 yum search zimbra cd /usr/src -
Obtain and prepare the ZCS 10.1 release for RHEL8 (as root) and Install ZCS 10.0
cd /usr/src wget zcs-NETWORK-10.1.0_GA_####.RHEL7_64.YYYYMMDD#######.tgz tar zxvf zcs-NETWORK-10.1.0_GA_####.RHEL7_64.YYYYMMDD#######.tgz cd zcs-NETWORK-10.1.0_GA_####.RHEL7_64.YYYYMMDD####### ./install.sh-
Packages to Install
-
zimbra-mta
-
zimbra-dnscache
-
zimbra-mta
-
zimbra-snmp
-
zimbra-proxy
-
zimbra-memcached
-
zimbra-license-daemon
-
-
On the installation menu, choose "1" for common configuration
-
Change the LDAP master hostname to 10LDAP01.hostname.com.
-
Change the LDAP admin password to that of the Zimbra LDAP admin password on 10LDAP01.hostname.com.
-
-
-
Apply Commercial SSL Certificates
-
Copy commercial certs to /opt/zimbra/ssl/zimbra/commercial
-
Set permissions/ownership for commercial certs
-
zmcertmgr verifycrt
-
zmcertmgr deploycrt
-
-
Verify and/or settings the following configuration:
a. Update zimbraMailTrustedIP
b. Update zimbraHttpThrottleSafeIps
c. Check zimbraMtaMyNetworks (subnet should already be included) at the server level
d. zmprov ms `zmhostname` zimbraMtaCommandDirectory /opt/zimbra/common/sbin
e. zmprov ms `zmhostname` zimbraMtaDaemonDirectory /opt/zimbra/common/libexec
f. zmprov ms `zmhostname` zimbraMtaMailqPath /opt/zimbra/common/sbin/mailq
g. zmprov ms `zmhostname` zimbraMtaManpageDirectory /opt/zimbra/common/share/man
h. zmprov ms `zmhostname` zimbraMtaNewaliasesPath /opt/zimbra/common/sbin/newaliases
i. zmprov ms `zmhostname` zimbraMtaSendmailPath /opt/zimbra/common/sbin/sendmail
j. zmprov ms `zmhostname` zimbraMtaSenderCanonicalMaps 'proxy:ldap:/opt/zimbra/conf/ldap-canonical.cf'
k. zmprov ms `zmhostname` -zimbraServiceEnabled antispam
l. zmprov ms `zmhostname` zimbraReverseProxyMailMode redirect
m. Check zmocalconfig for admin@<fqdn_of_this_host>, change to admin@hostname.com
n. zmlocalconfig -e ldap_master_url=”ldap://10LDAP01.hostname.com:389 ldap://10LDAP02.hostname.com:389”
o. zmlocalconfig -e ldap_url=”ldap://10LDAP02.hostname.com:389 ldap://10LDAP01.hostname.com:389”
| The following two commands need to be ran on each proxy after installing the first two new mailstores. |
emsproxy01n
zmprov ms `zmhostname` zimbraReverseProxyUpstreamLoginServers emsmbs01n.hostname.com
emsproxy02n
zmprov ms `zmhostname` zimbraReverseProxyUpstreamLoginServers emsmbs02n.hostname.com-
Validate setup and configuration;
-
Initial Checks of Zimbra Health
zmcontrol status for i in \{25,80,110,143,443,465,587,993,995};do lsof -i:$i; done nc -zv mailstore 7025 nc -zv ldap 389 nc -zv other_proxy 11211 -
Test/Validate routing (use command line tools and email clients)
-
Port 25
-
Port 587
-
Port 465
-
Port 80
-
Port 443
-
Port 110
-
Port 143
-
Port 995
-
Port 993
-
-
-
Validate Mail:
-
Login to ZWC and send email to internal (other Zimbra users) and outside (Yahoo/Gmail account).
-
Login with Thick client using IMAP, send mail to internal (other Zimbra users) and outside (Yahoo/Gmail account).
-
Validate Zimbra Mobile (phone-based send/receive).
-
Observe /opt/zimbra/log/mailbox.log on mailstores (verify operations are occurring)
-
-
Revert Strategy
-
The addition of new ZCS 10 Proxy+MTA servers will not affect current production. To remove the new ZCS 10 Proxy+MTA servers, you would execute:
zmprov ds emsproxy01n.hostname.com
zmprov ds emsproxy02n.hostname.com
-
State After Proxy+MTA Additions

| The production inbound client and mail connections are currently directed to emsproxy01 and emsproxy02, emsproxy01n and emsproxy02n are active and listening but not receiving active connections. |
Maintenance Window Estimates for Phase 3
| Estimated Install Time | Estimated True Outage Time | Suggested Maintenance Window Time |
|---|---|---|
20 minutes for each Proxy/MTA, an estimate of 60 minutes total |
No outage |
Maintenance Window Not Required (can be done any time) |
Estimated Post Install Time (configuration, tuning, testing) |
Estimated True Outage Time |
Suggested Maintenance Window Time |
2 hours each proxy |
No outage |
Maintenance Window Not Required (can be done any time) |
Phase 4 - Mailstore Additions
This step will involve the creation of new Zimbra mailstores and a new logger server. It is recommended to create all mailstores at the same time but not required.
| Since you are going to setup LDS on the new mailstore, enter Y for Install zimbra-license-daemon package. |
| For a rolling migration, phase 4 is required. Doing an in-place upgrade will stop the mail store and all users on the store will be off line during the upgrade. Also with the migration from 8.8.15 / 9.0 with NG modules you will need to ensure, you have utilize the migration tools for data some retention. |
-
The following modification will configure the existing 8.8.15 proxies to utilize the 8.8.15 stores as the only login page.
-
zmprov ms emsproxy01.hostname.com +zimbraReverseProxyUpstreamLoginServers emsmbs01.hostname.com
-
zmprov ms emsproxy01.hostname.com +zimbraReverseProxyUpstreamLoginServers emsmbs02.hostname.com
-
zmprov ms emsproxy02.hostname.com +zimbraReverseProxyUpstreamLoginServers emsmbs01.hostname.com
-
zmprov ms emsproxy02.hostname.com +zimbraReverseProxyUpstreamLoginServers emsmbs02.hostname.com
-
-
Validate access to the public Zimbra servers from your internal server using the root user:
nc -zv files.zimbra.com 443 nc -zv repo.zimbra.com 443 yum search zimbra cd /usr/src -
Obtain and prepare the ZCS 10.1.0 release for RHEL8 (as root) and Install ZCS 10.1.0 or latest release.
cd /usr/src wget zcs-NETWORK-10.1.0_GA_####.RHEL7_64.YYYYMMDD#######.tgz tar zxvf zcs-NETWORK-10.1.0_GA_####.RHEL7_64.YYYYMMDD#######.tgz cd zcs-NETWORK-10.1.0_GA_####.RHEL7_64.YYYYMMDD####### ./install.sh-
Packages to Install
-
zimbra-snmp
-
zimbra-store
-
zimbra-apache
-
zimbra-spell
-
zimbra-converted
-
-
| Only a single instance of Zimbra-Logger is needed. You can install logger onto a standalone or a mailbox store by selecting Y for zimbra-logger. Do not install more than one instance, it is not needed. |
-
On the installation menu, choose "1" for common configuration
-
Change the LDAP master hostname to 10LDAP01.hostname.com.
-
Change the LDAP admin password to that of the Zimbra LDAP admin password on 10LDAP01.hostname.com.
-
-
While the Installation is occurring, using 10LDAP01 review the default COS and global config
-
Remove from default COS zimbraMailHostPool
-
Remove from zimbraReverseProxyUptreamLoginServers
-
Remove from zmprovReverseProxyLookupTarget
-
Apply Commercial SSL Certificates (if necessary)
-
Copy commercial certs to /opt/zimbra/ssl/zimbra/commercial
-
Set permissions/ownership for commercial certs
-
zmcertmgr verifycrt
-
zmcertmgr deploycrt
-
-
Validation
-
zmcontrol status
-
netstat -ntplu | grep java
-
for i in \{7025,7026,7071,7110,7143,7993,7995,8080,8443};do lsof -i:$i; done
-
nc -zv ldap 389
-
nc -zv other_proxy 11211
-
-
Tune Mailstore
-
Reset Localconfig keys
-
Reset MariaDB parameters
-
Reset server config values
-
Apply Zimlets
-
Check zmocalconfig for admin@<fqdn_of_this_host>, change to admin@hostname.com
-
Vm.swappiness setting
-
-
-
-
As root execute sysctl vm.swappiness=1
-
As root modify /etc/sysctl.conf, add the following lines
# Zimbra settings vm.swappiness = 0-
Mailbox Testing
-
Create test mailbox in new mailstores
-
Manually update new proxy to add new mailstores
-
Access the mailbox through a new proxy (direct)
-
-
Logger Configuration for emslog01n
Edit rsyslog.conf (enable UDP 514)
Run zmsyslogsetup (as root)
Run zmloggerinit (as zimbra)
Run zmupdateauthkeys (as zimbra)
Run zmcontrol restart (as zimbra)
Run systemctl restart rsyslog (as root)
Validate zimbraloghostname still points to emslog.hostname.com
-
-
At this point we can manually paste in the bottom of /etc/rsyslog.conf on all ZCS 10 servers, the following:
local0.* @emslogn.hostname.com local1.* @emslogn.hostname.com auth.* @emslogn.hostname.com local0.* -/var/log/zimbra.log local1.* -/var/log/zimbra-stats.log auth.* -/var/log/zimbra.log mail.* @emslogtn.hostname.com mail.* -/var/log/zimbra.log -
Restart rsyslog
[root@emsproxy01n etc]# service rsyslog restart -
Now the zimbra-stats and service up/down info will go to the emslog01n for the new version 10 servers only.
| Actual cutover to use emslog01n is TBD, will require a change to zimbraloghostname (global config) and execution of zmsyslogsetup and restart of rsyslog service on all Zimbra servers. |
-
Validate Mail
-
Login to ZWC and send email to internal (other Zimbra users) and outside (Yahoo or Gmail account).
-
Login with Thick client using IMAP, send mail to internal (other Zimbra users) and outside (Yahoo or Gmail account).
-
Validate Zimbra Mobile (phone-based send/receive).
-
Observe /opt/zimbra/log/mailbox.log on mailstores (verify operations are occurring).
-
-
Revert Strategy
-
The addition of new ZCS 10 Mailstore servers will not affect current production. To remove the new ZCS 10 Mailstores servers, you would execute:
zmprov ds emsmbs01n.hostname.com
zmprov ds emmbs02n.hostname.com
zmprov ds emsmbs03n.hostname.com
zmprov ds emsmbs04n.hostname.com
-
State after Mailstore Additions
Overall End State (all Zimbra servers)
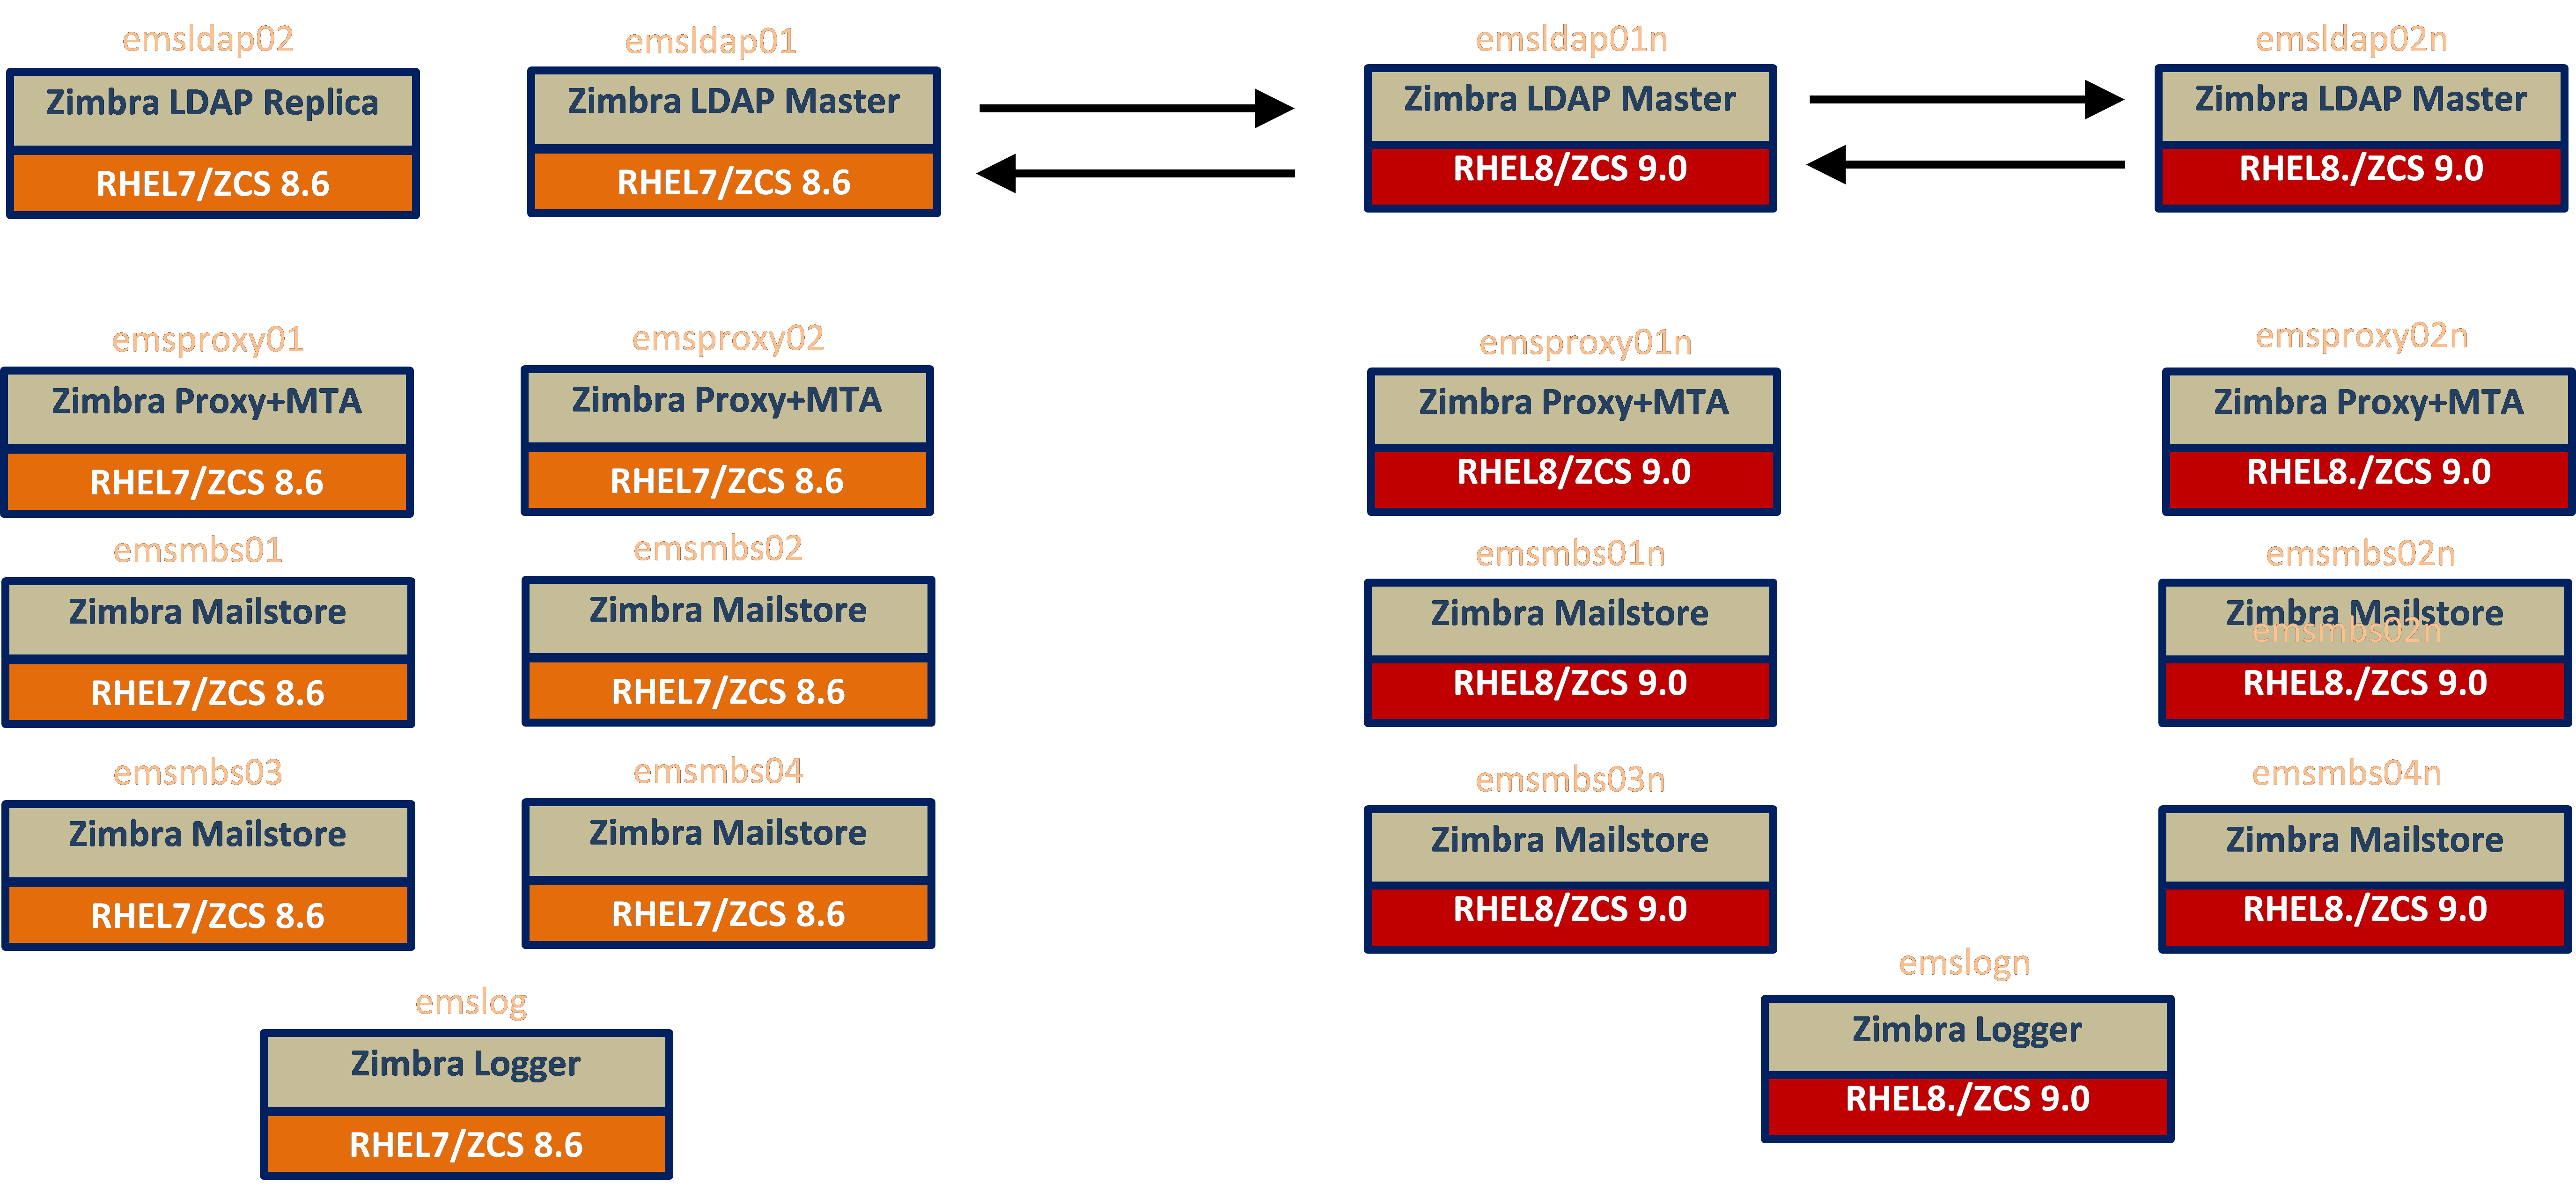
-
ZCS 10.1.0 side is completely built, but there is no impact on production - essentially idle.
-
You can now tune all ZCS 10.1.0 servers
-
Add test mailboxes to ZCS 10.1.0 mailstores
-
You can apply customizations
-
You can test scripts
-
You can execute isolated testing on the ZCS 10.0 side through the Proxy+MTAs
-
Preliminary testing using OpenSSL
-
Direct client connections for all secure POP, IMAP, HTTP and SMTP (25, 465, 587)
-
Test against test mailboxes on the ZCS 8.8.15 mailstores
-
Maintenance Window Estimates for Phase 4
| Estimated Install Time | Estimated True Outage Time | Suggested Maintenance Window Time |
|---|---|---|
45 minutes for each mailstore but can install in a parallel estimate of 120 minutes total |
No outage |
Maintenance Window Not Required (can be done any time) |
Estimated Post Install Time (configuration, tuning, customizations, testing) |
Estimated True Outage Time |
Suggested Maintenance Window Time |
4 hours each mailstore and logger |
No outage |
Maintenance Window Not Required (can be done any time) |
Phase 5 - Traffic Cutover
-
Validate in advance the SMTP and client traffic can successfully route through the new Proxy+MTA servers for mailboxes on both ZCS 8.8.15 and ZCS 10.0
-
Testing and Validation (initiate SMTP and client traffic at new MTA and Proxies, validate successful connectivity to ZCS 8.8.15 and 10.0 mailstores)
-
Verify Login Page and Portal Functionality through the new Proxy+MTA servers
-
-
Execute Cutover
-
Review global config for zimbraMailTrustedIP and zimbraHttpThrottleSafeIps (adding in ZCS 10/RHEL8 IP addresses)
-
Issue zmmailboxdctl restart on all mailstores (ZCS 8.8.15 and ZCS 10.0)
-
Introduce first Proxy+MTA to production traffic by adding emsproxy01n to your external, inbound SMTP & HTTP/s relay.
-
Monitor/Evaluate
-
Remove one RHEL7.2/ZCS 8.8.15 Proxy+MTA server from Pool
-
Monitor/Evaluate
-
Repeat replacement procedures for the second Proxy+MTA
-
Soft Maintenance window recommended (execute upgrade during off-business hours)
-
Zmprov gacf zimbraReverseProxyUpstreamLoginServers should show all (ZCS 8.8.15 and ZCS 10.0) mailstores
-
Point all ZCS 8.8.15 servers to the new Logger
[root@emsproxy01 etc]# perl -pi -e 's/emslog01/emslog01n/g' /etc/rsyslog.conf
[root@emsproxy01 etc]# service rsyslog restart
Redirecting to /bin/systemctl restart rsyslog.service
-
-
-
As you add the new RHEL8/ZCS10 servers into production, you will need to update the Zimbra attribute zimbraThrottleSafeIps. At present you do not have your new production IPs within your list, but you can add them as well.
-
You don’t need to whitelist the LDAP or the migration server. So within the Phase 5 Cutover of traffic, we recommend adding the new production IPs to zimbraHttpThrottleSafeIPs, which can be done with a single request. The following is an example:
-
[zimbra@emsmbst02n ~]$ zmprov mcf +zimbrahttpthrottlesafeips xx.xx.xx.x1 +zimbrahttpthrottlesafeips xx.xx.xx.x2 +zimbrahttpthrottlesafeips xx.xx.xx.x3 +zimbrahttpthrottlesafeips xx.xx.xx.x4 +zimbrahttpthrottlesafeips xx.xx.xx.x5
+zimbrahttpthrottlesafeips xx.xx.xx.x6 +zimbrahttpthrottlesafeips xx.xx.xx.x7 +zimbrahttpthrottlesafeips xx.xx.xx.x8 +zimbrahttpthrottlesafeips xx.xx.xx.x9-
Because the mailstores will not pick up the change until you issue a zmmailboxdctl restart, you will have to do this on emsmbs01 - emsmbs04. We also have to do this on emsmbs01n - emsmbs04n, but these will not have any users on them (no impact). the zmmailboxctl restart only takes 30-60 seconds, so very, very minor, and minimized by the fact that you will have declared a maintenance window.
-
Revert Strategy
-
Change the RRDNS to refer to emsproxy01 and emsproxy02
-
-
After Phase 5 is complete
-
All traffic for ZCS 8.8.15 users will come through the ZCS 10 Proxy+MTA hosts
-
There will be a new Login Page (similar)
-
The ZCS 8.8.15 mailstores will continue to use ZCS 8.8.15 LDAP Masters
-
Maintenance Window Estimates for Phase 5
| Estimated Cutover Time (testing included) | Estimated True Outage Time | Suggested Maintenance Window Time |
|---|---|---|
90 minutes |
10-15 minutes |
Maintenance Window Required (because revert may be necessary) |
Phase 6 - Migration
-
Prepare Directories
-
Migrate single account
-
Validate fidelity of mailbox
-
Migrate pilot group (friendlies)
-
Production Migration
-
Prepare a migration list;
-
Test accounts
-
Pilot group of friendly users
-
Migrate all users
-
-
Maintenance Window Estimates for Phase 6
| Estimated Migration Time | Estimated True Outage Time | Suggested Maintenance Window Time |
|---|---|---|
TBA Days |
No outage |
Maintenance Window Not Required (can be done any time) |
Migration Analysis
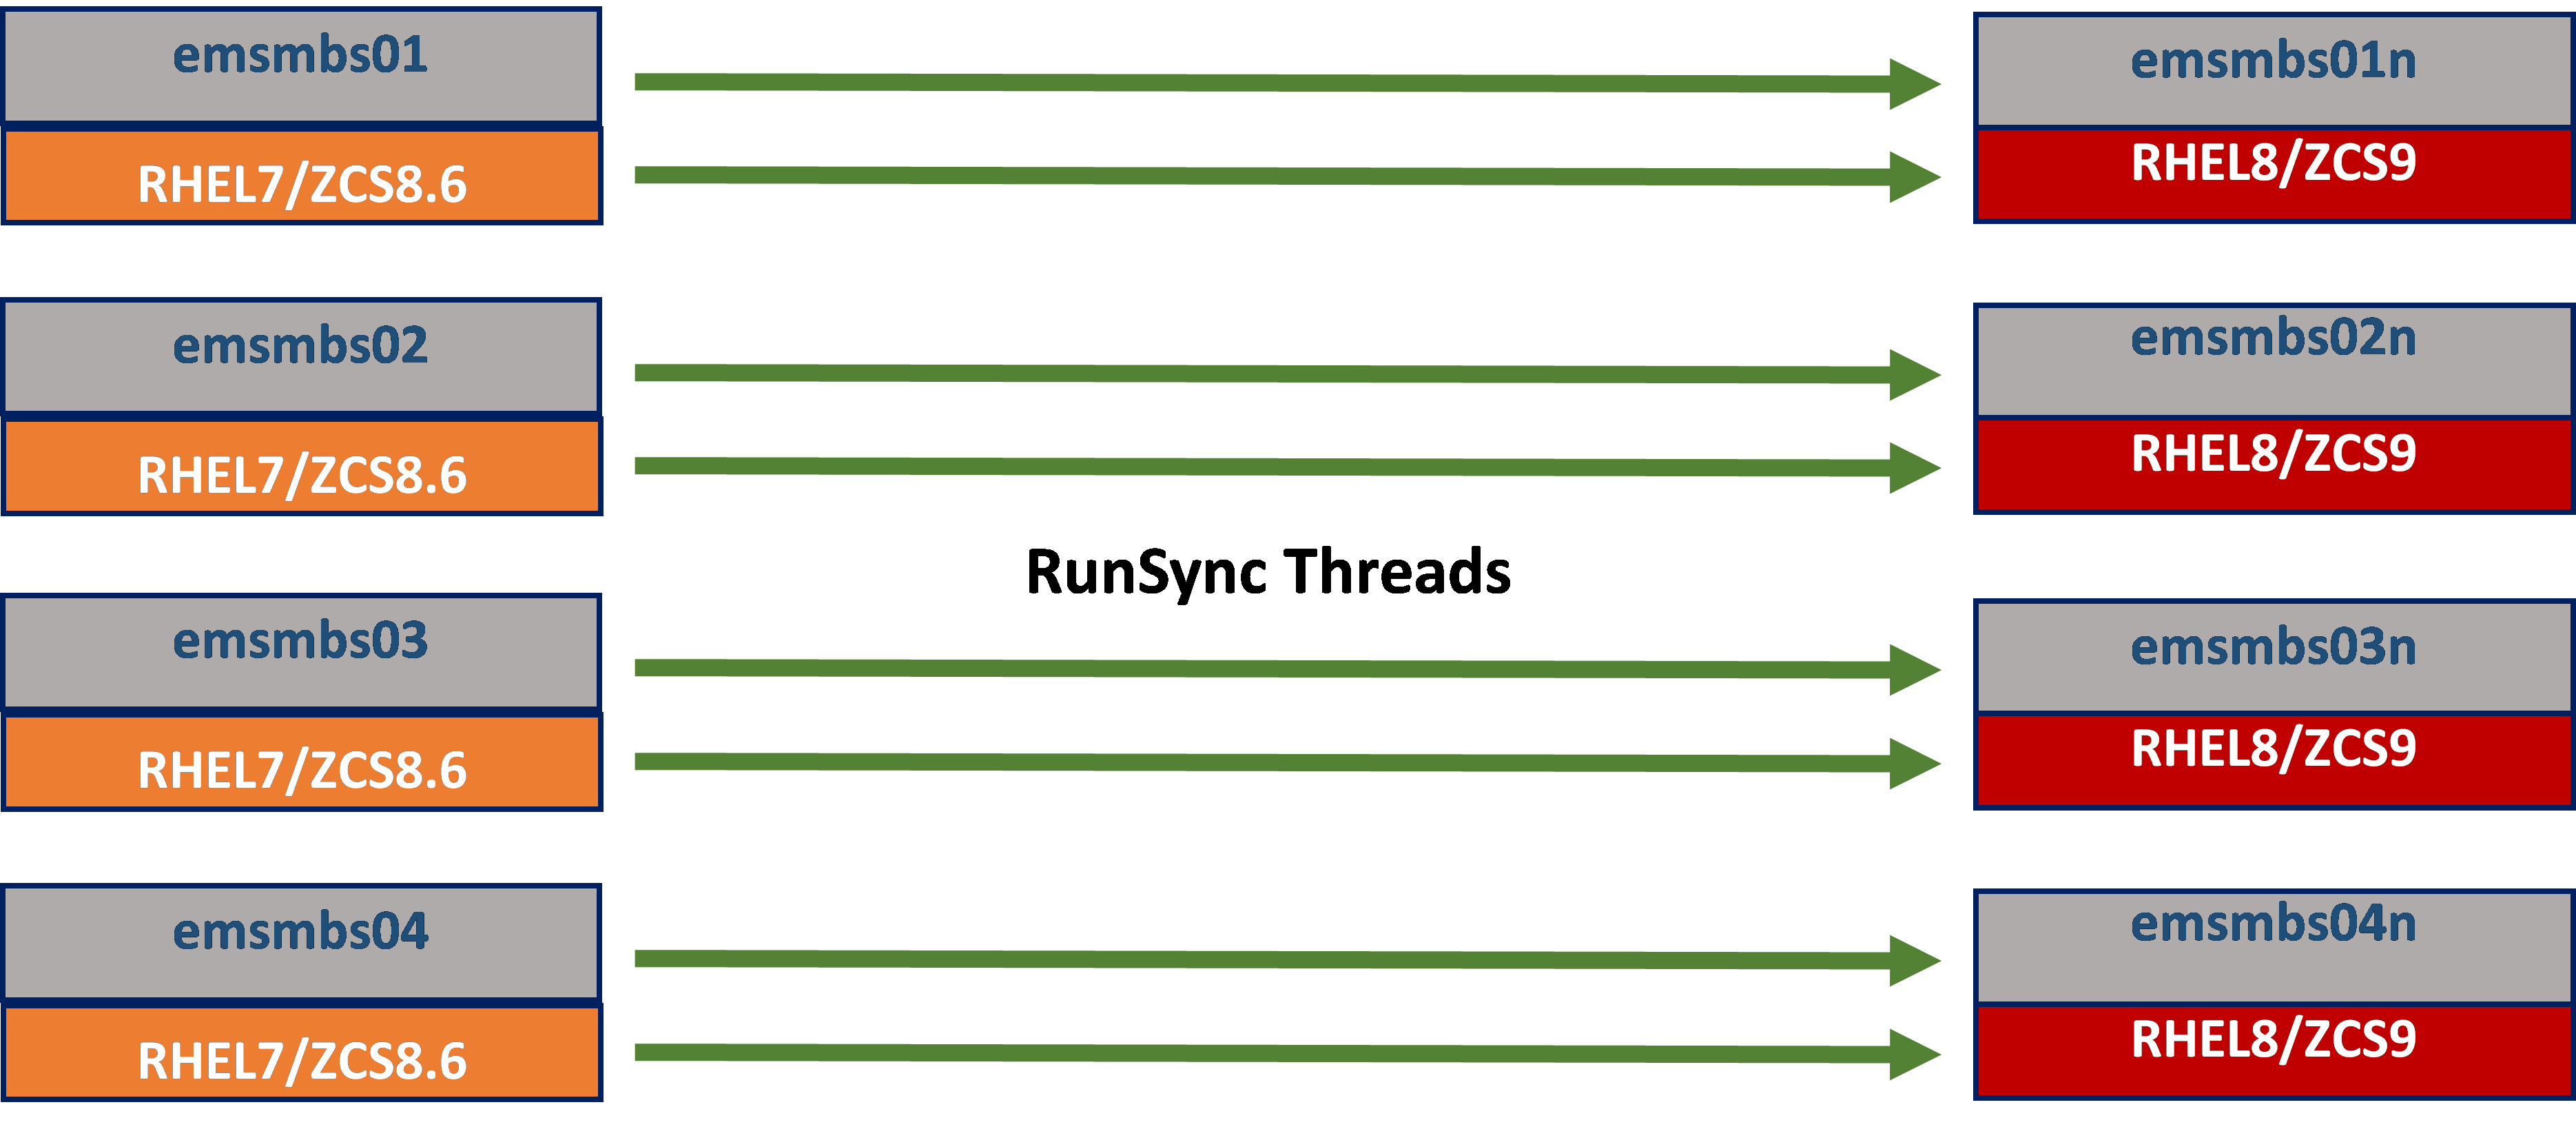
Building four new RHEL8/ZCS 10 mailstores in advance, it would provide the opportunity to execute parallel processing.
Key Assumptions
, The throughput rate that is typically achieved is about 20GB/Hour if using 2 threads between each source and destination mailstore. (But this is subject to change based on each environment). Although this will add some load on the Zimbra source and destination server it is typically undetectable by end users, however, to be safe - some customers opt to run the migration threads during non-business hours.
Using a single migration thread between the source and destination server drops the throughput down to around 12 GB/Hour, and the load increase on the source and the destination server is negligible which means the migration can be run through business hours with just a one hour break per 24 hours for remediation on any migration issues (typically solved by a simple retry of the migrated mailbox). Optionally, the migration can simply be run continuously until finished if using a single thread.
Installing dedicated LDS node
The License Daemon Service (LDS) is a new service that communicates with the Zimbra License Server in online mode and the Offline Daemon service (local installation) in offline mode. For more information, refer to admin guide LDS Overview section.
To separate the license daemon service from rest of the Zimbra services, you can setup a dedicated LDS node. You need to setup this node after installing/upgrading the LDAP server and before you begin to install/upgrade the Mailbox servers.
The package zimbra-license-daemon gets installed by default during Zimbra installation unless the administrator marks N for the package during Zimbra installation.
Unpack the Zimbra Daffodil (v10.1) and execute the installer script ./install.sh.
Type y and press Enter to install the zimbra-license-daemon package.
Select the packages to install

Install zimbra-ldap [Y] N

Install zimbra-logger [Y] N

Install zimbra-mta [Y] N

Install zimbra-dnscache [Y] N

Install zimbra-snmp [Y] N

Install zimbra-license-daemon [Y] Y

Install zimbra-store [Y] N

Install zimbra-apache [Y] N

Install zimbra-spell [Y] N

Install zimbra-convertd [Y] N

Install zimbra-memcached [Y] N

Install zimbra-proxy [Y] N

Install zimbra-archiving [N] N

Install zimbra-onlyoffice [Y] N

Install zimbra-patch [Y] N

Install zimbra-mta-patch [Y] N

Install zimbra-proxy-patch [Y] N
Complete the rest of the installation.