This document is applicable for Zimbra Daffodil versions 10.0 and 10.1.0.
License
 Synacor, Inc., 2024-2025
© 2024-2025 by Snacor, Inc. Zimbra Daffodil (v10) Single-Server Installation Guide
This work is licensed under the Creative Commons Attribution-ShareAlike 4.0 International License unless another license agreement between you and Synacor, Inc. provides otherwise. To view a copy of this license, visit http://creativecommons.org/licenses/by-sa/4.0 or send a letter to Creative Commons, PO Box 1866, Mountain View, CA 94042, USA.
Synacor, Inc., 2024-2025
505 Ellicott Street, Suite A39
Buffalo, NY 14203
US
IMPORTANT: Zimbra Daffodil (v10.1) Licensing Changes
|
Introduction
Zimbra Collaboration includes the Zimbra MTA, the Zimbra LDAP server, and the Zimbra mailbox server. In a single-server installation, all components are installed on one server and require no additional manual configuration.
This installation guide is a quick start guide that describes the basic steps needed to install and configure Zimbra Collaboration in a direct network connect environment. In this environment, the Zimbra 10 server is assigned a domain for which it receives mail, and a direct network connection to the Internet. When Zimbra Collaboration is installed, you will be able to log on to the Zimbra 10 administration console to manage the domain and provision accounts. The accounts you create are able to send and receive external email.
Important Notice About Single Server Installations
Zimbra Collaboration is designed to be the only application suite installed on the server. As part of the installation process, Zimbra Collaboration bundles and installs various other third party and open source software, including Eclipse Jetty, Postfix, and OpenLDAP®. The versions installed have been tested and configured to work with Zimbra 10 software. See the Zimbra Daffodil Administrator Guide for a complete list of software.
You cannot install Zimbra Daffodil (v10) without a license.
The following table shows the default port settings when Zimbra Collaboration is installed.
Zimbra 10 Port Mapping
External access
These are ports typically available to mail clients.
Port |
Protocol |
Zimbra Service |
Description |
25 |
smtp |
mta |
incoming mail to postfix |
80 |
http |
mailbox / proxy / LDS |
web mail client (disabled by default in 8.0) |
110 |
pop3 |
mailbox / proxy |
POP3 |
143 |
imap |
mailbox / proxy / LDS |
IMAP |
443 |
https |
mailbox / proxy - web mail client |
HTTP over TLS |
465 |
smtps |
mta |
Incoming mail to postfix over TLS (Legacy Outlook only? If possible, use 587 instead) |
587 |
smtp |
mta |
Mail submission over TLS |
993 |
imaps |
mailbox / proxy |
IMAP over TLS |
995 |
pop3s |
mailbox / proxy |
POP3 over TLS |
3443 |
https |
proxy |
User Certificate Connection Port (optional) |
5222 |
xmpp |
mailbox |
Default server port |
5223 |
xmpp |
mailbox |
Default legacy SSL port |
9071 |
https |
proxy admin console |
HTTP over TLS (optional) |
10000 |
udp |
video |
Network video/audio communications |
3478 |
udp |
video |
Quering the stun server |
5349 |
tcp |
video |
Fallback network video/audio communications over TCP (For e.g., when UDP is blocked), served by coturn |
Internal access
These are ports typically only used by the Zimbra system itself.
Port |
Protocol |
Zimbra Service |
Description |
389 |
ldap |
ldap |
LC(ldap_bind_url) |
636 |
ldaps |
ldaps |
if enabled via LC(ldap_bind_url) |
3310 |
- |
mta/clamd |
zimbraClamAVBindAddress |
5269 |
xmpp |
mailbox |
Server-to-Server communications between servers on the same cluster. |
7025 |
lmtp |
mailbox |
local mail delivery; zimbraLmtpBindAddress |
7026 |
milter |
mailbox |
zimbra-milter; zimbraMilterBindAddress |
7047 |
http |
conversion server |
Accessed by localhost by default; binds to '*' |
7071 |
https |
mailbox |
admin console HTTP over TLS; zimbraAdminBindAddress |
7072 |
http |
mailbox |
Zimbra 10 nginx lookup - backend http service for nginx lookup/authentication |
7073 |
http |
mailbox |
Zimbra 10 saslauthd lookup - backend http service for SASL lookup/authentication (added in Zimbra Collaboration 8.7) |
7110 |
pop3 |
mailbox |
Backend POP3 (if proxy configured); zimbraPop3BindAddress |
7143 |
imap |
mailbox |
Backend IMAP (if proxy configured); zimbraImapBindAddress |
7171 |
- |
zmconfigd |
configuration daemon; localhost |
7306 |
mysql |
mailbox |
LC(mysql_bind_address); localhost |
7307 |
mysql |
logger |
logger (removed in Zimbra Collaboration 7) |
7780 |
http |
mailbox |
spell check |
7993 |
imaps |
mailbox |
Backend IMAP over TLS (if proxy configured); zimbraImapSSLBindAddress |
7995 |
pop3s |
mailbox |
Backend POP3 over TLS (if proxy configured); zimbraPop3SSLBindAddress |
8080 |
http |
mailbox |
Backend HTTP (if proxy configured on same host); zimbraMailBindAddress |
8443 |
https |
mailbox |
Backend HTTPS (if proxy configured on same host); zimbraMailSSLBindAddress |
8465 |
milter |
mta/opendkim |
OpenDKIM milter service; localhost |
10024 |
smtp |
mta/amavisd |
to amavis from postfix; localhost |
10025 |
smtp |
mta/master |
opendkim; localhost |
10026 |
smtp |
mta/amavisd |
"ORIGINATING" policy; localhost |
10027 |
smtp |
mta/master |
postjournal |
10028 |
smtp |
mta/master |
content_filter=scan via opendkim; localhost |
10029 |
smtp |
mta/master |
"postfix/archive"; localhost |
10030 |
smtp |
mta/master |
10032; localhost |
10031 |
milter |
mta/cbpolicyd |
cluebringer policyd |
10032 |
smtp |
mta/amavisd |
(antispam) "ORIGINATING_POST" policy |
10663 |
- |
logger |
LC(logger_zmrrdfetch_port); localhost |
23232 |
- |
mta/amavisd |
amavis-services / msg-forwarder (zeromq); localhost |
23233 |
- |
mta/amavisd |
snmp-responder; localhost |
11211 |
memcached |
memcached |
nginx route lookups, mbox cache (calendar, folders, sync, tags); zimbraMemcachedBindAddress |
8081 |
- |
license daemon service |
Internally accessible from Mailbox to LDS |
80 |
http |
Offline daemon |
When using Offline method, internally accessible from Mailbox to LDS |
16700 |
- |
Offline PG daemon service |
When using Offline method, internally accessible from Mailbox to LDS |
System Access and Intra-Node Communication
In a multi-node environment the typical communication between nodes required includes:
Destination |
Source(s) |
Description |
ALL |
||
22 |
ALL |
SSH (system & zmrcd): host management |
udp/53 |
ALL |
DNS (system ¦ dnscache): name resolution |
Logger |
||
udp/514 |
ALL |
syslog: system and application logging |
LDAP |
||
389 |
ALL |
all nodes talk to LDAP server(s) |
MTA |
||
25 |
ldap |
sent email (cron jobs) |
25 |
mbox |
sent email (web client, cron, etc.) |
antivirus |
||
3310 |
mbox |
zimbraAttachmentsScanURL (not set by default) |
memcached |
||
11211 |
mbox |
mbox metadata data cache |
11211 |
proxy |
backend mailbox route cache |
Mailbox (mbox) |
||
80 |
proxy |
backend proxy http |
110 |
proxy |
backend proxy pop3 |
143 |
proxy |
backend proxy imap |
443 |
proxy |
backend proxy https |
993 |
proxy |
backend proxy imaps |
995 |
proxy |
backend proxy pop3s |
7025 |
mta |
all mta talk to any mbox (LMTP) |
7047 |
mbox |
localhost by default; zimbraConvertdURL |
7071 |
mbox |
all mbox talk to any mbox (Admin) |
7072 |
proxy |
zmlookup; zimbraReverseProxyLookupTarget |
7073 |
mta |
sasl auth; zimbraMtaAuthTarget (since Zimbra Collaboration 8.7) |
License Daemon Service (LDS) |
||
8081 |
mbox |
LDS |
80 |
mbox |
Offline Daemon |
16700 |
mbox |
Offline Daemon |
Important: You cannot have any other web server, database, LDAP, or MTA server running, when you install Zimbra Collaboration. If you have installed any of those applications before you install Zimbra 10 software, disable them. During Zimbra Collaboration installation, Zimbra 10 makes global system changes that may break applications that are on your server.
Preparing Your Server Environment
To successfully install and run Zimbra Daffodil, ensure your system meets the requirements described in this section. System administrators should be familiar with installing and managing email systems.
| Do not manually create the user zimbra before running the Zimbra 10 installation. The installation automatically creates this user and sets up its environment. |
System Requirements
For the Zimbra Daffodil system requirements see System Requirements for Zimbra Daffodil at the end of this guide.
Modifying Operating System Configurations
Zimbra Collaboration runs on one of several operating systems, including Ubuntu® LTS, Red Hat® Enterprise Linux, CentOS, Rocky and Oracle Linux.
A full default installation of the Linux distribution that you select is required.
| Zimbra recommends that the operating systems you use are updated with the latest patches that have been tested with Zimbra Collaboration. See the latest release notes to see the operating systems patch list that has been tested with Zimbra Collaboration. |
Configuring High-Fidelity Document Preview
This section is applicable only if zimbra-onlyoffice package was not installed during the installation process. Onlyoffice allows high fidelity document preview & collabarative editing.
|
The high-fidelity document preview feature requires the installation of LibreOffice or the LibreOffice-core package, depending on the operating system you are running.
If LibreOffice is installed, the system is automatically configured to use high-fidelity document preview. If LibreOffice is not installed, the preview engine from prior Zimbra Collaboration releases is used.
This can be accomplished with the appropriate Linux distribution’s package management systems:
-
For RHEL 7/8, install the libreoffice-core package:
yum install libreoffice
yum install libreoffice-core
-
For Ubuntu, install libreoffice:
apt-get install libreoffice
DNS Configuration Requirement
When you create a domain during the installation process, Zimbra Collaboration checks to see if you have an MX record correctly configured for that domain. If it is not, an error is displayed suggesting that the domain name have an MX record configured in DNS.
To send and receive email, the Zimbra 10 MTA must be configured in DNS with both A and MX records. For sending mail, the MTA uses DNS to resolve hostnames and email-routing information. To receive mail, the MX record must be configured correctly to route the message to the mail server.
You must configure a relay host if you do not enable DNS. After Zimbra Collaboration is installed, go to the administration console's Global Settings → MTA tab and:
-
Uncheck Enable DNS lookups.
-
Enter the relay MTA address to use for external delivery.
| Even if a relay host is configured, an MX record is still required if the Zimbra Collaboration server is going to receive email from the Internet. |
Overview of the Installation Process
When you run the install script, the process verifies that the correct prerequisite Zimbra application packages are available to be installed.
Zimbra 10 Application Packages
Zimbra 10 architecture includes open-source integrations using industry-standard protocols. The third-party software has been tested and configured to work with the Zimbra 10 software.
The following describes the Zimbra Collaboration application packages that are installed.
- Zimbra 10 Core
-
This package includes the libraries, utilities, monitoring tools, and basic configuration files. Zimbra 10 Core is automatically installed on each server.
- Zimbra 10 LDAP
-
User authentication is provided through
OpenLDAP®software. Each account on the Zimbra server has a unique mailbox ID that is the primary point of reference to identify the account. The OpenLDAP schema has been customized for Zimbra Collaboration.The Zimbra 10 LDAP server must be configured before any other servers.
You can set up LDAP replication, configuring a master LDAP server and replica LDAP servers.
- Zimbra 10 Store
-
This package includes the components for the mailbox server, including Jetty, which is the servlet container the Zimbra 10 software runs within. The Zimbra 10 mailbox server includes the following components:
- Data store
-
The data store is a MariaDB® database.
- Message store
-
The message store is where all email messages and file attachments reside.
- Index store
-
Index and search technology is provided through
Lucene. Index files are maintained for each mailbox. - Web application services
-
The
Jettyweb application server runs web applications (webapps) on any store server. It provides one or more web application services. - Zimbra 10 MTA
-
Postfixis the open source mail transfer agent (MTA) that receives email via SMTP and routes each message to the appropriate Zimbra 10 mailbox server using Local Mail Transfer Protocol (LMTP). The Zimbra 10 MTA also includes anti-virus and anti-spam components. - Zimbra 10 Proxy
-
Zimbra 10 Proxy is a high-performance reverse proxy service for passing IMAP[S]/POP[S]/HTTP[S] client requests to other internal Zimbra Collaboration services using
nginx. This package is normally installed on the MTA server(s) or on its own independent server(s). When the zimbra-proxy package is installed, the proxy feature is enabled by default.By default Zimbra 10 Proxy is configured to perform strict server name enforcement of the HTTP 'Host' header sent by clients for new installs. Strict server name enforcement may be disabled during the post-install configuration process in the Zimbra 10 Proxy configuration section or using the zimbraReverseProxyStrictServerNameEnabledconfiguration option. Please see the Zimbra 10 Proxy section of the administration guide for more details. - Zimbra 10 Modern Web App
-
This package includes the assets of the Zimbra 10 Modern Web App. This package is automatically installed on each server.
- Zimbra 10 Memcached
-
This package is automatically selected when the Zimbra 10-Proxy package is installed and provides access to
Memcached.At least one server must run zimbra-memcached when the Zimbra 10 Proxy service is in use. You can use a single memcached server with one or more Zimbra 10 proxies. - Zimbra 10 SNMP
-
Installing this package is optional.
If you choose to install Zimbra 10-SNMP for monitoring, this package should be installed on every Zimbra 10 server. - Zimbra 10 Logger
-
Installing this package is optional. It is installed on one mailbox server. It provides tools for
syslogaggregation and reporting.-
If you do not install Zimbra 10 Logger, the server statistics section of the administration console will not display.
-
The Zimbra 10 Logger package must be installed at the same time as the Zimbra 10 Store package.
-
- Zimbra 10 Spell
-
This package is optional. It provides the open source spell checker
Aspellused by the Zimbra 10’s web app. - Zimbra 10 Apache
-
This package is installed automatically when Zimbra 10 Spell or Zimbra 10 Convertd is installed.
- Zimbra 10 Convertd
-
This package should be installed on at least one Zimbra 10-Store server. Only one Zimbra 10-Convertd package needs to be present in the Zimbra Collaboration environment. The default is to install one Zimbra 10-Convertd on each Zimbra 10-Store server.
- Zimbra 10 Archiving
-
The Zimbra 10 Archiving and Discovery feature is an optional feature for Zimbra Collaboration. Archiving and Discovery offers the ability to store and search all messages that were delivered to or sent by Zimbra Collaboration. This package includes the cross mailbox search function which can be used for both live and archive mailbox searches.
Using Archiving and Discovery can trigger additional mailbox license usage. To find out more about Zimbra 10 Archiving and Discovery, please refer to Zimbra Daffodil Administration Guide. - Zimbra 10 OnlyOffice
-
This package installation is required for collaborative document editing of documents which is powered by Onlyoffice and enables collaborative editing of the documents stored in Briefcase. This package can be installed and setup on a Proxy server, Mailbox server or as a separate Document server.
- Zimbra Daffodil (v10.1) License Daemon
-
With the introduction of the new license service within Zimbra Daffodil (v10.1) a new license service has been added named License Daemon Service (LDS) to allow enhanced and flexible license management. The LDS is a required service to support the management of the license. Refer to Admin guide sections of Licensing and LDS for more details.
The Zimbra 10 server configuration is menu driven. The installation menu shows you the default configuration values. The menu displays the logical host name and email domain name [mailhost.example.com] as configured on the computer. You can change any of the values. For single server installs, you must define the administrator’s password, which you use to log on to the administration console, and you specify the location of the Zimbra 10 license xml file.
Downloading the Zimbra 10 Software
Obtain the Zimbra Collaboration software download and save to the computer from which you will install the software.
Zimbra Daffodil (v10.1) Licensing
Zimbra Daffodil (v10.1) introduced an automated licensing and entitlement system for better flexibility in managing licenses and allows for future growth.
With the introduction of the new license service within Zimbra Daffodil (v10.1) a new license service has been added named License Daemon Service (LDS) to allow enhanced and flexible license management.
A Zimbra Collaboration license is required to enable license features and create accounts.
Following are the Zimbra Daffodil (v10.1) licensing updates:
-
A new license daemon is part of the Zimbra installation. It gets displayed as
zimbra-license-daemonin the modules list and required for the normal functioning of Zimbra. -
An 18-26 alphanumeric character key is required which replaces the older license.xml file.
-
Zimbra Collaboration licenses are restrictive to the entitlement defined within the license and do not support multiple activations.
-
Once the Zimbra Collaboration license is activated no future license management by the user is required. License management is real-time and is managed by Zimbra.
-
An offline license server has been introduced to support environments that don’t have access to the public network.
-
All data gathered is based on license requirements and total usage which meets GDPR and other legal regulations.
The LDAP and LDS hostname are recorded for license registration and activation. -
Independent lab licenses are available. Contact Zimbra Sales or Support team.
License Features
Zimbra Collaboration licensing gives administrators visibility and control of the licensed features they plan to deploy. You can monitor usages and manage the following license features.
Zimbra Daffodil (v10.1) introduced a detailed view of licensed and unlicensed features for better management within the Admin UI or command line. The following are tracked licensed features:
| Feature | Licensed Attributes | Description | Feature Code |
|---|---|---|---|
Accounts |
AccountsLimit |
Accounts you can create. |
AL |
ZCO |
MAPIConnectorAccountsLimit |
Accounts that can use Zimbra 10 Connector for Microsoft Outlook (ZCO). |
MCAL |
EWS |
EwsAccountsLimit |
Accounts that can use EWS for connecting to an Exchange server. EWS is a separately licensed add-on feature. |
EAL |
Zimbra Mobile |
MobileSyncAccountsLimit |
Accounts that can use ActiveSync protocol to access emails on their mobile devices. |
MSAL |
S/MIME |
SMIMEAccountsLimit |
Accounts that can use S/MIME feature. |
SMAL |
Archiving |
ArchivingAccountsLimit |
Allowed archive accounts. The archive feature installation is required. |
AAL |
Zimbra Office |
DocumentEditingAccountsLimit |
Document collaboration feature which enables to create/edit/share the documents within the organization. OnlyOffice installation is required. |
DEAL |
Sharing |
SharingAccountsLimit |
Control the Sharing & Delegation feature for the users. |
SHAL |
Briefcase |
BriefcaseAccountsLimit |
Control the Briefcase feature for the users. |
BAL |
Backup & Restore |
BackupEnabled |
Allows the admin to use Backup & Restore Feature |
BE |
Storage Management (Internal Volumes) |
StorageManagementEnabled |
Allows the admin to use Storage Management feature and create volumes using internal stores. |
SME |
Storage Management (External(S3) Volumes) |
ObjectStoreSupportEnabled |
Allows the admin to use Storage Management feature and create volumes using external S3 providers (e.g. AWS, Ceph). |
OSSE |
Attachment Indexing |
AttachmentIndexingEnabled |
Allows indexing of the attachment contents |
AIE |
Calendar |
CalenderAccountsLimit |
Enabling calendar feature for the users |
CALAL |
Conversation |
ConversationEnabledAccountsLimit |
Enabling conversation feature for the users |
CNEAL |
CrossMailboxSearch |
CrossMailboxSearchEnabled |
Allows doing searches for content across live and archive mailboxes. |
CMBSE |
Delegated Admin |
DelegatedAdminAccountsLimit |
Delegated Admin Accounts you can create |
DAAL |
Group Calendar |
GroupCalenderAccountsLimit |
Enables you to see multiple calendars at the same time |
GCAL |
Tag |
TaggingEnabledAccountsLimit |
Enabling tagging feature for the users |
TEAL |
Task |
TaskEnabledAccountsLimit |
Enabling task feature for the users |
TKEAL |
HTML View of attachements |
ViewInHtmlEnabledAccountsLimit |
View email attachments in HTML format |
VHEAL |
Zimlets |
ManageZimletsEnabledAccountsLimit |
User accounts that can manage Zimlets |
MZEAL |
Multi Factor Auth |
MultiFactorAuthEnabled |
Control the two factor authentication feature for the users. |
MFAE |
Zimbra Daffodil (v10.1) License Requirements
| You require a Zimbra 10’s license to create accounts in Zimbra Collaboration and to use the Modern Web App. |
| Trial License is limited to one email address and an extension can be requested by contacting Zimbra Sales. |
To try out Zimbra Collaboration, you can obtain a trial version free of charge. Once your system is installed in a production environment, you will need to purchase a subscription or a perpetual license.
| License Types | Description |
|---|---|
Trial |
You can obtain a free Trial license from the Zimbra website, at https://www.zimbra.com → Product → Download → Get Trial License. The trial license allows you to create up to 50 users. It expires in 60 days. |
Subscription |
A Zimbra 10 Subscription license can only be obtained through purchase. This license is valid for a specific Zimbra Collaboration system, is encrypted with the number of Zimbra 10 accounts (seats) you have purchased, the effective date, and the expiration date of the subscription license. |
Perpetual |
A Zimbra 10 Perpetual license can only be obtained through purchase. This license is similar to a subscription license. It is valid for a specific Zimbra Collaboration system, is encrypted with the number of Zimbra 10 accounts (seats) you have purchased, the effective date, and an expiration date of 2099-12-31. When you renew your support agreement, you receive no new perpetual license, but your Account record in the system gets updated with your new support end date. |
License Usage by Zimbra Collaboration Account Type
An account assigned to a person, including an account created for archiving, requires a mailbox license. Distribution lists, aliases, locations, and resources do not count against the license.
Below is a description of types of Zimbra Collaboration accounts and if they impact your license limit.
| License Account Type | Description |
|---|---|
System account |
System accounts are specific accounts used by Zimbra Collaboration. They include the spam filter accounts for junk mail (spam and ham), the virus quarantine account for email messages with viruses, and the GALsync account if you configure GAL for your domain. Do not delete these accounts! These accounts do not count against your license. |
Administrator account |
Administrator and delegated administrator accounts count against your license. |
User account |
User accounts count against your license account limit. When you delete an account, the license account limit reflects the change. |
Alias account |
These types do not count against your license. |
Distribution list |
|
Resource account |
License Activation
All Zimbra Daffodil (v10.1) installations require license activation and continues to support the Automatic and Manual license methods. In Daffodil (v10.1), the terms has been changed to Online Activation and Offline Activation.
The Admin Console has been enhanced with a more intuitive and easy-to-follow UI where all the operations related to license deployment are on a single screen.
The activation of the Zimbra Daffodil (v10.1) License can be done during the installation, upgrade, or after the installation. No future license management is required on the server once the license has been activated.
Without activating the license, the Zimbra services will not start.
Online License Activation
Licenses are automatically activated if the Zimbra Collaboration server has a connection to the Internet and can communicate with the Zimbra 10 License server.
Following are the applicable activation rules for an online license:
-
Account should have valid support end date.
-
License should be Valid (should not be expired).
-
License can be switched, provided new license limit is greater than or equal to current license usage.
Following are the steps to activate the license:
Admin Console
-
Login to Admin Console and go to Home → Get Started → Install Licenses → Online Activation
-
In the Key text box, specify the 18-26 alphanumeric character license key and click on Activate.
-
After successful activation, you will see a success message - Your license is successfully activated.
Command Line
You can also activate your license from the command line interface.
-
As a
zimbrauser, run the command:
zmlicense -a <license_key>
-
After successful activation, you will see a success message - Your license is successfully activated.
| Upgraded Zimbra Collaboration versions require an immediate activation to maintain network feature functionality. |
If you are unable to activate your license automatically, see the next section on Offline License Activation.
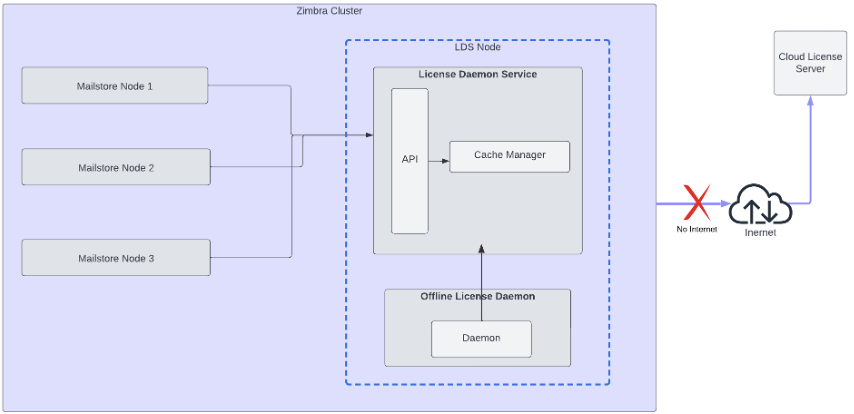
Offline License Activation
The method of generating and activating an Offline License in Zimbra Daffodil (v10.1) has changed. As a pre-requisite, a new package zimbra-nalpeiron-offline-daemon
| The Offline License activation will not work if the package is not installed or the offline daemon service is not running. |
| The Offline Daemon service is a critical and important service for the functioning of a Offline License and its management. You are recommended to have a service monitoring setup to check the state of the service. |
| The offline license may take upto 48 hours to be issued. |
Following is the architectural view of the Offline License process:
Pre-requisites
Following are the pre-requisites to be completed before installing the offline daemon packages:
Disable FIPS
FIPS should be disabled on the system before installing the packages.
Following are the steps to disable FIPS. Execute the commands as root user:
-
For RHEL/CentOS/Rocky Linux systems:
sudo fips-mode-setup --disable
sudo reboot
-
Verify FIPS is disabled. Check the /proc/sys/crypto/fips_enabled file. If disabled, following will be the output:
$ cat /proc/sys/crypto/fips_enabled
0
-
-
For Ubuntu systems:
sudo ua disable fips
sudo reboot
-
Verify FIPS is disabled. Check the /proc/sys/crypto/fips_enabled file. If disabled, following will be the output:
$ cat /proc/sys/crypto/fips_enabled
0
-
Disable SELinux
SELinux should be disabled on the system before installing the offline daemon packages. You will have to reboot the system to make the changes effective.
Following are the steps to disable SELinux. Execute the commands as root user:
-
For RHEL/CentOS/Rocky Linux systems:
-
Check the SELinux status. If the status appears
enabled, execute the further steps to disable:$ sestatus| grep 'SELinux status\|Current mode' SELinux status: enabled Current mode: enforcing
-
Edit
/etc/sysconfig/selinux:vi /etc/selinux/config
-
Change the SELINUX directive to disabled.
SELINUX=disabled
-
Save and exit the file. Reboot the system:
reboot
-
After the reboot, check the status. SELinux should appear disabled:
$ sestatus| grep 'SELinux status'
SELinux status:                 disabled
-
-
For Ubuntu systems:
-
Check the SELinux status. If the status appears
enabled, execute the further steps to disable:$ sestatus| grep 'SELinux status\|Current mode' SELinux status: enabled Current mode: enforcing
-
Edit
/etc/selinux/config:vi /etc/selinux/config
-
Change the SELINUX directive to disabled.
SELINUX=disabled
-
Save and exit the file. You will have to reboot the system:
reboot
-
After the reboot, check the status. SELinux should appear disabled:
$ sestatus| grep 'SELinux status'
SELinux status:                 disabled
-
Add locale en_US.utf8
Locale en_US.utf-8 is required for the offline daemon packages.
Following are the steps to check and add the locale. Execute the commands as root user:
-
For RHEL/CentOS/Rocky/Ubuntu Linux systems:
-
Check if the required locale
en_US.utf8is available on the system. If available, it will display as following:$ locale -a |grep 'en_US.utf8' en_US.utf8
-
If not available, add the locale:
$ localedef -i en_US -f UTF-8 en_US.UTF-8
-
Install offline daemon packages
Following are the steps to install the offline daemon packages. Execute the commands as a root user:
-
For RHEL/CentOS/Rocky Linux systems:
yum clean metadata
yum check-update
yum install zimbra-nalpeiron-offline-daemon
-
For Ubuntu systems:
apt-get update
apt-get install zimbra-nalpeiron-offline-daemon
-
Verify the nalpdaemon service is active:
$ systemctl status nalpdaemon
● nalpdaemon.service - Nalpeiron Licensing Daemon
   Loaded: loaded (/usr/lib/systemd/system/nalpdaemon.service; enabled; vendor preset: disabled)
   Active: active (running) since Sat 2024-06-08 02:03:37 EDT; 1s ago
In case the service is not active, restart the service:
$ systemctl restart nalpdaemon
As a zimbra user, restart the LDS and configdctl service:
$ su - zimbra
$ zmlicensectl --service restart
$ zmconfigdctl restart
Requesting and Activating Offline license
The method is supported through Admin Console and CLI.
Following are the steps:
Admin Console
-
Contact the Support team to get the Network Key and License Key.
-
Login to Admin Console and go to Home → Get Started → Install Licenses → Offline Activation
-
Under Step 1, specify the Network Key and License Key and click on Generate Activation Request.
-
After the network and product activation files are generated successfully, Download button will appear next to the text box.
-
Click on Download button next to the text box and save the files. The name and filetype will be pre-populated when saving - network_activation_fingerprint, product_activation_fingerprint.
-
Login to Support Portal and select the License tab.
-
Select Generate an Offline License Activation file for versions 10.1 or greater.
-
Specify the Product License Key and Network License Key.
-
Copy the contents of network_activation_fingerprint.txt file and paste in the Network Activation Fingerprint text box.
-
Copy the contents of product_activation_fingerprint.txt file and paste in Product Activation Fingerprint text box.
-
Specify the product version in Product Verstion text box.
-
Click on Generate License Certificate
-
Save the generated License Activation XML file.
-
Go back to the Admin Console License page.
-
Under Offline Activation → Step3, upload the License Activation XML file and click on Activate.
-
After successful activation, you will see a success message - Your license is successfully activated.
Command Line
-
Contact Sales and get the Network Key and License Key.
-
As a
zimbrauser, runzmlicensecommand to generate Network Key and License Keyzmlicense --offlineActivationRequestCert --network <network_key> --product <product_key>
-
Save the certificates printed on the screen as network_activation_fingerprint.txt, and product_activation_fingerprint.txt.
-
Login to Support Portal and select the License tab.
-
Select Generate an Offline License Activation file for versions 10.1 or greater.
-
Specify the Product License Key and Network License Key.
-
Copy the contents of network_activation_fingerprint.txt file and paste in the Network Activation Fingerprint text box.
-
Copy the contents of product_activation_fingerprint.txt file and paste in Product Activation Fingerprint text box.
-
Specify the product version in Product Verstion text box.
-
Click on Generate License Certificate
-
Save the generated License Activation XML file on the server.
-
As a
zimbrauser, runzmlicensecommand to activate the offline licensezmlicense -A /path_to_XML/activation_file.xml
-
After successful activation, you will see a success message - Your license is successfully activated.
If you have problems accessing the Support Portal or facing any issues when activating the Offline License, contact Zimbra Sales or Support.
When Licenses are not Installed or Activated
If you fail to install or activate your Zimbra Collaboration server license, the following scenarios describe how your Zimbra Collaboration server will be impacted.
| License Condition | Description/Impact |
|---|---|
Not installed |
With no installed license, the Zimbra Collaboration server defaults to single user mode where all license-limited features are limited to one user. |
Not valid |
If the license file appears forged or fails validation for other reasons, the Zimbra Collaboration server defaults to single-user mode. |
Not activated |
A license activation grace period is 10 days. If this period passes without activation, the Zimbra Collaboration server defaults to single-user mode. |
For future date |
If the license starting date is in the future, the Zimbra Collaboration server defaults to single-user mode. |
In grace period |
Zimbra Daffodil (v10.1) onwards, the Grace Period functionality has been changed. For more details, please refer to the Grace Period section in the Admin Guide. |
Expired |
Zimbra Daffodil (v10.1.10) onwards, if the license ending date has passed, the server will not enter the grace period. For more details, please refer to the License Expiry and Grace Period section in the Admin Guide. |
Renewal |
Zimbra Daffodil (v10.1.10) onwards, if the license is not renewed before the ending date, the server will not enter the grace period. For more details on how to re-activate the license after renewal, please refer to the License Renewal After Expiry section in the Admin Guide |
Obtaining a License
Go to the Zimbra Website https://www.zimbra.com → Product → Download → Get Trial License to obtain a trial license. Contact Zimbra sales to extend the trial license, or to purchase a subscription license or perpetual license, by emailing sales@zimbra.com or calling 1-972-407-0688.
The subscription and perpetual license can only install on the Zimbra Collaboration system identified during purchase. Only one Zimbra 10 license is required for your Zimbra Collaboration environment. This license sets the maximum number of accounts on the system.
Current license information, including the number of accounts purchased, the number of accounts used, and the expiration date, can be viewed in the Admin Console.
- Admin Console:
-
Home → Get Started → Install Licenses → Current License Information.
License Reconciliation and Data Collection Notice
| By consenting to the End-User License Agreement, you grant Synacor Inc. and its certain licensees, permission to collect licensing and non-personally-identifiable usage data from your Zimbra Collaboration server. |
During installation, upgrades, and periodically while in use, the Zimbra Collaboration server transmits information for reconciliation of billing and license data.
Permission for this data collection is granted under sections 11.4 and 11.6 of the End User License Agreement for Zimbra Collaboration. Copies of the license can be found at https://www.zimbra.com/legal/licensing/.
The data that is being collected consists of elements of the current license information and is governed by Synacor’s Privacy Policy, which can be found at https://www.synacor.com/privacy-policy/.
Basic Configuration
The default configuration installs Zimbra 10-LDAP, Zimbra 10-MTA with anti-virus and anti-spam protection, the Zimbra 10 mailbox server, SNMP monitoring tools (optional), Zimbra 10-spell (optional), the logger tool (optional), and the Zimbra 10 proxy (optional) on one server.
Menu-Driven Configuration
The default configuration installs Zimbra 10-LDAP, Zimbra 10-MTA with anti-virus and anti-spam protection, the Zimbra 10 mailbox server, SNMP monitoring tools (optional), Zimbra 10-spell (optional), the logger tool (optional), and the Zimbra 10 proxy on one server.
The menu driven installation displays the components and their existing default values. You can modify the information during the installation process. The table below describes the menu options.
Main Menu options
| Server Configured | Menu Item | Description |
|---|---|---|
Main Menu |
||
All |
Common Configuration |
Select the sub-menu for Common Configuration Options |
zimbra-ldap |
Select the sub-menu for Ldap configuration |
|
zimbra-logger |
Toggle whether zimbra-logger is enabled or not. |
|
zimbra-mta |
Select the sub-menu for Mta configuration. Postfix is the open source mail transfer agent (MTA) that receives email via SMTP and routes each message to the appropriate Zimbra mailbox server using Local Mail Transfer Protocol (LMTP). The Zimbra MTA also includes the anti-virus and anti-spam components. |
|
zimbra-dnscache |
Select the sub-menu for DNS Cache. Intended primarily on MTAs for optimized DNS and RBL lookups. Can also be installed on mailstores and proxy servers. |
|
zimbra-snmp |
Select the sub-menu for Snmp configuration. Installing the Zimbra-SNMP package is optional. If you choose to install Zimbra-SNMP for monitoring, the package should be run on every server (Zimbra server, Zimbra LDAP, Zimbra MTA) that is part of the Zimbra configuration. Zimbra uses swatch to watch the syslog output to generate SNMP traps. |
|
zimbra-store |
Select the sub-menu for Store configuration |
|
zimbra-spell |
Toggle whether zimbra-spell is enabled or not. |
|
zimbra-convertd |
Toggle whether zimbra-convertd is enabled or not - defaults to yes |
|
zimbra-proxy |
Select the sub-menu for Proxy configuration |
|
Default Class of Service Configuration |
This menu section lists major new features for the Zimbra Collaboration release and whether the feature is enabled or not. When you change the feature setting during Zimbra Collaboration installation, you change the default COS settings. Having this control, lets you decide when to introduce new features to your users. |
|
s) Save config to file |
At any time during the installation, you can save the configuration to file. |
|
c) Collapse menu |
Allows you to collapse the menu. |
|
x) Expand menu |
Expand menus to see the underlying options |
|
q) Quit |
Quit can be used at any time to quit the installation. |
|
Common Configuration Options
The packages installed in common configuration include libraries, utilities, monitoring tools, and basic configuration files under Zimbra Core.
| Server Configured | Menu Item | Description |
|---|---|---|
Common Configuration - These are common settings for all servers |
||
All |
Hostname |
The host name configured in the operating system installation |
LDAP master host |
The LDAP host name. On a single server installation, this name is the same as the hostname. On a multi server installation, this LDAP host name is configured on every server |
|
LDAP port |
The default port is 389 |
|
LDAP Admin password |
This is the master LDAP password. This is the password for the Zimbra admin user and is configured on every server |
|
All except Zimbra LDAP Server |
LDAP Base DN |
The base DN describes where to load users and groups. In LDAP form, it is cn=Users. Default is cn=zimbra. |
All |
Secure interprocess communications |
The default is yes. Secure interprocess communications requires that connections between the mail store, and other processes that use Java, use secure communications. It also specifies whether secure communications should be used between the master LDAP server and the replica LDAP servers for replication. |
Time Zone |
Select the time zone to apply to the default COS. The time zone that should be entered is the time zone that the majority of users in the COS will be located in. The default time zone is PST (Pacific Time). |
|
IP Mode |
IPv4 or IPv6. |
|
Default SSL digest |
Sets the default message digest to use when generating certificate. Defaults is sha256. |
|
Ldap configuration
| Server Configured | Menu Item | Description |
|---|---|---|
zimbra-ldap - These options are configured on the Zimbra LDAP server. |
||
Zimbra LDAP Server |
Status |
The default is Enabled. For replica LDAP servers, the status can be changed to Disabled if the database is manually loaded after installation completes. |
Create Domain |
The default is yes. You can create one domain during installation. Additional domains can be created from the administration console. |
|
Domain to create |
The default domain is the fully qualified hostname of the server. If you created a valid mail domain on your DNS server, enter it here. |
|
LDAP Root password |
By default, this password is automatically generated and is used for internal LDAP operations. |
|
LDAP Replication password |
This is the password used by the LDAP replication user to identify itself to the LDAP master and must be the same as the password on the LDAP master server. |
|
LDAP Postfix password |
This is the password used by the postfix user to identify itself to the LDAP server and must be configured on the MTA server to be the same as the password on the LDAP master server. |
|
LDAP Amavis password |
This password is automatically generated and is the password used by the amavis user to identify itself to the LDAP server and must be the same password on the LDAP master server and on the MTA server. |
|
LDAP Nginx password |
This password is automatically generated and is used by the nginx user to identify itself to the LDAP server and must be the same password on the LDAP master server and on the MTA server. NOTE: This option is displayed only if the zimbra-proxy package is installed. |
|
Zimbra Logger
| Server Configured | Menu Item | Description |
|---|---|---|
Zimbra mailbox server |
zimbra-logger |
The Logger package is installed on one mail server. If installed, it is automatically enabled. Logs from all the hosts are sent to the mailbox server where the logger package is installed. This data is used for generating statistics graphs and reporting and for message tracing. |
MTA Server Configuration Options
Zimbra MTA server configuration involves installation of the Zimbra-MTA package. This also includes anti-virus and anti-spam components.
| Server Configured | Menu Item | Description |
|---|---|---|
zimbra-mta |
||
Zimbra MTA Server |
MTA Auth host |
This is configured automatically if the MTA authentication server host is on the same server, but must be configured if the authentication server is not on the MTA. The MTA Auth host must be one of the mailbox servers. |
Enable Spamassassin |
Default is enabled. |
|
Enable ClamAV |
Default is enabled. To configure attachment scanning, see Scanning Attachments in Outgoing Mail |
|
Notification address for AV alerts |
Sets the notification address for AV alerts. You can either accept the default or create a new address. If you create a new address, remember to provision this address from the admin console. NOTE: If the virus notification address does not exist and your host name is the same as the domain name on the Zimbra server, the virus notifications remain queued in the Zimbra MTA server cannot be delivered. |
|
Bind password for Postfix LDAP user |
Automatically set. This is the password used by the postfix user to identify itself to the LDAP server and must be configured on the MTA server to be the same as the password on the LDAP master server. |
|
Bind password for Amavis LDAP user |
Automatically set. This is the password used by the amavis user to identify itself to the LDAP server and must be configured on the MTA server to be the same as the amavis password on the master LDAP server. |
|
New installs of Zimbra 10 limit spam/ham training to the first MTA installed.
If you uninstall or move this MTA, you will need to enable spam/ham training
on another MTA, as one host should have this enabled to run
zmtrainsa --cleanup. To do this on that host, do:zmlocalconfig -e zmtrainsa_cleanup_host=TRUE
|
DNS Cache
| Server Configured | Menu Item | Description |
|---|---|---|
zimbra-dnscache (optional) |
||
Zimbra mailbox server |
Master DNS IP address(es) |
IP addresses of DNS servers |
Enable DNS lookups over TCP |
yes or no |
|
Enable DNS lookups over UDP |
yes or no |
|
Only allow TCP to communicate with Master DNS |
yes or no |
|
Snmp configuration
| Server Configured | Menu Item | Description |
|---|---|---|
zimbra-snmp (optional) |
||
All |
Enable SNMP notifications |
The default is yes. |
SNMP Trap hostname |
The hostname of the SNMP Trap destination |
|
Enable SMTP notification |
The default is yes. |
|
SMTP Source email address |
From address to use in email notifications |
|
SMTP Destination email address |
To address to use in email notifications |
|
Store configuration
| zimbra-store | ||
|---|---|---|
Zimbra Mailbox Server |
Create Admin User |
Yes or No. The administrator account is created during installation. This account is the first account provisioned on the Zimbra 10 server and allows you to log on to the administration console. |
Admin user to create |
The user name assigned to the administrator account. Once the administrator account has been created, it is suggested that you do not rename the account as automatic Zimbra Collaboration notifications might not be received. |
|
Admin Password |
You must set the admin account password. The password is case sensitive and must be a minimum of six characters. The administrator name, mail address, and password are required to log in to the administration console. |
|
Anti-virus quarantine user |
A virus quarantine account is automatically created during installation. When AmavisD identifies an email message with a virus, the email is automatically sent to this mailbox. The virus quarantine mailbox is configured to delete messages older than 7 days. |
|
Enable automated spam training |
Yes or No. By default, the automated spam training filter is
enabled and two mail accounts are created - one for the
Spam Training User and one for the Non-spam (HAM) Training User.
See the next 2 menu items which will be shown if spam training is
enabled. |
|
Spam Training User |
to receive mail notification about mail that was not marked as junk, but should have been. |
|
Non-spam (HAM) Training User |
to receive mail notification about mail that was marked as junk, but should not have been. |
|
The default port configurations are shown |
||
Zimbra Mailbox Server |
SMTP host |
Defaults to current server name |
Web server HTTP port: |
default 80 |
|
Web server HTTPS port: |
default 443 |
|
Web server mode |
Can be HTTP, HTTPS, Mixed, Both or Redirect.
|
|
IMAP server port |
default 143 |
|
IMAP server SSL port |
default 993 |
|
POP server port |
default 110 |
|
POP server SSL port |
default 995 |
|
Use spell checker server |
default Yes (if installed) |
|
Spell server URL |
||
If either or both of these next 2 options are changed to TRUE,
the proxy setting on the mailbox store are enabled in preparation for
setting up |
||
Zimbra Mailbox Server |
*Configure for use with mail proxy. |
default FALSE |
*Configure for use with web proxy. |
default FALSE |
|
Enable version update checks. |
Zimbra Collaboration automatically checks to see if a new Zimbra Collaboration update is available. The default is TRUE. |
|
Enable version update notifications. |
This enables automatic notification when updates are available
when this is set to TRUE. |
|
Version update notification email. |
This is the email address of the account to be notified when updates are available. The default is to send the notification to the admin’s account. |
|
Version update source email. |
This is the email address of the account that sends the email notification. The default is the admin’s account. |
|
License Activation. |
To select license options. You can either choose to install activate license during installation or after installation. |
|
Proxy configuration
Zimbra Proxy (Nginx-Zimbra) is a high-performance reverse proxy server that passes IMAP[S]/POP[S]/HTTP[S] client requests to other internal Zimbra 10 services.
It requires the separate package Zimbra Memcached which is
automatically selected when the zimbra-proxy package is installed.
One server must run zimbramemcached when the proxy is in use.
All installed zimbra proxies can use a single memcached server.
| Server Configured | Menu Item | Description |
|---|---|---|
zimbra-proxy |
||
mailbox server, |
Enable POP/IMAP Proxy |
default TRUE |
IMAP proxy port |
default 143 |
|
IMAP SSL proxy port |
default 993 |
|
POP proxy port |
default 110 |
|
POP SSL proxy port |
default 995 |
|
Bind password for nginx ldap user |
default set |
|
Enable HTTP[S] Proxy |
default TRUE |
|
HTTP proxy port |
default 80 |
|
HTTPS proxy port |
default 443 |
|
Proxy server mode |
default https |
|
Installing Zimbra Collaboration Software
| Before you begin, make sure to review the installer changes for Zimbra Daffodil (v10.1). |
Zimbra Daffodil (v10.1) Installer changes
Zimbra Daffodil (v10.1) introduced an automated licensing and entitlement system for better flexibility in managing licenses and allows for future growth.
With the introduction of the new license service within Zimbra Daffodil (v10.1) a new license service has been added named License Daemon Service (LDS) to allow enhanced and flexible license management.
A Zimbra Collaboration license is required to enable license features and create accounts.
Following are the Zimbra Daffodil (v10.1) licensing updates:
-
A new license daemon is part of the Zimbra installation. It gets displayed as
zimbra-license-daemonin the modules list and and is required for the normal functioning of Zimbra. -
An 18-26 alphanumeric character key is required which replaces the older license.xml file.
-
Zimbra Collaboration licenses are restrictive to the entitlement defined within the license and do not support multiple activations.
-
Once the Zimbra Collaboration license is activated no future license management by the user is required. License management is real-time and is managed by Zimbra.
-
An offline license server has been introduced to support environments that don’t have access to the public network.
-
All data gathered is based on license requirements and total usage which meets GDPR compliance.
The LDAP and LDS hostname are recorded for license registration and activation. -
Independent lab licenses are available. Contact Zimbra Sales or Support team.
The license daemon is now part of the Zimbra installation. It gets displayed as zimbra-license-daemon in the modules list and by default is set to Y. The LDS is a required service to support the management of the license.
| If the license daemon service is not installed or not running, Zimbra’s network features will not be able to validate and will be disabled which will affect license functionality and account management. |
| For more information, refer to admin guide LDS Overview section. |
|
Contact the Sales team to get your license key and keep it ready to be provided during the installation. Confirm you have the latest system requirements and prerequisites for installing Zimbra Collaboration. |
Open an SSH session to the Daffodil (v10.1) server and follow the steps below:
-
Log in as root to the Zimbra 10 server and cd to the directory where the Zimbra Collaboration archive tar file is saved (
cd /var/<tmp>). Run the following commands:- Unpack the file
-
tar xvzf [zcsfullfilename.tgz] - Change to the correct directory
-
cd [zcsfullfilename] - Begin the installation
-
./install.shroot@mailhost:/tmp# tar xzvf zcs*.tgz zcs-NETWORK-10.1.0_GA_4633.RHEL8_64.20240608004525/ zcs-NETWORK-10.1.0_GA_4633.RHEL8_64.20240608004525/packages/ . . . zcs-NETWORK-10.1.0_GA_4633.RHEL8_64.20240608004525/install.sh zcs-NETWORK-10.1.0_GA_4633.RHEL8_64.20240608004525/README.txt
-
The install.sh script reviews the installation software to verify that the Zimbra 10 packages are available. The installation process checks to see whether any of the applications Sendmail, Postfix, MySQL or MariaDB are running. If any of these applications are running, you are asked to disable them. Disabling MySQL and MariaDB is optional but highly recommended. Sendmail and Postfix must be disabled for Zimbra Collaboration to start correctly.
root@zimbraiop:/tmp/# cd zcs-NETWORK-10.1.0_GA_4633.RHEL8_64.20240608004525/ root@zimbraiop:/tmp/zcs-NETWORK-10.1.0_GA_4633.RHEL8_64.20240608004525# ./install.sh Operations logged to /tmp/install.log.y1YeCSI5 Operations logged to /tmp/install.log.KaWxzjhU Checking for existing installation... zimbra-license-tools...NOT FOUND zimbra-license-extension...NOT FOUND zimbra-network-store...NOT FOUND zimbra-modern-ui...NOT FOUND zimbra-modern-zimlets...NOT FOUND zimbra-zimlet-document-editor...NOT FOUND zimbra-zimlet-classic-document-editor...NOT FOUND zimbra-zimlet-classic-set-default-client...NOT FOUND zimbra-patch...NOT FOUND zimbra-mta-patch...NOT FOUND zimbra-proxy-patch...NOT FOUND zimbra-ldap-patch...NOT FOUND zimbra-ldap...NOT FOUND zimbra-logger...NOT FOUND zimbra-mta...NOT FOUND zimbra-dnscache...NOT FOUND zimbra-snmp...NOT FOUND zimbra-license-daemon...NOT FOUND zimbra-store...NOT FOUND zimbra-apache...NOT FOUND zimbra-spell...NOT FOUND zimbra-convertd...NOT FOUND zimbra-memcached...NOT FOUND zimbra-proxy...NOT FOUND zimbra-archiving...NOT FOUND zimbra-onlyoffice...NOT FOUND zimbra-core...NOT FOUND -
The Zimbra 10 software agreement displays. Press Y to accept and N to decline.
The license agreement displays in multiple sections, and you must accept each section of the license agreement. -
Use Zimbra 10’s package repository [Y]displays, press Enter to continue. Your system will be configured to add the Zimbra 10 packaging repository for yum or apt-get as appropriate so it can install the Zimbra 10 3rd party packages.-
If installing Zimbra 10, you will have the modules Archiving and Convertd as an option to add to your Zimbra 10 installation.
-
It is recommended to only install Zimbra 10-dnscache on the MTA Servers when there are no other DNS servers (for example dnsmasq or bind) already installed and running on the same server.
Checking for installable packages

Found zimbra-core (local)
Found zimbra-ldap (local)
Found zimbra-logger (local)
Found zimbra-mta (local)
Found zimbra-dnscache (local)
Found zimbra-snmp (local)
Found zimbra-license-daemon (repo)
Found zimbra-store (local)
Found zimbra-apache (local)
Found zimbra-spell (local)
Found zimbra-convertd (local)
Found zimbra-memcached (repo)
Found zimbra-proxy (local)
Found zimbra-archiving (local)
Found zimbra-onlyoffice (repo)
Found zimbra-license-tools (local)
Found zimbra-license-extension (local)
Found zimbra-network-store (local)
Found zimbra-modern-ui (repo)
Found zimbra-modern-zimlets (repo)
Found zimbra-zimlet-document-editor (repo)
Found zimbra-zimlet-classic-document-editor (repo)
Found zimbra-zimlet-classic-set-default-client (repo)
Found zimbra-patch (repo)
Found zimbra-mta-patch (repo)
Found zimbra-proxy-patch (repo)
Found zimbra-ldap-patch (repo)


Select the packages to install

Install zimbra-ldap [Y]

Install zimbra-logger [Y]

Install zimbra-mta [Y]

Install zimbra-dnscache [Y]

Install zimbra-snmp [Y]

Install zimbra-license-daemon [Y]

Install zimbra-store [Y]

Install zimbra-apache [Y]

Install zimbra-spell [Y]

Install zimbra-convertd [Y]

Install zimbra-memcached [Y]

Install zimbra-proxy [Y]

Install zimbra-archiving [N]

Install zimbra-onlyoffice [Y]

Install zimbra-patch [Y]

Install zimbra-mta-patch [Y]

Install zimbra-proxy-patch [Y]

Install zimbra-ldap-patch [Y]
Checking required space for zimbra-core
Checking space for zimbra-store

Installing:
    zimbra-core
    zimbra-ldap
    zimbra-logger
    zimbra-mta
    zimbra-dnscache
    zimbra-snmp
    zimbra-license-daemon
    zimbra-store
    zimbra-apache
    zimbra-spell
    zimbra-convertd
    zimbra-memcached
    zimbra-proxy
    zimbra-onlyoffice
    zimbra-license-tools
    zimbra-license-extension
    zimbra-network-store
    zimbra-modern-ui
    zimbra-modern-zimlets
    zimbra-zimlet-document-editor
    zimbra-zimlet-classic-document-editor
    zimbra-zimlet-classic-set-default-client
    zimbra-patch
    zimbra-mta-patch
    zimbra-proxy-patch
    zimbra-ldap-patch
    zimbra-rabbitmq-server

The system will be modified.  Continue? [N] Y
Also select the services to be installed on this server. To install Zimbra Collaboration on a single server, enter Y for the ldap, logger, mta, snmp, store, and spell packages. If you use IMAP/POP Proxy, enter Y for the Zimbra proxy package and the Zimbra Memcached package.
Ensure that the zimbra-memcachedpackage is installed on at least one of the nodes in the system if the Proxy is installed.For the cross mailbox search feature, install the Zimbra Archive package. To use the archiving and discovery feature, contact Zimbra sales. The installer verifies that there is enough room to install Zimbra 10.
-
-
Next, type Y and press Enter to modify the system. Zimbra 10 performs the following checks.
-
Selected packages are installed on the server.
-
Checks to see if MX record is configured in DNS. The installer checks to see if the hostname is resolvable via DNS. If there is an error, the installer asks if you would like to change the hostname. We recommend that the domain name have an MX record configured in DNS.
-
Checks for port conflict.
-
-
At this point, the Main menu displays showing the default entries for the Zimbra 10 components you are installing. To expand the menu to see the configuration values, type X and press Enter. The Main menu expands to display configuration details for the packages being installed. Values that require further configuration are marked with asterisks (******) to their left. To navigate the Main menu, select the menu item to change. You can modify any of the defaults. For a quick installation, accepting all the defaults, you only need to do the following:
-
To set the appropriate time zone, enter 1 to select Common Configuration and then enter 7 for TimeZone. Set the correct time zone.
Main menu 1) Common Configuration: 2) zimbra-ldap: Enabled 3) zimbra-logger: Enabled 4) zimbra-mta: Enabled 5) zimbra-dnscache: Enabled 6) zimbra-snmp: Enabled 7) zimbra-store: Enabled +Create Admin User: yes +Admin user to create: admin@qa-rol8-release-1.zimbradev.com ******* +Admin Password UNSET +Anti-virus quarantine user: virus-quarantine.fdymvkox@daffodilv101.server.com +Enable automated spam training: yes +Spam training user: spam.g0jedxahv@daffodilv101.server.com +Non-spam(Ham) training user: ham.ssgdrgj8@daffodilv101.server.com +SMTP host: daffodilv101.server +Web server HTTP port: 8080 +Web server HTTPS port: 8443 +Web server mode: https +IMAP server port: 7143 +IMAP server SSL port: 7993 +POP server port: 7110 +POP server SSL port: 7995 +Use spell check server: yes +Spell server URL: http://daffodilv101.server.com:7780/aspell.php +Enable version update checks: TRUE +Enable version update notifications: TRUE +Version update notification email: admin@daffodilv101.server.com +Version update source email: admin@daffodilv101.server.com +Install mailstore (service webapp): yes +Install UI (zimbra,zimbraAdmin webapps): yes ******* +License Activation: UNSET 8) zimbra-spell: Enabled 9) zimbra-convertd: Enabled 10) zimbra-proxy: Enabled 11) zimbra-onlyoffice: Enabled 12) zimbra-license-daemon: Enabled 13) Default Class of Service Configuration: 14) Enable default backup schedule: yes s) Save config to file x) Expand menu q) Quit Address unconfigured (**) items (? - help) 7 -
Type r to return to the Main menu.
-
Type r to return to the Main menu.
-
Enter 7 to select zimbra-store from the Main menu. The store configuration menu displays.
-
Select the following from the store configuration menu:
-
Type 4 to set the Admin Password. The password must be six or more characters. Press Enter.
-
Type
25for License Activation. -
Following are the details on the options:
-
Activate license with installation - This is an online method of activation. You need to specify the 18-26 alphanumeric character license key.
-
Activate license after installation - In case you have not received the license key or want to use the offline method of license activation, you can choose this option. The installationn will be completed but the services will not be started.
Select, or 'r' for previous menu [r] 25

1) Activate license with installation
2) Activate license after installation

Select, or 'r' for previous menu [r]
-
-
Select the appropriate option and proceed with the installation.
-
Please see Daffodil v10.1 Licensing section for more information.
-
Enable version update checks and Enable version update notifications. If these are set to
TRUE, Zimbra Collaboration automatically checks for the latest Zimbra Collaboration software updates and notifies the account that is configured inVersion update notification email. You can modify this later from the administration console.
-
-
Type r to return to the Main menu.
-
If you want to change the default Class of Service settings for new features that are listed here, type
12for Default Class of Service Configuration. Then type the appropriate number for the feature to be enabled or disabled. Changes you make here are reflected in the default COS configuration. -
If no other defaults need to be changed, type a to apply the configuration changes. Press Enter
*** CONFIGURATION COMPLETE - press 'a' to apply
Select from menu, or press 'a' to apply config (? - help) a
-
When Save Configuration data to file appears, type "Yes" and press Enter.
Save configuration data to a file? [Yes]
-
The next request asks where to save the files. To accept the default, press "Enter". To save the files to another directory, enter the directory and then press Enter.
Save config in file: [/opt/zimbra/config.16039]
Saving config in /opt/zimbra/config.16039...done.
-
When "The system will be modified - continue?" appears, type "Yes" and press Enter.
The server is modified. Installing all the components and configuring the server can take several minutes. Components that are installed include spam training and documents, (wiki) accounts, time zone preferences, backup schedules, licenses, as well as common Zimlets.
he system will be modified - continue? [No] yes
Operations logged to /tmp/zmsetup.20240608-105721.log
Setting local config values...done.
Initializing core config...Setting up CA...done.
Deploying CA to /opt/zimbra/conf/ca ...done.
Creating SSL zimbra-store certificate...done.
Creating new zimbra-ldap SSL certificate...done.
Creating new zimbra-mta SSL certificate...done.
Creating new zimbra-proxy SSL certificate...done.
Creating new SSL certificate...done.
Creating new SSL certificate...done.
Installing mailboxd SSL certificates...done.
Installing MTA SSL certificates...done.
Installing LDAP SSL certificate...done.
Installing Proxy SSL certificate...done.
Initializing ldap...done.
Setting replication password...done.
Setting Postfix password...done.
Setting amavis password...done.
Setting nginx password...done.
Setting BES searcher password...done.
.
.
Checking current setting of zimbraReverseProxyAvailableLookupTargets
Returning retrieved global config attribute zimbraReverseProxyAvailableLookupTargets=
Querying LDAP for other mailstores
Getting local config zimbra_ldap_password
ldap bind done for uid=zimbra,cn=admins,cn=zimbra
Searching LDAP for reverseProxyLookupTargets...


Granting group zimbraDomainAdmins@daffodilv101.server.com domain right +domainAdminConsoleRights on daffodilv101.server.com...
*** Running as zimbra user: /opt/zimbra/bin/zmprov -r -m -l grr domain daffodilv101.server.com grp zimbraDomainAdmins@daffodilv101.server.com +domainAdminConsoleRights
done.
Granting group zimbraDomainAdmins@daffodilv101.server.com global right +domainAdminZimletRights...
*** Running as zimbra user: /opt/zimbra/bin/zmprov -r -m -l grr global grp zimbraDomainAdmins@daffodilv101.server.com +domainAdminZimletRights
done.
.
.
Setting default backup schedule...Done
Looking for valid license to install...license installed.
Starting servers...done.
Installing common zimlets...
        com_zimbra_mailarchive...
        com_zimbra_viewmail...
          .
          .
Finished installing common zimlets.
Installing network zimlets...
        com_zimbra_backuprestore...
        com_zimbra_mobilesync...done.
         .
         .
        com_zimbra_license...done.
Finished installing network zimlets.
Restarting mailboxd...done.
Creating galsync account for default domain...done.
Setting up zimbra crontab...done.


Moving /tmp/zmsetup.20240608-105721.log to /opt/zimbra/log


Configuration complete - press return to exit
Installing External Zimlets for Modern Web App
These six zimlets are available.
-
Slack
-
Zoom
-
Dropbox
-
Google Drive
-
Onedrive
-
Jitsi
You have to install and configure them for users to integrate and use these zimlets. Once you are done installing the zimlet(s), you need to restart the mailbox service before configuring them.
Slack
-
As
rootrun the below command:- RHEL
-
yum install zimbra-zimlet-slack - Ubuntu
-
apt-get install zimbra-zimlet-slack
-
Restart mailbox service as a
zimbrauser:
su - zimbra
zmmailboxdctl restart
Zoom
-
As
rootrun the below command:- RHEL
-
yum install zimbra-zimlet-zoom - Ubuntu
-
apt-get install zimbra-zimlet-zoom
-
Restart mailbox service as a
zimbrauser:
su - zimbra
zmmailboxdctl restart
Dropbox
-
As
rootrun the below command:- RHEL
-
yum install zimbra-zimlet-dropbox - Ubuntu
-
apt-get install zimbra-zimlet-dropbox
-
Restart mailbox service as a
zimbrauser:
su - zimbra
zmmailboxdctl restart
Google Drive
-
As
rootrun the below command:- RHEL
-
yum install zimbra-zimlet-google-drive - Ubuntu
-
apt-get install zimbra-zimlet-google-drive
-
Restart mailbox service as a
zimbrauser:
su - zimbra
zmmailboxdctl restart
Onedrive
-
As
rootrun the below command:- RHEL
-
yum install zimbra-zimlet-onedrive - Ubuntu
-
apt-get install zimbra-zimlet-onedrive
-
Restart mailbox service as a
zimbrauser:
su - zimbra
zmmailboxdctl restart
Jitsi
-
As
rootrun the below command:- RHEL
-
yum install zimbra-zimlet-jitsi - Ubuntu
-
apt-get install zimbra-zimlet-jitsi
-
Restart mailbox service as a
zimbrauser:
su - zimbra
zmmailboxdctl restart
Please visit Configuring Zimlets for Modern Web App for instructions for on how to configure zimlets for Modern Web App users.
Final Set-Up (required)
After the Zimbra Collaboration servers are configured, the following functions must be configured.
| Zimbra Collaboration supports the default syslog of a supported operating system. Depending on your operating system, the steps contained in this section might not be correct. See your operating system documentation for specific information on how to enable syslog. |
If zimbra-logger is installed, set up the syslog configuration files to enable server statistics to display on the administration console, and enable the logger monitor host. The server statistics includes information about the message count, message volume, and anti-spam and anti-virus activity.
Access to the 'zimbra' user
Zimbra Collaboration ships a default zimbra user with a disabled password.
Zimbra Collaboration requires access to this account via ssh public key authentication.
On most operating systems this combination is okay, but if you have modified spam rules to disallow any ssh access to disabled accounts then you must define a password for the zimbra UNIX account.
This will allow ssh key authentication for checking remote queues.
See the Zimbra wiki article, Mail Queue Monitoring.
- Set up the ssh keys
-
To populate the ssh keys
sudo -u zimbra -i
zmupdateauthkeys
The key is updated on /opt/zimbra/.ssh/authorized_keys
- Enabling Server Statistics Display
-
In order for the server statistics to display on the administration console, the syslog configuration files must be modified.
Note, your system may use a different provider for the syslog service. See the Wiki article Configuring Logger Host for more information -
As root, type the following command to enable the server to display statistics -
/opt/zimbra/libexec/zmsyslogsetup. -
You must enable syslog to log statistics from remote machines.
-
- RedHat Systems
-
-
Edit the
/etc/sysconfig/syslogfile to add -r to the SYSLOGD_OPTIONS setting,SYSLOGD_options="-r -m 0" -
Stop the syslog daemon -
/etc/init.d/syslog stop -
Start the syslog daemon -
/etc/init.d/syslog start
-
- Debian and Ubuntu Systems
-
-
Edit the
/etc/default/syslogdfile to add -r to the SYSLOGD_OPTIONS setting,SYSLOGD_options="-r -m 0" -
Stop the syslog daemon -
/etc/init.d/sysklogd stop -
Start the syslog daemon -
/etc/init.d/sysklogd start
-
Final Set-Up (optional)
Ephemeral Data Migration
Versions of Zimbra prior to 9.0.0 stored ephemeral data in LDAP. Examples of ephemeral data include:
-
zimbraAuthTokens -
zimbraCsrfTokenData -
zimbraLastLogonTimestamp
Zimbra Collaboration versions after 9.0.0 introduced the ability to store ephemeral data in an external service such as SSDB. This is an optional feature; however, it can improve LDAP performance and stability.
Please refer to the Zimbra Daffodil Administration Guide for more information. Migration of ephemeral data out of LDAP and into SSDB must be performed after an install or upgrade has been completed.
Settings to enable ActiveSync for users
You can enable the ActiveSync feature for a single user or all the users under the cos.
To enable on cos:
zmprov mc "cos_name" zimbraFeatureMobileSyncEnabled TRUE
zmprov mc "cos_name" zimbraMobileShareMailEnabled TRUE
zmprov mc "cos_name" zimbraMobileShareContactEnabled TRUE
zmprov mc "cos_name" zimbraMobileShareCalendarEnabled TRUE
To enable for an individual user:
zmprov ma "user_name" zimbraFeatureMobileSyncEnabled TRUE
zmprov ma "user_name" zimbraMobileShareMailEnabled TRUE
zmprov ma "user_name" zimbraMobileShareContactEnabled TRUE
zmprov ma "user_name" zimbraMobileShareCalendarEnabled TRUE
Settings to enable Public Document Sharing in Briefcase
By default, Public Sharing is disabled for users.
To enable public sharing on the global level:
zmprov mcf zimbraPublicServiceProtocol https
zmprov mcf zimbraPublicServiceHostname <public hostname>
Scanning Attachments in Outgoing Mail
You can enable real-time scanning of attachments in outgoing emails sent using the Zimbra 10 Web Client. If enabled, when an attachment is added to an email, it is scanned using ClamAV prior to sending the message. If ClamAV detects a virus, it will block attaching the file to the message. By default, scanning is configured for a single node installation.
To enable using a single node:
zmprov mcf zimbraAttachmentsScanURL clam://localhost:3310/
zmprov mcf zimbraAttachmentsScanEnabled TRUE
Provisioning Accounts
Once the mailbox server is running, open your browser, enter the administration console URL and log on to the console to provision email accounts. The administration console URL is entered as:
https://[mailhost.example.com]:7071
| To go to the administration console, you must type https, even if you configured the Web server mode as HTTP. |
The first time you log on, a warning may be displayed stating the
connection is untrusted. This only applies the first time you log in.
Click I understand the Risks to be able to connect to the Zimbra 10
administration console. Then click OK.
Enter the admin user name and password configured during the
installation process. Enter the name as admin@mailhost.example.com
Activate the Zimbra Daffodil (v10) license
- Admin Console:
-
After you log on, a dialog displays stating your license is not activated.
Go to:
Home > Configure > Global Settings > License
click Activate License on the toolbar then Click OK to continue.
Provision accounts
You can configure one account at a time with the New Account Wizard or you can create many accounts at once using the Account Migration Wizard.
Configuring One Account
- Admin Console:
-
The administration console New Account wizard steps you through the account information to be completed.
-
From the administration console Home page’s Content pane, go to
Add Accounts.Four accounts will already be listed - the admin account, two spam training accounts, and a global Documents account. These accounts do not need any additional configuration. -
Click
Add Account. The first page of the New Account wizard opens. -
Enter the account name to be used as the email address and the last name. This is the only required information to create an account.
-
You can click
Finishat this point, and the account is configured with the default COS and global features.
-
To configure aliases, forwarding addresses, and specific features for this account, proceed through the dialog before you click Finish.
When the accounts are provisioned, you can send and receive emails.
Administrator Account
Initial administrative tasks when you log on for the first time may include setting up the admin mailbox to include features, aliases, and forwarding addresses needed for the administrator’s working environment.
Two aliases for the admin account are created during install:
-
Postmaster. The postmaster address is displayed in emails that are automatically generated from Postfix when messages cannot be sent. If users reply to this address, the message is forwarded to the admin mailbox.
-
Root. This address is where notification messages from the operating system are sent.
If you entered a notification address for AV alerts when you configured the MTA, that is different from the default, you need to create that account in the administration console. If you didn’t change the default during installation, the anti-virus notification is sent directly to the admin account.
Uninstalling Zimbra Collaboration
To uninstall servers, run the install script -u, delete the Zimbra Collaboration directory, and remove the zcs.tgz file on the servers.
-
cd to the original install directory for the Zimbra Collaboration files.
-
Type
sudo ./install.sh -u -
When
Completely remove existing installation?is displayed, typeYes. The Zimbra 10 servers are stopped, the existing packages, webapp directories, and most of the contents of the/opt/zimbradirectory are removed. -
Type
rm -rf [zcsfullfilename]to delete the Zimbra Collaboration directory. -
Delete the zcs.tgz file.
System Requirements for Zimbra Daffodil
Servers |
Evaluation and Testing
Production environments
General Requirements
|
||
Network Edition supported Cloud platforms |
The following Cloud Platforms are supported:
|
||
Operating System (Network Edition) |
The following operating systems are supported:
|
||
File Systems |
The following file systems are supported:
The following file system is not supported for Store/HSM/Backup features:
|
||
Other Dependencies |
Netcat ( For Ubuntu systems, disable AppArmor and verify that the AppArmor service is not running before installing Zimbra Daffodil. For Red Hat Enterprise, Oracle Linux and Rocky Linux operating systems, the server must also have the following installed:
|
||
Miscellaneous |
|
||
Administrator Computers
|
The following operating system/browser combinations are supported: Windows 8.1 or Windows 10 with one of the following:
MacOS 10.12 or later with one of the following:
Linux (Red Hat, Ubuntu, or Fedora) with one of the following:
|
||
Administrator Console Monitor |
Display minimum resolution 1024 x 768 |
||
End User Computers using Zimbra 10 Web Client
|
For Zimbra 10 Web Client - Classic Web App & Modern Web App Minimum
Recommended
The following operating system/browser combinations are supported: Windows 8.1 or Windows 10 with one of the following:
MacOS 10.12 or 10.13, 10.14 with one of the following:
Linux (Red Hat, Ubuntu, or Fedora) with one of the following:
|
||
End User Computers Using Other Clients |
Minimum
Recommended
Operating system POP/IMAP combinations
|
||
Exchange Web Services |
EWS Clients
EWS Interoperability
|
||
Monitor |
Display minimum resolution: 1024 x 768 |
||
Internet Connection Speed |
1 Mbps or higher |
Zimbra 10 Connector for Outlook (Network Edition Only)
Operating System |
|
Microsoft Outlook |
|
Zimbra 10 Mobile (Network Edition Only)
Network Edition Mobile (MobileSync) provides mobile data access to email, calendar, and contacts for users of selected mobile operating systems, including:
Smartphone Operating Systems:
-
iOS versions currently supported by Apple - iOS12 and above.
-
Android versions currently supported by Google - 8.0 and above.
Available Languages
This section includes information about available languages, including End User Translations and Administrator Translations.
End User Translations
| Component | Category | Languages |
|---|---|---|
Zimbra 10 Classic Web App |
Application/UI |
Arabic, Basque (EU), Chinese (Simplified PRC and Traditional HK), Danish, Dutch, English (AU, UK, US), French, French Canadian, German, Hindi, Hungarian, Italian, Japanese, Korean, Malay, Polish, Portuguese (Brazil), Portuguese (Portugal), Romanian, Russian, Spanish, Swedish, Thai, Turkish, Ukrainian |
Zimbra 10 Classic Web App - Online Help (HTML) |
Feature Documentation |
Dutch, English, Spanish, French, Italian, Japanese, German, Portuguese (Brazil), Chinese (Simplified PRC and Traditional HK), Russian |
Zimbra 10 Classic Web App - End User Guide (PDF) |
Feature Documentation |
English |
Zimbra 10 Modern Web App - End User Guide (HTML) |
Feature Documentation |
English |
Zimbra 10 Connector for Microsoft Outlook |
Installer + Application/UI |
Arabic, Basque (EU), Chinese (Simplified PRC and Traditional HK), Danish, Dutch, English (AU, UK, US), French, French Canadian, German, Hindi, Hungarian, Italian, Japanese, Korean, Malay, Polish, Portuguese (Brazil), Portuguese (Portugal), Romanian, Russian, Spanish, Swedish, Thai, Turkish, Ukrainian |
Zimbra 10 Connector for Microsoft Outlook - End User Guide (PDF) |
Feature Documentation |
English |
Administrator Translations
Component |
Category |
Languages |
Zimbra 10 Admin Console |
Application |
Arabic, Basque (EU), Chinese (Simplified PRC and Traditional HK), Danish, Dutch, English (AU, UK, US), French, French Canadian, German, Hindi, Hungarian, Italian, Japanese, Korean, Malay, Polish, Portuguese (Brazil), Portuguese (Portugal), Romanian, Russian, Spanish, Swedish, Turkish, Ukrainian |
Zimbra 10 Admin Console Online Help (HTML) |
Feature Documentation |
English |
"Documentation" Install + Upgrade / Admin Manual / Migration / Import / Release Notes / System Requirements |
Guides |
English |
Zimbra 10 Connector for Microsoft Outlook - Admin Guide (PDF) |
Install + Configuration Guide |
English |
Note: To find SSH client software, go to Download.com at http://www.download.com/, and search for SSH. The list displays software that can be purchased or downloaded for free. An example of a free SSH client software is PuTTY, a software implementation of SSH for Win32 and Unix platforms. To download a copy go to http://putty.nl